
How to Build an AI Chat App with React Native Expo, Node.js, and OpenAI API
Building an AI chat app is an excellent way to learn modern mobile and backend development. By combining React Native Expo, Node.js, Express, and the OpenAI API, you can create intelligent mobile applications that communicate with powerful AI models and deliver real-time responses to users.
In this article, you'll learn how to build an AI chat app using Expo and a Node.js backend connected to the OpenAI API. We'll explore how a mobile application sends user messages to a server, how the backend securely communicates with an AI model, and how the generated response is returned to the user interface.
Along the way, we'll cover essential concepts such as API requests and responses, backend architecture, API key security, environment variables, and the role of Express in connecting a React Native application with an AI service.
By the end of this guide, you'll understand how an AI-powered mobile application works behind the scenes and have a solid foundation for building your own AI chat applications.
This beginner-friendly guide is intended for developers who want to learn how to build an AI chat app using React Native Expo, Node.js, Express, and the OpenAI API, even if they have little or no prior experience with AI integration.
2.Project Architecture
3.Setting Up the Node.js Backend
4.Configuring the .env file and add the OpenAI API key.
5.Creating the Express Server (server.js)
6.Creating the Expo Application
7.Connecting Expo to the Node.js Backend
Prerequisites
Before starting this tutorial, you should have:
✓ Basic knowledge of JavaScript and React Native.
✓ Node.js and npm installed on your computer.
✓ An Expo development environment set up.
✓ A code editor such as Visual Studio Code.
✓ An OpenAI API key stored securely using environment variables.
You can create an OpenAI account and generate an API key from the OpenAI Platform.
You do not need to be an expert in backend development, but a basic understanding of APIs, HTTP requests, and how client-server communication works will help you follow along more easily.
This tutorial uses Expo SDK 57.0.4 for the React Native application. The backend is built with Express 5.2.1, OpenAI (Node.js) SDK 6.46.0, dotenv 17.4.2, and cors 2.8.6. The examples and code snippets in this guide have been tested with these versions to ensure consistency. Although package versions may change over time, the concepts and implementation steps remain the same.
The examples in this tutorial were developed and tested using the iOS Simulator.
Project Architecture
You will need two separate folders: one for your Expo project and another for your Node.js backend. Your backend folder should have the following structure.
my-ai-server/
├── server.js
├── package.json
├── package-lock.json
├── .env
└── node_modules/
The next section explains how to create and configure the backend.
Setting Up the Node.js Backend
Create a new folder for the backend and initialize a Node.js project:
npm init -y
Install the required packages:
npm install express cors dotenv openai
These packages provide the tools needed for the backend:
✓ express — creates the API server and handles routes.
✓ cors - allows the mobile app to communicate with the backend.
✓ dotenv — loads environment variables such as your OpenAI API key.
✓ openai — provides the official OpenAI Node.js SDK.
Configuring the .env file and add the OpenAI API key
Before creating the backend server, create a file named ".env" in the root of your Node.js project and add your OpenAI API key:
OPENAI_API_KEY=your_api_key_here
The "dotenv" package will load this value into your application, allowing you to access it through "process.env.OPENAI_API_KEY". Storing the API key in an environment variable helps keep sensitive information out of your source code and makes it easier to use different keys across development and production environments.
If you haven't created an API key yet, sign in to your OpenAI account, navigate to **API Keys**, and generate a new **Secret Key**. Copy the key and save it securely, as you'll need it in the next step.
Creating the Express Server (server.js)
The backend acts as a bridge between the Expo application and the OpenAI API. Instead of sending requests directly from the mobile app, the app sends them to the Node.js server, which securely communicates with the OpenAI API and returns the generated response. Create a file named "server.js" and add the following code.
To make the code easier to follow, I've added brief explanations alongside the relevant lines.
require("dotenv").config();
const express = require("express");
const cors = require("cors");
const OpenAI = require("openai");

const app = express();

app.use(cors());
app.use(express.json());

// This creates an OpenAI client using the API key stored in the .env file.
// Keeping the API key on the backend prevents it from being exposed in the mobile application.
const client = new OpenAI({
  apiKey: process.env.OPENAI_API_KEY,
});

// This route listens for HTTP POST requests sent to the /api/chat endpoint.
// When the Expo application sends a user's message, Express receives the
// request and executes the code inside this function.
app.post("/api/chat", async (req, res) => {
  try {
    const chatHistory = req.body.messages;

    if (!chatHistory || !Array.isArray(chatHistory)) {
      return res.status(400).json({ error: "Messages array is required." });
    }

    console.log("Chat History received:", chatHistory);

    // The user's message is forwarded to the OpenAI API:
    const response = await client.responses.create({
      model: "gpt-5.4-mini", // Using the modern light-weight developer model
      input: chatHistory, // Pass the array directly to 'input'
    });

    // The await keyword pauses the function until the OpenAI API returns a response.
    // Once the response is received, the generated text can be accessed through response.output_text.
    console.log("AI Response:", response.output_text);

    // Finally, the backend sends a JSON response back to the Expo application.
    // The mobile app receives this object, extracts the reply property, and displays the AI-generated answer to the user.
    res.json({
      reply: response.output_text,
      message: {
        role: "assistant",
        content: response.output_text,
      }
    });

  } catch (error) {
    console.error("OpenAI API Error:", error);

    res.status(500).json({
      error: error.message,
    });
  }
});

// The listen() method starts the Express server and tells it to listen for incoming requests on port 3000.
// The address 0.0.0.0 allows devices on the same local network, such as your phone running the Expo application,
// to connect to the backend during development.
app.listen(3000, "0.0.0.0", () => {
  console.log("Server running on port 3000");
});
The dotenv package loads environment variables from the .env file, allowing you to access your OpenAI API key securely through process.env.
express is used to create the backend server and define API routes, while cors enables communication between the Expo application and the backend.
The openai package is the official Node.js SDK used to communicate with the OpenAI API.
An Express application is created and configured with two middleware functions. The cors() middleware allows requests from other applications, while express.json() automatically parses incoming JSON data so it can be accessed through req.body.
Run the following command to start the Node.js server:
node server.js
If everything is configured correctly, you should see the following message in your terminal:
Server running on port 3000
Creating the Expo Application
The backend is now ready to receive requests and communicate with the OpenAI API. Next, we will create the Expo application that users will interact with. The Expo app will be responsible for collecting user input, sending messages to the Node.js server, and displaying the AI assistant's responses.
import { useState } from "react";
import {
  Button,
  FlatList,
  KeyboardAvoidingView,
  Platform,
  StyleSheet,
  Text,
  TextInput,
  View,
} from "react-native";

export default function App() {
  const [question, setQuestion] = useState("");
  const [messages, setMessages] = useState([]);
  const [loading, setLoading] = useState(false);

  async function askAI() {
    // Prevent API calls if the input is empty or contains only spaces
    if (!question.trim()) return;

    // Keep message schema clean & simple (role + string content)
    const userMessage = {
      role: "user",
      content: question.trim(),
    };
    // Create a new array to avoid directly mutating React state
    const updatedMessages = [...messages, userMessage];

    setMessages(updatedMessages);
    setQuestion("");
    setLoading(true);

    try {
      // Replace with your actual local network IP
      // If testing via Android Emulator, use 'http://10.0.2.2:3000/api/chat'
      const response = await fetch("http://localhost:3000/api/chat", {
        method: "POST",
        headers: {
          "Content-Type": "application/json",
        },
        body: JSON.stringify({
          messages: updatedMessages,
        }),
      });

      const data = await response.json();

      console.log("Status:", response.status);
      console.log("Server response:", data);

      if (!response.ok) {
        throw new Error(data.error || "Server error");
      }

      // Read reply from server (Adjust based on what your backend key maps to, eg: data.message.content)
      const aiResponseText =
        data.message?.content || data.reply || "No response received.";

      const aiMessage = {
        role: "assistant",
        content: aiResponseText,
      };

      setMessages([...updatedMessages, aiMessage]);
    } catch (error) {
      console.error("Fetch error:", error);

      setMessages([
        ...updatedMessages,
        {
          role: "assistant",
          content: "Something went wrong. Check your Node server logs.",
        },
      ]);
    } finally {
      setLoading(false);
    }
  }

  return (
       <View style={styles.container}>
         <KeyboardAvoidingView
        behavior={Platform.OS === "ios" ? "padding" : "height"}
        style={{ flex: 1 }}
      >
           <FlatList
          data={messages}
          keyExtractor={(item, index) => index.toString()}
          contentContainerStyle={{ paddingBottom: 20 }}
          renderItem={({ item }) => (

               <View
              style={[
                styles.messageBubble,
                item.role === "user"
                  ? styles.userBubble
                  : styles.assistantBubble,
              ]}
            >
                 <Text style={styles.roleText}>
                {item.role === "user" ? "You" : "AI"}
                 </Text>
                 <Text style={styles.messageText}>{item.content}</Text>
               </View>
          )}
        />

           <View style={styles.inputContainer}>
             <TextInput
            style={styles.input}
            placeholder="Ask something..."
            value={question}
            onChangeText={setQuestion}
          />
             <Button
            title={loading ? "Thinking..." : "Ask"}
            onPress={askAI}
            disabled={loading}
          />
           </View>
         </KeyboardAvoidingView>
       </View>
  );
}

const styles = StyleSheet.create({
  container: {
    flex: 1,
    backgroundColor: "#f5f5f5",
  },
  messageBubble: {
    padding: 12,
    borderRadius: 12,
    marginVertical: 6,
    marginHorizontal: 12,
    maxWidth: "80%",
  },
  userBubble: {
    backgroundColor: "#007AFF",
    alignSelf: "flex-end",
  },
  assistantBubble: {
    backgroundColor: "#E5E5EA",
    alignSelf: "flex-start",
  },
  roleText: {
    fontWeight: "bold",
    fontSize: 12,
    marginBottom: 4,
    color: "#444",
  },
  messageText: {
    fontSize: 16,
    color: "#000",
  },
  inputContainer: {
    flexDirection: "row",
    alignItems: "center",
    padding: 10,
    backgroundColor: "#fff",
    borderTopWidth: 1,
    borderTopColor: "#ddd",
  },
  input: {
    flex: 1,
    borderWidth: 1,
    borderColor: "#ccc",
    padding: 10,
    borderRadius: 8,
    marginRight: 10,
    backgroundColor: "#fafafa",
  },
});
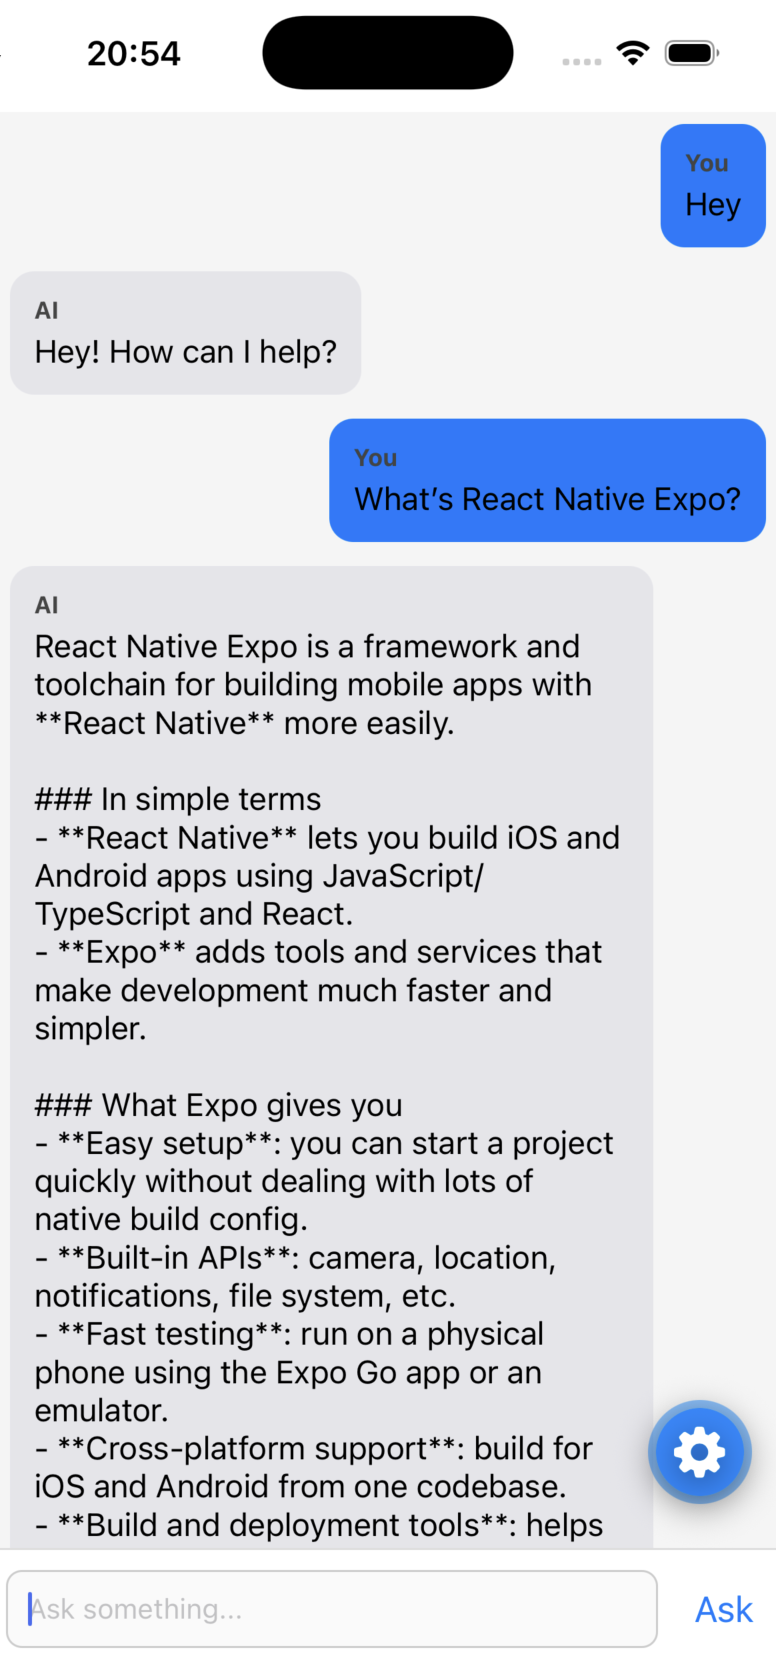
This app is a simple React Native chat interface that maintains three pieces of state: question (the current text in the input), messages (the conversation history), and loading (whether a request is in progress). When the user presses the Ask button, the askAI() function is called. It first checks that the input isn't empty, then creates a new message object with the format { role: "user", content: question.trim() }. Rather than modifying the existing messages array, it creates a new array called updatedMessages containing the previous conversation plus the new user message. This updated array is immediately stored in state so the user's message appears on the screen before the AI responds. The input field is then cleared and the loading state is set to true so the button changes from Ask to Thinking....
Connecting Expo to the Node.js Backend
The Expo application acts as the client in our architecture, while the Node.js application serves as the backend. Rather than communicating directly with the OpenAI API, the mobile app sends requests to the Express server, which securely forwards them to the OpenAI API and returns the generated response.
The app sends the entire conversation history to the backend using fetch(). The request is made with the POST method because data is being sent to the server, and the Content-Type header is set to "application/json" to indicate that the request body contains JSON. The body consists of { messages: updatedMessages }, allowing the backend to receive the full conversation rather than just the latest question. Sending the complete history is important because large language models are stateless—they don't remember previous messages unless the conversation is included with each request.
After the request completes, the response is converted from JSON into a JavaScript object using await response.json(). The code checks response.ok to determine whether the request succeeded. If the server returned an error status (such as 400 or 500), an exception is thrown, transferring execution to the catch block. Otherwise, the code extracts the AI's reply from data.message?.content, falling back to data.reply or "No response received." if those properties are unavailable. The optional chaining operator (?.) prevents an error if message is undefined by safely returning undefined instead of attempting to access a property that doesn't exist. A new assistant message object is then created and appended to the conversation by updating the messages state again.
If any error occurs during the request—for example, if the Node.js server is not running or the network request fails—the catch block logs the error and adds a fallback assistant message informing the user that something went wrong. Regardless of whether the request succeeds or fails, the finally block executes and resets loading to false, ensuring the button returns to its normal state.
The UI is rendered declaratively based on the current state. A FlatList displays each object in the messages array by calling renderItem for every message. Each message is displayed inside a styled bubble, with different styles applied depending on whether item.role is "user" or "assistant", giving the two participants distinct appearances. The TextInput is a controlled component whose value is always synchronized with the question state, so every keystroke updates the state through onChangeText={setQuestion}. The Ask button triggers askAI() and is disabled while loading is true, preventing multiple requests from being sent simultaneously. Finally, the KeyboardAvoidingView adjusts the layout when the on-screen keyboard appears, using different behavior on iOS and Android to keep the input field visible while typing.
Replace "localhost" with your computer's local IP address before running the Expo application. You can find your local IP address using your computer's network settings or by running a network command in the terminal. Make sure your mobile device and your computer are connected to the same Wi-Fi network so the Expo application can reach the Node.js backend.
Conclusion
In this article, we built the foundation of an AI chat app using React Native Expo, Node.js, Express, and the OpenAI API. We explored how a mobile application communicates with a backend server, how the server securely handles API requests, and how AI-generated responses are delivered back to the user. Beyond creating a working chat interface, we learned the importance of separating the frontend and backend, protecting API keys with environment variables, and understanding the flow of data between an application and an AI service. The architecture covered in this guide is the foundation behind many modern AI-powered applications. From here, you can extend the project by adding features such as user authentication, conversation storage, streaming responses, and deploying the backend to a production server.
If you'd like to explore an alternative to OpenAI, check out our tutorial on building an AI chat app with Expo and the Gemini API, where we use Gemini to handle the conversation and compare its API structure with OpenAI's.
To learn more about Expo and React Native development, check out our detailed Expo tutorial, which covers the fundamentals step by step. You can also explore our other Expo-related articles for specific topics and practical examples.