
Firebase Tutorial 2026
a.How to set up Firebase
b.Install Firebase
2.Firebase Authentication
a.Firebase Authentication with Expo Example
3.Cloud Firestore
4.Cloud (Firebase) Storage
a.Firebase Storage with Expo example
5.Expo and Firebase Authentication, Firestore, Firebase Storage Example
Advanced Articles
Expo Push Notifications and Firebase Cloud Messaging (FCM V1) on Android: Complete Setup GuideFirebase with React Native Expo Tutorial
This
Firebase is Google's backend-as-a-service platform that provides tools like authentication, databases, and file storage, allowing you to build and scale apps without managing your own backend. Firebase offers different types of services for mobile and web app development. You'll find a step-by-step guide, along with examples for Firebase Authentication, Cloud Firestore, and Firebase Storage. You can integrate Firebase into your app and test its performance. It offers a free plan and is easy to integrate with both Expo and React Native.
Firebase still offers a free plan for Firebase Storage, but you need to provide your credit card details. You can either try it or skip the Storage part in the tutorial below. You can also remove the Storage-related parts from the final code example at the end. React Native Expo will be used for Firebase Authentication, Cloud Firestore, and Storage examples below. If you want to learn Expo, you can visit the Expo Tutorial page. You need to create a Firebase account. If you already have a Gmail, it can be created automatically.
Create a Firebase project step-by-step
How to set up Firebase
1. Go to the Firebase website
2. "Go to console"
3. Click "Create a Project"
4. Write the project name
5. Click "Continue"
6. Accept or reject Google Analytics and click "Continue"
7. You'll get the Firebase Console to manage your app
8. You need to choose and add an app to get started (the Web (</>) will be used for the examples below)
9. Add an App nickname and Register the app
10. You'll get the configuration settings for your app, copy the code (you'll need it later) and click "Continue to the Console"
11. You can choose the category you want (Product categories > Build > Authentication)
Install Firebase
Open your editor and terminal, and install the Firebase SDK using npm with the code below:
npm i firebase
Firebase Authentication
How to initialize app and set up Firebase Authentication
Open the Firebase console. Navigate to the Authentication category, and choose your sign-in method. Email/password sign-in method will be used in the example below. You can choose another sign-in method. After choosing the sign-in method, you need to enable and save it.
Add Firebase authentication to your Expo app
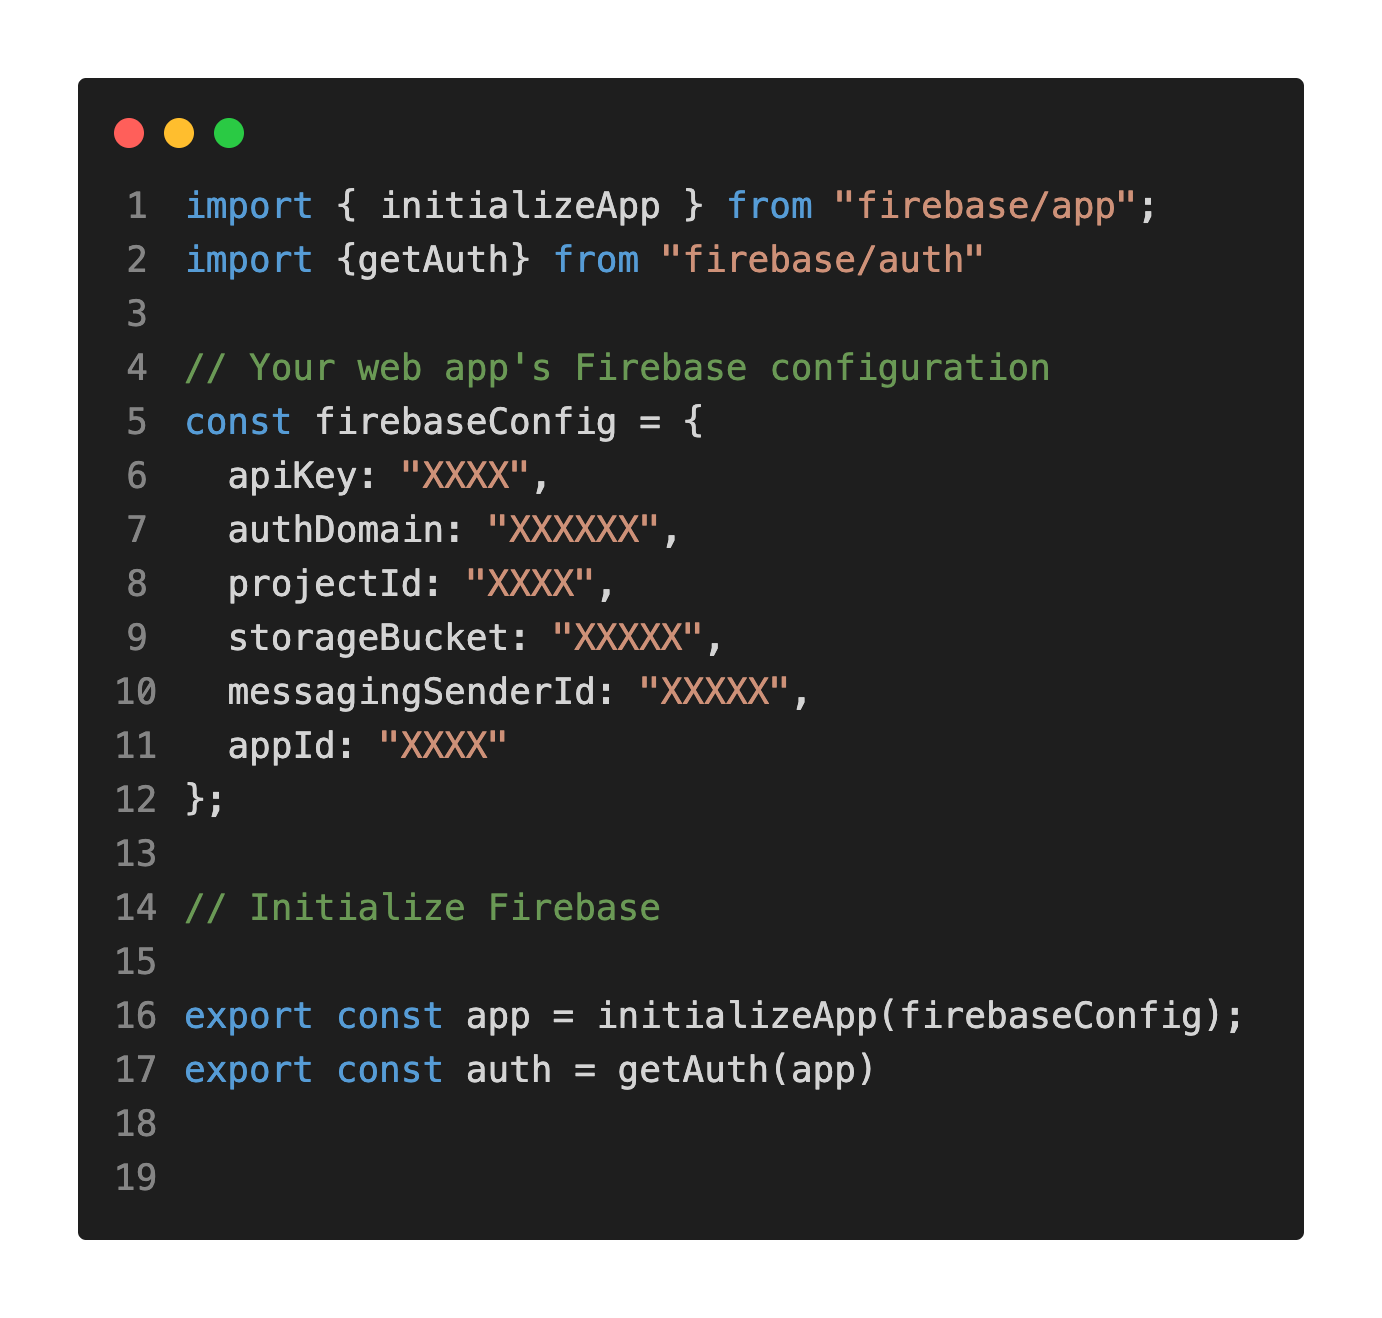
You need to integrate your React Native Expo app with Firebase. You can either create a new file or add it to your existing app file. You need to paste the configuration code. You should initialize Firebase Authentication:
Firebase Authentication - How to manually add a user
Open Firebase Console. Select Authentication. If you choose Users, you can see all the users. You can click Add user button to add a new user. You just need to add the new user's email and password. Click Add user.
signInWithEmailAndPassword, createUserWithEmailAndPassword, sendPasswordResetEmail, signOut, and onAuthStateChanged methods will be used in the example below. You can find a detailed example of Firebase Authentication below:
Firebase Authentication with Expo Example
import React, {useState} from 'react'
import { StyleSheet, Text, View, KeyboardAvoidingView, TextInput, TouchableOpacity, Alert } from 'react-native'
import { createUserWithEmailAndPassword, signInWithEmailAndPassword, signOut, sendPasswordResetEmail, onAuthStateChanged} from "firebase/auth"
import {auth} from "./firebase"
const App = () => {
const [isSignedIn, setIsSignedIn] = useState(false)
const [email, setEmail] = useState("")
const [password, setPassword] = useState("")
const [error, setError] = useState("")
const handleSignUp = () => {
createUserWithEmailAndPassword(auth, email, password).then(()=> auth.onAuthStateChanged(user=>{
if(user){
(console.log(user.uid))}}))
.catch((error) => {
if(error.code === "auth/weak-password"){
console.log("Password should be longer than 6 characters.")
setError("Password should be longer than 6 characters.")
}else if (error.code === "auth/email-already-in-use"){
console.log("Email already exists.")
setError("Email already exists.")
}else if(error.code === "auth/invalid-email"){
console.log("Invalid email")
setError("Invalid email")
}else{
console.log(error)
setError(error)}
})};
const signIn = () => {
signInWithEmailAndPassword(auth,email, password)
.then((re) => {
setIsSignedIn(true)
setEmail("")
setPassword("")
})
.catch(error => {
console.log(error.code, error.message)
if(error.code === "auth/invalid-email"){
console.log("The provided value for the email user property is invalid")
setError("invalid email")
}else if(error.code === "auth/invalid-credential"){
console.log("wrong password")
setError("wrong password")
}else if(error.code === "auth/user-not-found"){
console.log("user not found")
setError("user not found")
}else{
console.log(error)
setError(error)
}})}
const logOut = () => {
signOut(auth)
.then((re) =>{ setIsSignedIn(false)}
)
.catch((re) => {
console.log(re)
})}
const forgotPasswordHandler = () => {
return sendPasswordResetEmail(auth, email);};
return (
<KeyboardAvoidingView style={styles.container} behavior="padding">
<View><View>{isSignedIn ? <TouchableOpacity onPress={logOut} style={styles.button}><Text>Log out</Text></TouchableOpacity> :
(<View><Text style={{marginLeft: 25, marginBottom: 8}}>Email</Text>
<TextInput style={{borderWidth: 1, marginHorizontal: 25, marginBottom: 8, borderRadius: 3}} value={email} onChangeText={text => setEmail(text)} />
<Text style={{marginLeft: 25, marginBottom: 8}}>Password</Text>
<TextInput style={{borderWidth: 1, marginHorizontal: 25, borderRadius: 3}} value={password} onChangeText={text => setPassword(text)} />
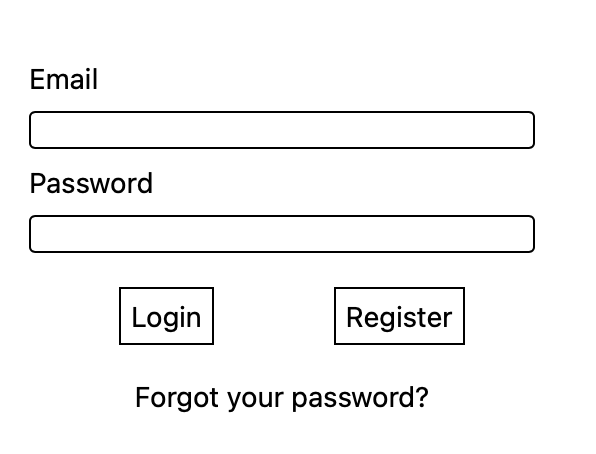
<View style={{flexDirection: "row", flexWrap: "wrap"}}><TouchableOpacity style={styles.login} onPress={signIn} ><Text style={{textAlign: "center"}}>Login</Text></TouchableOpacity><TouchableOpacity style={styles.register} onPress={handleSignUp}><Text style={{textAlign: "center"}}>Register</Text></TouchableOpacity></View><TouchableOpacity onPress={forgotPasswordHandler}><Text style={{textAlign: "center"}}>Forgot your password?</Text></TouchableOpacity><Text style={{textAlign: "center", color: "red" }}>{error}</Text></View>)}
{isSignedIn && <Text>Welcome</Text>}</View></View></KeyboardAvoidingView>)}
export default App
const styles = StyleSheet.create({
container: {
flex: 1,
justifyContent: "center",
alignItems: "center"
},
inputContainer:{
width: "80%"
},
login: { marginVertical: 17, borderWidth: 1, padding: 5, marginLeft: 70, marginRight: 60},
register: { marginVertical: 17, borderWidth: 1, padding: 5, marginRight: 60},
paragraph: {
margin: 24,
fontSize: 18,
fontWeight: 'bold',
textAlign: 'center',
},
input:{
backgroundColor: "white",
borderRadius: 10,
marginTop: 5
}})
•
signInWithEmailAndPassword allows users to sign in.
•
createUserWithEmailAndPassword allows users to create a new account with the provided email and password.
•
sendPasswordResetEmail sends a password reset email. If you want to edit the reset email template, you can navigate to Authentication > Templates > Password reset and click the pen icon to edit.
•
onAuthStateChanged method attaches the observer and it gets called whenever the user's sign-in state changes. You can get information about the user (user.uid) like in the example above.
• signInWithEmailAndPassword allows users to sign in.
• createUserWithEmailAndPassword allows users to create a new account with the provided email and password.
• sendPasswordResetEmail sends a password reset email. If you want to edit the reset email, you can navigate to Authentication > Templates > Password reset and click the pen icon to edit.
• onAuthStateChanged method attaches the observer and it gets called whenever the user's sign-in state changes. You can get information about the user (user.uid) like in the example above.
We've included some common Firebase Authentication error messages you might encounter. You can find the descriptions of the createUserWithEmailAndPassword error codes used in the example above:
•"auth/email-already-exists": The provided email is already in use by an existing user. Each user must have a unique email.
•"auth/invalid-email": The provided value for the email user property is invalid. It must be a string email address.
•"auth/invalid-password": The password must be a string with at least six characters.
You can read the comments below the error codes for their descriptions.
Please visit the website for the full list of Firebase authentication error codes.
✓ You can use the code above for Firebase with bare React Native as well.
How to set a Password Policy
You can also set a Password Policy. The password must be a string with at least six characters, but you can add extra requirements. You should go to the Firebase Console: Authentication > Settings > Password Policy > Enforcement mode > Require enforcement.
You can choose the password requirement options: uppercase character, lowercase character, special character, numeric character, and force upgrade on sign-in. You can also set password length requirements: minimum password length and maximum password length.
You should import the getAuth and validatePassword methods:
import { getAuth, validatePassword } from "firebase/auth";
const status = await validatePassword(getAuth(), password);
Cloud Firestore
Firestore is a flexible database for web and mobile development. It uses data synchronization to update data on any connected device. Realtime Database is the other Firebase database, you can compare and choose the best database for your app.
How to initialize the app and set up Firestore
After creating a Firebase project, you need to integrate your React native Expo app with Firebase. Navigate to the firebase.js file and initialize an instance of Cloud Firestore:
Import the Firebase database and the methods:

You only need to import the methods you need. You should also create a Firestore database from the Firebase console: Cloud Firestore > Create database > Select edition (Standard) > Database ID and location > Next > Test Mode > Create.
Rules
If you want users to read and/or write data, you should allow it from the Rules section in the Firestore Dashboard.

service cloud.firestore {
match /databases/{database}/documents {
match /{document=**} {
allow read, write: if true;
}}}
After changing the rules, click "Publish."
Firestore - How to manually create a Firestore collection and document
Open Console. Select Firestore Database from the navigation panel. You will see all the collections, documents and fields. You can click + Start Collection to create a collection. You can click + add document to create a document, you need to write a field and a value, create an identifier or generate an Auto-ID (using the Auto-ID button) and save.
Firestore - How to read data
If you want to read and use the data in the database, you can use the method getDoc():
const docRef = doc(db, "collectionname", "documentID");
const docSnap = await getDoc(docRef);
if (docSnap.exists()) {
console.log("Document data:", docSnap.data());
} else {
console.log("No such document!");
}
Firestore - How to add data
You can use Firestore without giving users direct access, or you can allow users to store their own data. Firestore supports structured data types such as strings, numbers, and objects, but it’s not designed to store large binary files like images — for those, Firebase Storage is the appropriate tool. To create a file in Firestore, you can use the setDoc method:
await setDoc(db, "Books", "0VDv0lCXsfSW2zbNv1u0ha9")
The method creates a collection named "Books" and 0VDv0lCXsfSW2zbNv1u0ha9 is the ID of the document.
You can create a document for every user who creates an account. You need to generate an ID for their document. You can make your own method or you can use user.uid for document ID:
await createUserWithEmailAndPassword (auth, email, password).then(cred => { return setDoc(doc(db, "Books", cred.user.uid), {email, name })})
Firestore - How to delete a document
To delete a doc, you can use the deleteDoc method:
await deleteDoc(doc(db, "Books", "0VDv0lCXsfSW2zbNv1u0ha9"));
We used the updateDoc method to keep the existing document and add new fields or update values. If you want to completely replace the existing document, you should use the setDoc method instead. By default, setDoc() overwrites the entire document.
Firebase Storage
Firebase Storage is used for uploading and storing photos, videos, and other files. Cloud Storage allows users to upload and download files directly from your app.
To enable users to read from or write to storage, you need to configure the appropriate permissions in the Rules section of the Firebase Storage Dashboard.
How to initialize app and set up Firebase Storage
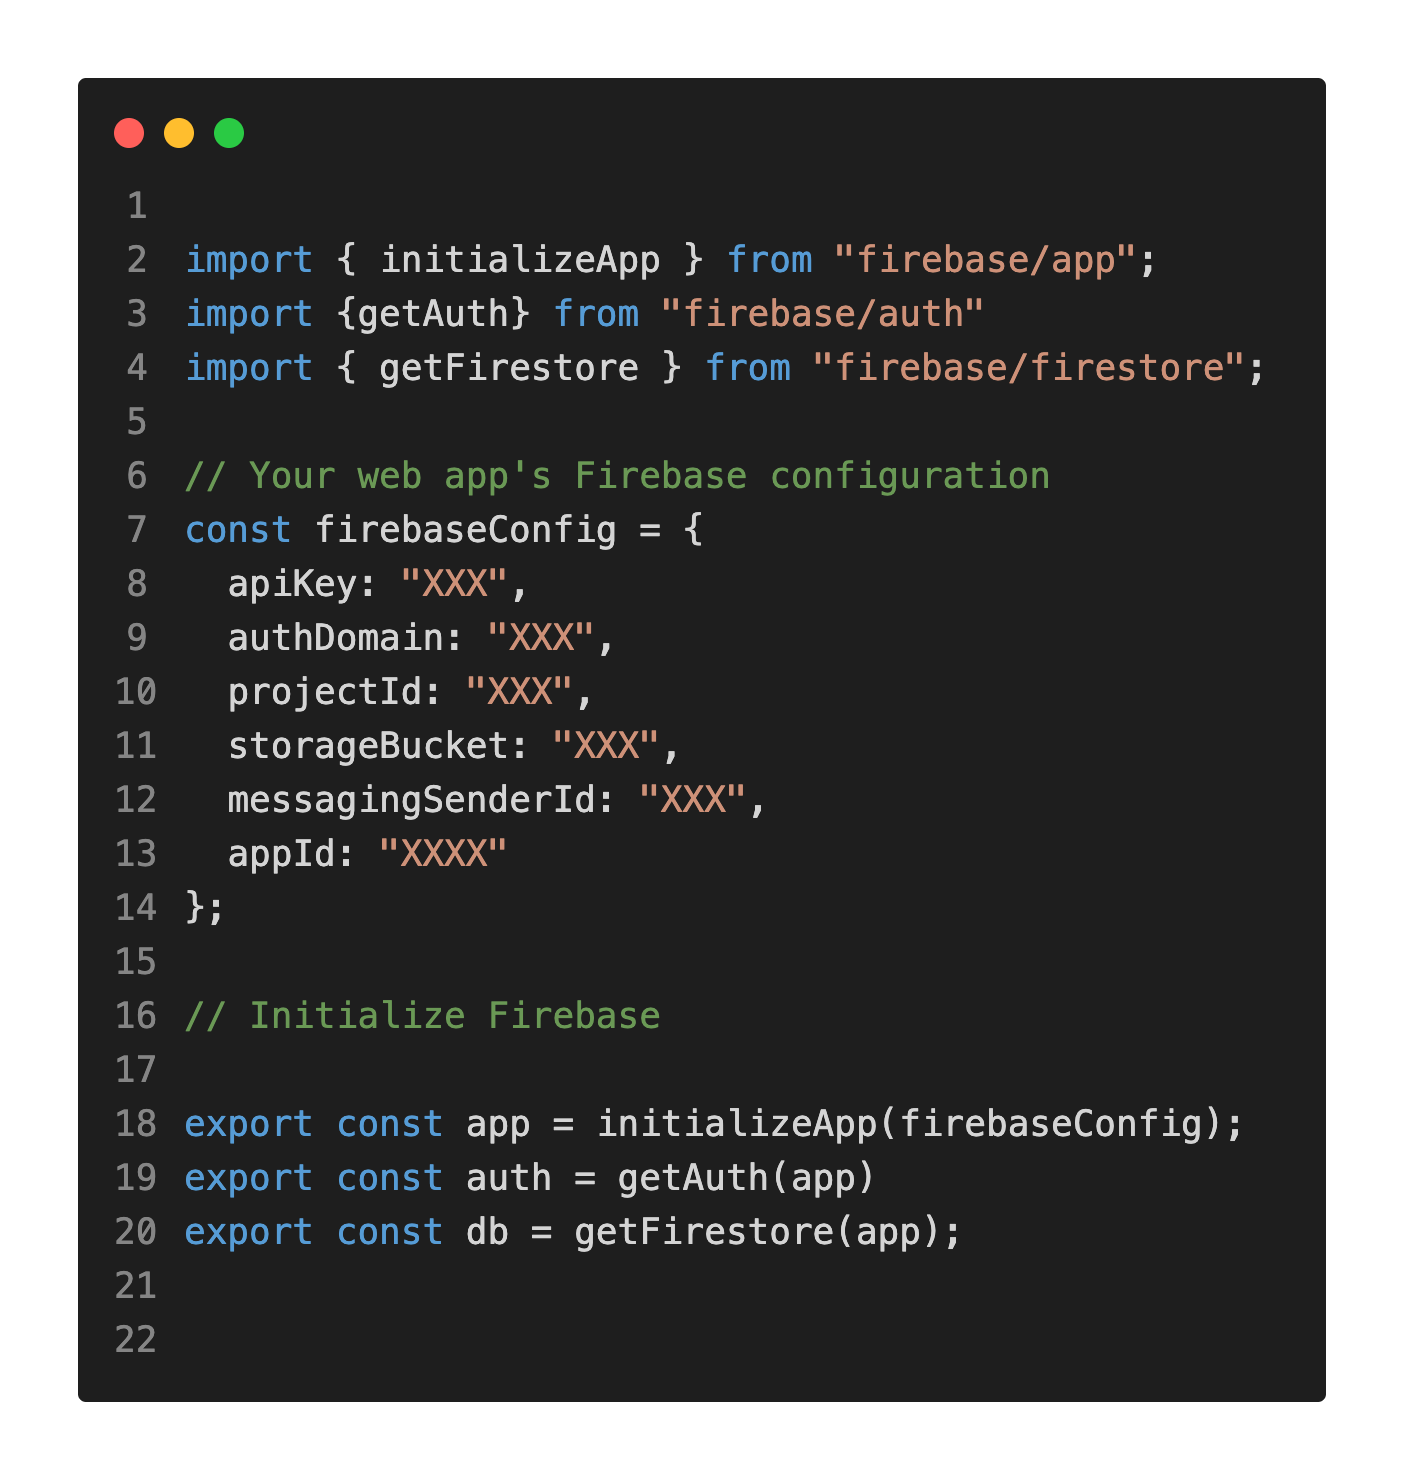
After creating a Firebase project, you need to integrate your React Native Expo app with Firebase. Navigate to firebase.js file and create a Firebase Storage:
// Import the functions you need from the SDKs you need
import { initializeApp } from "firebase/app";
import { getAuth } from "firebase/auth";
import { getFirestore } from "firebase/firestore";
import { getStorage } from "firebase/storage";
// Your web app's Firebase configuration
const firebaseConfig = {
  apiKey: "XXX",
  authDomain: "XXX",
  projectId: "XXX",
  storageBucket: "XXX",
  messagingSenderId: "XXX",
  appId: "XXX",
};

// Initialize Firebase
export const app = initializeApp(firebaseConfig);
export const auth = getAuth(app);
export const db = getFirestore(app);
export const storage = getStorage(app);
Import the Firebase database and the methods:

Firebase Storage - How to manually add an image/file
Open Firebase Console. Select Storage. You will see all the folders. You can click create folder button (just next to the Upload file button) and create a new folder. If you already have a folder, you can click the folder you want. You just need to click the upload file button and choose the image/file you want.
Firebase Storage - How to upload and get data
Firebase Storage allows users to upload a photo. They need to pick up a photo first. You can use the React Native Image Picker for bare React Native and the Expo Image Picker Library for Expo to pick up a photo. After selecting a photo, you can use the uploadBytes method to upload it to Firebase Storage. To do this, you first need to create a reference to the full path where the file will be stored, including the file name.
Firebase Storage with Expo Example
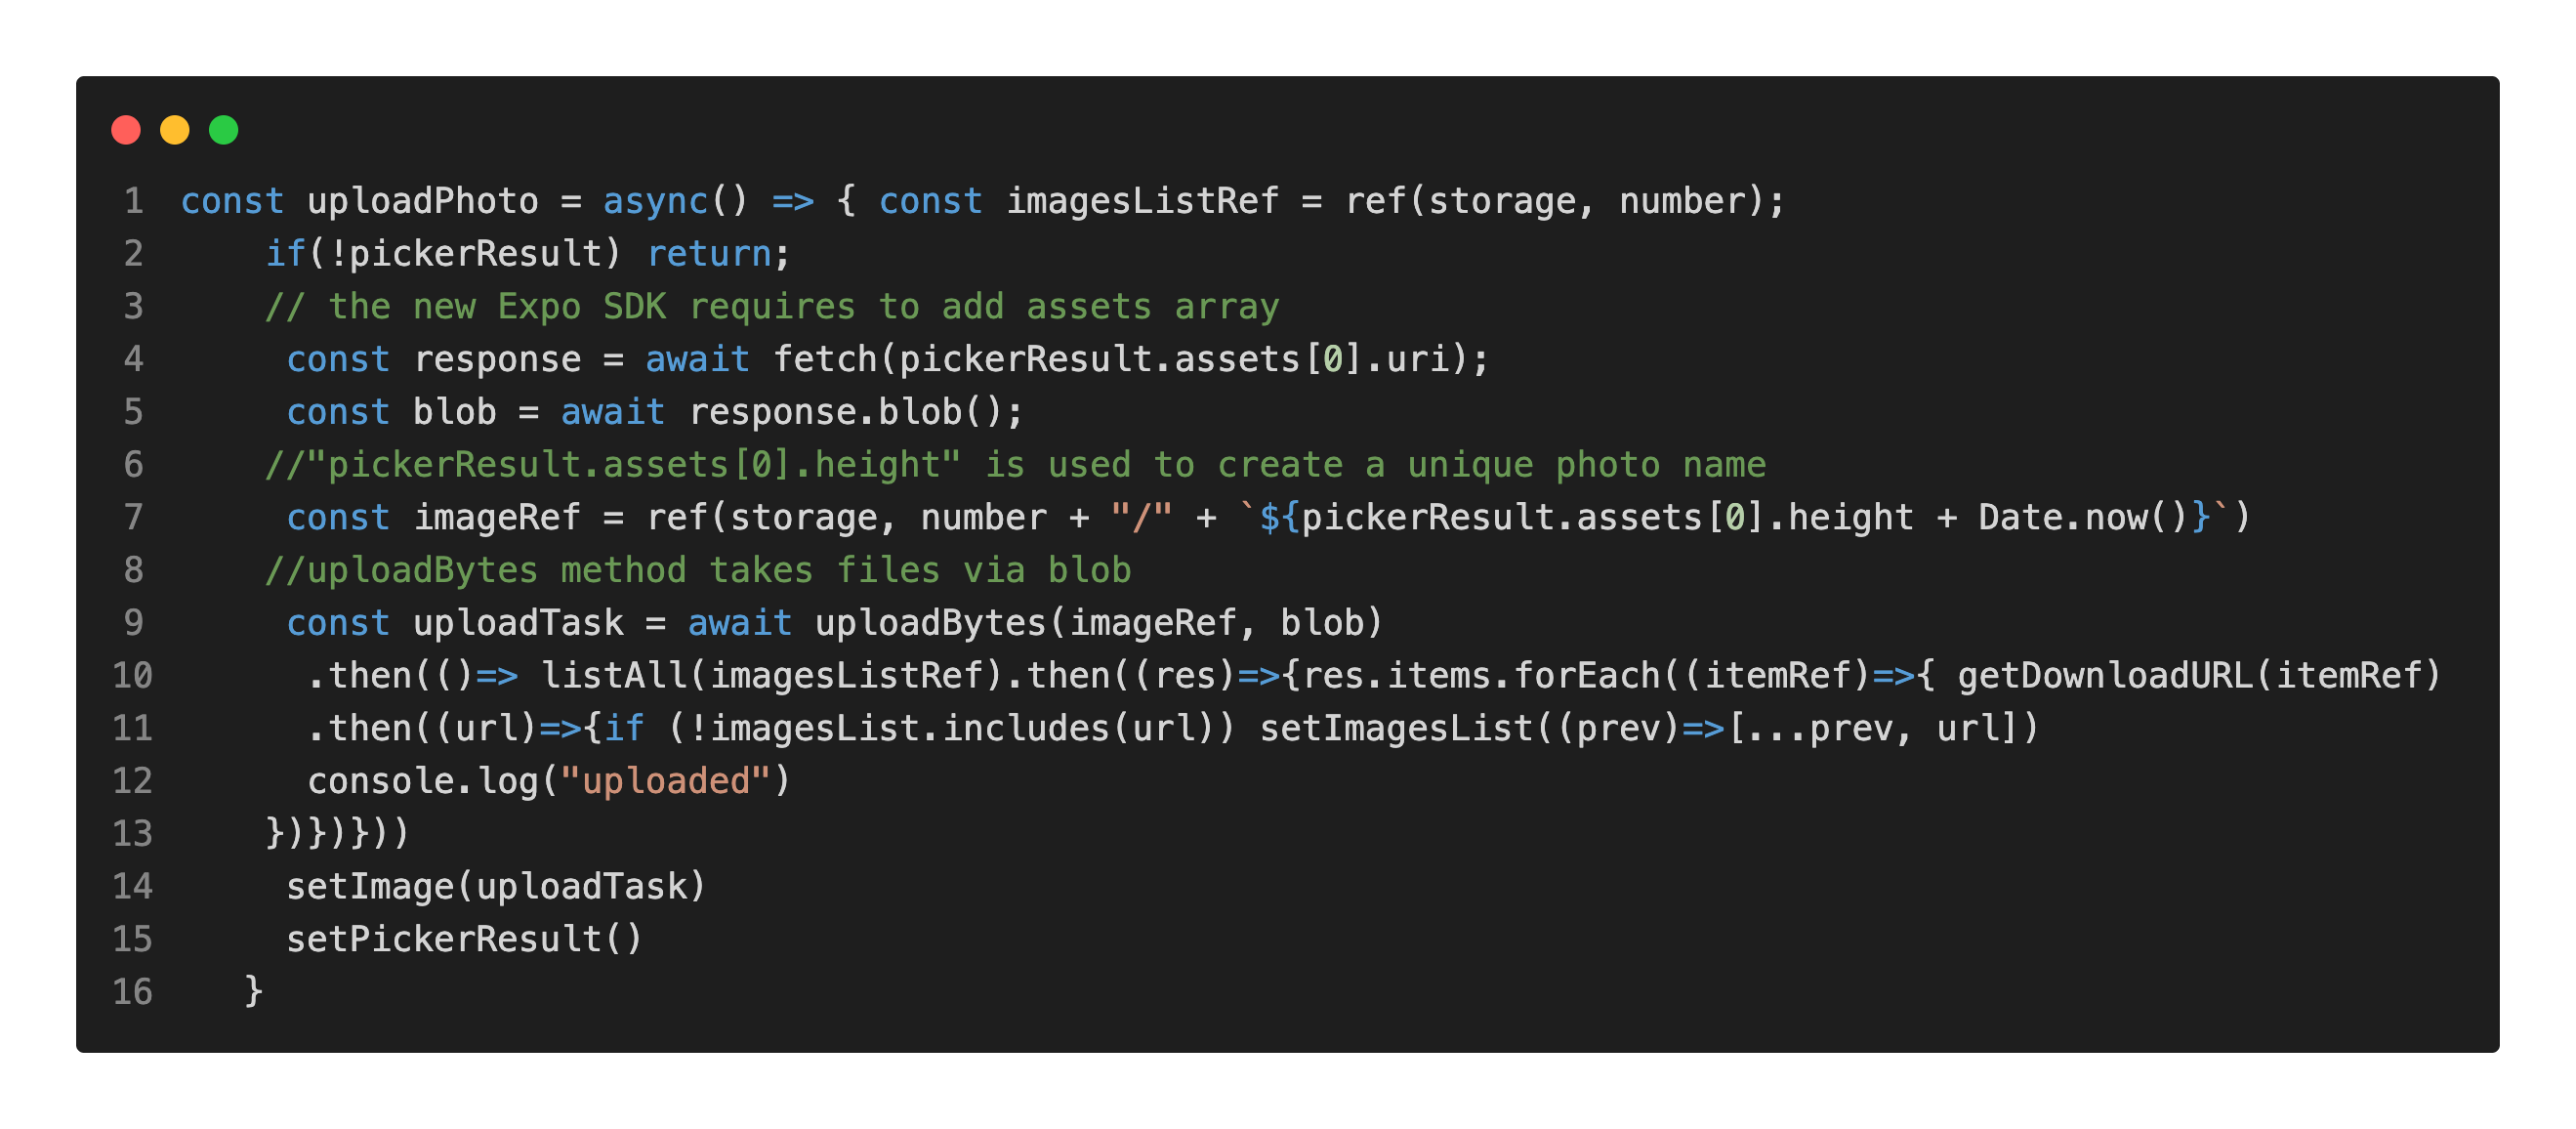
To use the uploadBytes method, you first need to create a reference to the image's storage path. This method accepts files as Blobs (or Uint8Array/ArrayBuffer) and uploads them to Firebase Cloud Storage. If a Blob isn't available, you can check other options. The new Expo SDK requires adding an assets array to fetch the selected image, whereas older SDK versions didn't require this.
To display all the saved photos, you can use the listAll method.

Expo and Firebase Authentication, Firestore, Firebase Storage Example
Firebase Authentication, Cloud Firestore, Storage with Expo example
Let's make an Expo app using Firebase Authentication, Cloud Firestore, and Firebase Storage. Users need to create an account with their email and password. They can log in to their account with the email and password that they created. We'll use the createUserWithEmailAndPassword, signInWithEmailAndPassword, and signOut methods for users to create an account, log in, and log out. They can write the details of the books they like. We'll store the data in the Cloud Firestore. When a user creates an account, our app will automatically create a document for the user. We will use the setDoc method and the user.uid to create the document. Users can also upload the image of the book or the image of a page. We will use the uploadBytes method to upload the images to the Firebase Storage. useState hook will be used for state management. If the user has already saved any document or image, the useEffect hook will get the files from Firebase Storage and Firestore when the user logs in. You can use getDoc and listAll methods for getting data and images from Firestore and Firebase Storage. You can use the sendPasswordResetEmail method to send a link for password recovery.
import React, {useState, useRef, useEffect} from 'react'
import { StyleSheet, Text, View, Button, FlatList, Image, KeyboardAvoidingView, TextInput, TouchableOpacity, Alert } from 'react-native'
import { createUserWithEmailAndPassword, getAuth, validatePassword, signInWithEmailAndPassword, signOut, sendPasswordResetEmail, onAuthStateChanged} from "firebase/auth"

import {collection, getDoc,  addDoc, getDocs, setDoc, updateDoc, orderBy, deleteField, deleteDoc, doc, snapshot, arrayUnion, arrayRemove, where, FieldValue, query, onSnapshot} from "firebase/firestore"
import {ref, uploadBytes, getDownloadURL,uploadBytesResumable, listAll, list, deleteObject} from "firebase/storage"
import {auth, db, storage} from "./firebase"

import * as ImagePicker from 'expo-image-picker';

const App = () => {

    const emailRef = useRef()
    const [isSignedIn, setIsSignedIn] = useState(false)
    const [email, setEmail] = useState("")
    const [password, setPassword] = useState("")
    const [error, setError] = useState("")
    const [number, setNumber] = useState("")
    const [books, setBooks] = useState([])
    const [book,setBook] = useState("")
    const [image, setImage] = useState("")
    const [pickerResult, setPickerResult] = useState("")
    const [imagesList, setImagesList] = useState([])
    const imagesListRef = ref(storage, number);

    useEffect(() => {
      if(isSignedIn){
      auth.onAuthStateChanged((user) => {
        if (user) {
          setNumber(user.uid)
          console.log(user.uid)
          console.log(number)}
      })
    }}, [isSignedIn])

    const readData = async() => {
    const ref = doc(db, "books", number)
    console.log("doc ref:", ref)
    const docSnap = await getDoc(ref);
    if (docSnap.exists()) {
        const list = docSnap.data();
        console.log(list.Books);
        setBooks(list.Books)
      } else {
        console.log("No such document!");
      }}

    useEffect(()=> {
      if(isSignedIn && number){
      readData()}
  }, [isSignedIn])

    const listPics = async() => { await listAll(imagesListRef).then((res)=>{res.items.forEach((itemRef)=>{getDownloadURL(itemRef).then((url)=>{setImagesList((prev)=>[...prev, url]); console.log("started")})})})}
    useEffect(() => {listPics()}, [number])

    const signIn = () => {
      signInWithEmailAndPassword(auth,email, password)
      .then((re) => {
        setIsSignedIn(true)
        setEmail("")
        setPassword("")

      })

      .catch(error => {
      if(error.code === "auth/invalid-email"){
        console.log(error.code)
         console.log("The provided value for the email user property is invalid")
         setError("invalid email")}else if(error.code === "auth/wrong-password"){
          console.log(error.code)
         console.log("wrong password")
         setError("wrong password")
        }else if(error.code === "auth/user-not-found"){
         console.log("user not found")
         setError("user not found")
        }
        else{
         console.log(error)
    }})
}

  const handleSignUp = async() => {
    const status = await validatePassword(getAuth(), password);
    if(status.isValid) {
      await createUserWithEmailAndPassword(auth, email, password).then(cred => {
 return setDoc(doc(db, "books", cred.user.uid ), {email})})
  }else{
  console.log("password failed")
 console.log(status)
setError("Your password should include an uppercase, a lowercase, a special character and a number")
    }
}

    const openLibrary = async () => { const pickerResult = await ImagePicker.launchImageLibraryAsync({
  //   mediaTypes: ImagePicker.MediaTypeOptions.Photos,
     //allowsEditing: true,
     quality: 0

  })
     console.log(pickerResult);
     setPickerResult(pickerResult)

  }
    const uploadPhoto = async() => { const imagesListRef = ref(storage, number);
      if(!pickerResult) return;
        const response = await fetch(pickerResult.assets[0].uri);
        const blob = await response.blob();
        //"pickerResult.assets[0].height" is used to create a unique photo name
        const imageRef = ref(storage, number + "/" + `${pickerResult.assets[0].height + Date.now()}`)
        const uploadTask = await uploadBytes(imageRef, blob)
        .then(()=> listAll(imagesListRef).then((res)=>{res.items.forEach((itemRef)=>{ getDownloadURL(itemRef).then((url)=>{if (!imagesList.includes(url)) setImagesList((prev)=>[...prev, url])
        console.log("uploaded")
    })})}))
       setImage(uploadTask)
       setPickerResult()
    }

    const submitHandler = async() => {
      let docRef = doc(db, "books", number)

      await updateDoc(docRef, {
      Books: arrayUnion(book)})
      console.log("added")
      setBook("")
}
    const logOut = () => {
      signOut(auth)
      .then((re) =>{ setIsSignedIn(false)}
     )
      .catch((re) => {
      console.log(re)})}

    const forgotPasswordHandler = () => {
      return sendPasswordResetEmail(auth, email);
  };

    const deleteBook = async (e) => {
    const docRef = doc(db, "books", number );
    await updateDoc(docRef, {
    Books: arrayRemove(e)
    });
    console.log("deleted")
  }
    const deletePic = (index) => { const imagesListRef = ref(storage, number);
     let newArr =imagesList.filter(n => imagesList[index] !== n)
     deleteObject(ref(storage, `${imagesList[index]}`)).then(()=> {

     listAll(imagesListRef)
   })
    .then(()=>
    setImagesList(newArr))}

   return (
    <KeyboardAvoidingView style={styles.container} behavior="padding">
    <View><View>{isSignedIn ? <TouchableOpacity onPress={logOut} style={styles.button}><Text>Log out</Text></TouchableOpacity> :
   (<View><Text style={{marginLeft: 25, marginBottom: 8}}>Email</Text>
    <TextInput style={{borderWidth: 1, marginHorizontal: 25,  marginBottom: 8, borderRadius: 3}} value={email} onChangeText={text => setEmail(text)} />
    <Text style={{marginLeft: 25, marginBottom: 8}}>Password</Text><TextInput style={{borderWidth: 1, marginHorizontal: 25, borderRadius: 3}} value={password} onChangeText={text => setPassword(text)} />
    <View style={{flexDirection: "row", flexWrap: "wrap"}}><TouchableOpacity style={styles.login} onPress={signIn} ><Text style={{textAlign: "center"}}>Login</Text></TouchableOpacity><TouchableOpacity style={styles.register} onPress={handleSignUp}><Text style={{textAlign: "center"}}>Register</Text></TouchableOpacity></View><TouchableOpacity onPress={forgotPasswordHandler}><Text style={{textAlign: "center"}}>Forgot your password?</Text></TouchableOpacity><Text style={{textAlign: "center", color: "red" }}>{error}</Text></View>)}
    {isSignedIn && <View><TextInput placeholder="Write your thoughts here" value={book} onChangeText={text => setBook(text)} /><TouchableOpacity onPress={submitHandler}><Text>Submit</Text></TouchableOpacity><Button title="Pick an image from image picker" onPress={openLibrary}/>{image ? <Image source={{uri: pickerResult.uri}} style={{width: 20, height: 20}} /> : <></>}<Button title="Upload selected image" disabled={!pickerResult} onPress={uploadPhoto}/></View>}{isSignedIn && <View><FlatList horizontal="true" data={books} keyExtractor={(item,index) => index.toString()} renderItem={({item, index}) => <View><TouchableOpacity onPress={()=> deleteBook(books[index])}><Text>{item}, </Text></TouchableOpacity></View>} /><FlatList data={imagesList} horizontal={true} keyExtractor={(item, index) => index.toString()}  renderItem={({index, item}) =><TouchableOpacity onPress={() => deletePic(index)}><Image source={{uri: imagesList[index]}} style={{width: 80, height: 80, margin: 50, padding: 50,}} /></TouchableOpacity>} /></View>}
    </View></View></KeyboardAvoidingView>)}
  export default App
  const styles = StyleSheet.create({
   container: {
     flex: 1,
     justifyContent: "center",
     alignItems: "center"
   },
   inputContainer:{
     width: "80%"
   },
   login: { marginVertical: 17, borderWidth: 1, padding: 5, marginLeft: 80, marginRight: 40},
   register: { marginVertical: 17, borderWidth: 1, padding: 5, marginRight: 40},
   paragraph: {
     margin: 24,
     fontSize: 18,
     fontWeight: 'bold',
     textAlign: 'center',
   },
   input:{
     backgroundColor: "white",
     borderRadius: 10,
     marginTop: 5
   }
  })
In the example above, we used separate useEffect hooks to show the Firebase methods individually, but you can combine them.
Firebase Authentication, Firebase Storage, Firestore and Expo are used in the example above.
You can find the descriptions of the authentication error codes used in the example above (for the signInWithEmailAndPassword method):
• auth/invalid email -The provided value for the email user property is invalid. It must be a string email address.
• auth/wrong password error occurs when the user enters a wrong password for the email.
• auth/user not found - There is no existing user record corresponding to the provided identifier.
For more information about ImagePicker method of expo-image-picker library, you can visit the Expo page.
useEffect hook is used to display the data loaded from the database. useEffect hook loads and displays data when the user logs in. To learn more about the useEffect hook, please visit Expo Tutorial.
Expo Push Notifications and Firebase Cloud Messaging (FCM V1) on Android: Complete Setup Guide
Learn how to implement remote notifications in Expo using both the Expo Push Notification service and Firebase Cloud Messaging (FCM). This article also covers the modern FCM HTTP v1 API setup using Google service account credentials and OAuth-based authentication, helping you move away from legacy approaches. You'll learn how to retrieve and manage both Expo push tokens and FCM device tokens, properly configure your project for Android, and test notifications in real-world scenarios. The guide also includes practical debugging strategies for common issues such as token mismatches, missing permissions, and Android package name configuration errors, along with a structured workflow for reliable testing and delivery of push notifications.