
React Native Course 2026
1.React Native
2.React Native vs Expo
3.Installation
4.React Native environment setup
5.React Native app with core components
6.Style
7.useState Hook
8.React Native Image Crop Picker library
9.React Native Vector Icons
a.React Native Vector Icons installation and setup
b.React Native Vector Icons example
10.React Native Paper library
a.React Native Paper and React Native Vector Icons example
b.React Native Paper Icons, IconButton, Button
11.React Native Elements
12.React Native Navigation
13.How to run your React Native app on a device
14.React Native with TypeScript
a.React Native with TypeScript Installation and Setup
b.React Native app with core components - TypeScript
c.react-native-vector-icons with TypeScript
d.React Native Navigation with TypeScript
e.react-native-image-crop-picker with TypeScript
15.How to add iOS App Icon to React Native app
16.How to add Launch Screen for iOS React Native app
17.Data fetching in React Native: Axios vs fetch
a.How to Fetch Data in React Native Apps Using the Fetch API
aa.React Native API Example: Fetching Data Step-by-Step
b.Axios in React Native Apps: How to Fetch Data
ba.How to Set Up Axios in React Native for API Requests
bb.Using Axios in React Native: API Request Examples
bc.How to Use Params with Axios API in React Native
c.Fetch vs Axios
Advanced Topics
Material Bottom Tabs in React Navigation using React Native Paper & Vector IconsReact Native Gesture Handler Library
React Native Reanimated Library
How to Add an App Icon and Launch Screen in iOS Using Xcode
Getting Started with This React Native Course
Welcome! This site is designed to help you learn React Native step by step, whether you're completely new to mobile development or already familiar with JavaScript. If you want to build a React Native app without Expo, this page provides detailed guidance for setting up your environment on different operating systems. For MacOS users, Xcode installation is required, and we provide tips and resources to make this setup easier.
The lessons are self-contained, so you can focus on a specific topic or follow the course from start to finish. Each library covered includes a practical example along with the final result you'll see on your device, so you can see exactly how it works in a real app.
If you prefer a faster setup, you can also try the Expo version of the course. The Expo lessons let you build the exact same examples using Expo's simplified workflow. Please note that React Native and Expo use different libraries, so the instructions and code may vary slightly between the two versions.
By following this site, you'll have a clear, beginner-friendly, step-by-step path to learning React Native in 2026, building confidence as you create your own apps from scratch.
React Native
React Native is an open-source framework for building apps for iOS, Android, and the web using JavaScript and React. Before diving in, it's recommended to understand JavaScript and React fundamentals.
This section of the course is a beginner-friendly, step-by-step React Native tutorial (2026 edition), guiding you through real-world app development with the latest tools, libraries, and best practices. Every library includes a practical example, along with the final result you'll see on your device, so you know exactly how it works in a real app.
Additionally, this section includes a full Expo version, allowing you to build the same examples using Expo's faster, simplified workflow. Whether you're new to mobile development or transitioning from web development, this structured, hands-on approach helps you build complete React Native apps from scratch with confidence.
Throughout the course, we'll be using VS Code (Visual Studio Code) as the main code editor, which is beginner-friendly and widely used in the React Native community.
This tutorial covers the fundamentals and some important React Native libraries, then progresses into more advanced sections; for readers who want to go even deeper, additional topics, including advanced React Native libraries, are explored in separate articles.
React Native vs Expo
Expo is an open-source platform for making apps for iOS, Android and the web. Expo offers tools and services for making Expo apps. The build process is different for React Native and Expo.
Expo
Pros
• It's easy to set up and use.
• You can run the app on mobile and the web.
• Expo go is a free tool for testing Expo apps on iOS and Android.
• Documentation and guides are good.
• You can build cross-platform apps.
Cons
• You can't add any custom code*
• You can't use native libraries.
• Some databases do not support Expo.
*You can add with development build.
React Native
Pros
• You can add native code.
• You can use native libraries.
• The app may work faster than Expo.
• You can test your app on your own device.
Cons
• Setting up the environment takes longer than Expo.
• You need to use Xcode and Android Simulator.
• Building an app takes longer than Expo.
• You need a Mac to build an iOS app.
React Native Installation
Setting up your environment for React Native depends on your operating system and may require additional
dependencies, please check React Native
documentation. The following React Native installation instructions are only for MacOS and Node Package Manager. If you are using Yarn Package Manager, please use "yarn" instead of "npx".
Before starting a React Native project, you need to install Xcode and CocoaPods. For MacOS users, you'll need to install Xcode to build and run apps on the iOS simulator. You can download Xcode directly from the Mac App Store, which includes the iOS simulator you'll use to test your apps.
For iOS projects on MacOS, you'll need CocoaPods to manage dependencies. You can follow the official installation guide here: CocoaPods Installation guide.
To develop a React Native iOS app, you can use the following instructions for Mac:
After installing Xcode, open Xcode and navigate to Settings > Locations > select the most recent version in the Command Line Tools dropdown.
If you installed react-native package earlier, you'd better remove it:
npm uninstall -g react-native-cli @react-native-community/cli
To create a new React Native app, run the command below:
npx @react-native-community/cli init ProjectName
Tip: If you can't install CocoaPods with the command above, navigate to the ios folder and run "pod install". If you are not sure whether it's still being installed or stuck, you can exit (Ctrl + C) and run the command below:
pod install --verbose
Please note that pod install may take a long time. You can use the --verbose with other commands to increase logging verbosity. For example, you can use "npx react-native init NewProject --verbose" while creating a react-native project.
If you have installed successfully, you can see Podfile in the ios folder:
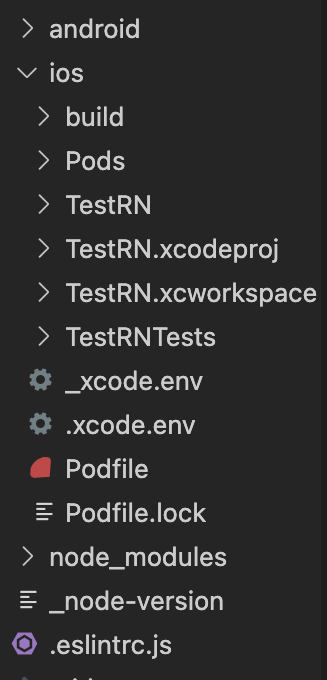
You can see ios folder of a React Native app in the example above. The app's name is "TestRN". Installing React Native is harder than installing Expo. If you installed React Native successfully, you should see the files and folders above. If you haven't installed React Native successfully, you can use React Native Doctor command. You can learn more about the React Native Doctor command.
React Native environment setup
To see if packages are installed correctly, you can use the react-native doctor command below:
npx react-native doctor
The react-native doctor command can detect and help with problems related to the development environment. You can also use the doctor command for the "Info 💡 tip: make sure that you have set up your development environment correctly" error.
After installation, run the command below for starting Metro Bundler:
npx react-native start
To start iOS simulator:
npx react-native run-ios
If your operating system is different or you want a specific version of React Native, check the official React Native website.
JavaScript logs will be removed from Metro in React Native 0.77. You can use React Native DevTools as your default tool. After starting React Native (you can do it later as well), just type j in the terminal to open. It requires Google Chrome or Microsoft Edge. If you have one of them and type j in the terminal, the React Native DevTools window will pop up, and you will be able to see the console and other tools. You can still use the terminal; they will be removed from metro in React Native 0.77.
Specifying device
To see device options for iOS simulator, you can run the command "xcrun simctl list devices".
If you want a specific device, run the command below:
npx react-native run-ios --simulator="iPhone 14 Pro Max"
You just need to change the device name.
Tip: If you run simulator for the first time, you need to wait for a while.
A simple React Native App with core components
Let's make an app with basic components. Since only basic React Native components are used, the code below works with both bare React Native and Expo.
You need to import React, React hooks and the React Native components.
import React, {useState} from 'react';

import { FlatList, SafeAreaView, ScrollView, StatusBar, StyleSheet, Text, TextInput, TouchableOpacity,View} from 'react-native';

function App() {

 const [item, setItem] = useState("")
 const [list, setList] = useState([])

 const Submit = () => {
  setList([item, ...list])
  setItem("")
 }

 const Delete =  (item) => {
  let newList = list.filter( n => item !== n)
  setList(newList)
 }

 return (
    <SafeAreaView><View style={{marginHorizontal: 100, marginTop: 40, textAlign: "center", marginBottom: 40, }}>
    <Text style={{color: "green", fontWeight: "bold", fontSize: 17, paddingBottom: 5, textDecorationLine: "underline"}}>Shopping List</Text>
    <FlatList data={list}  keyExtractor={(item, index) => index.toString()} renderItem={({item}) =><View style={{flexDirection: "row", }}><Text style={{paddingHorizontal: 2, }}>{item}</Text><TouchableOpacity style={{color: "red"}} onPress={()=> {Delete(item)}}><Text style={{color: "red", paddingHorizontal: 5}}>x</Text></TouchableOpacity></View> } />
    </View>
    <View style={{marginHorizontal: 90, borderWidth: 1, borderColor: "green", padding: 10}}><Text style={{color: "green"}}>Add a new item:</Text>
    <TextInput style={{borderBottomColor: "green", borderBottomWidth: 1, paddingVertical: 5}} value={item} onChangeText={text=> setItem(text)}/>
    <TouchableOpacity style={{backgroundColor: "green", marginVertical: 8 }} onPress={Submit}><Text style={{textAlign: "center", color: "white", paddingVertical: 3, marginHorizontal: 20}}>Add</Text></TouchableOpacity>
    </View>
    </SafeAreaView>
  );
}

export default App;
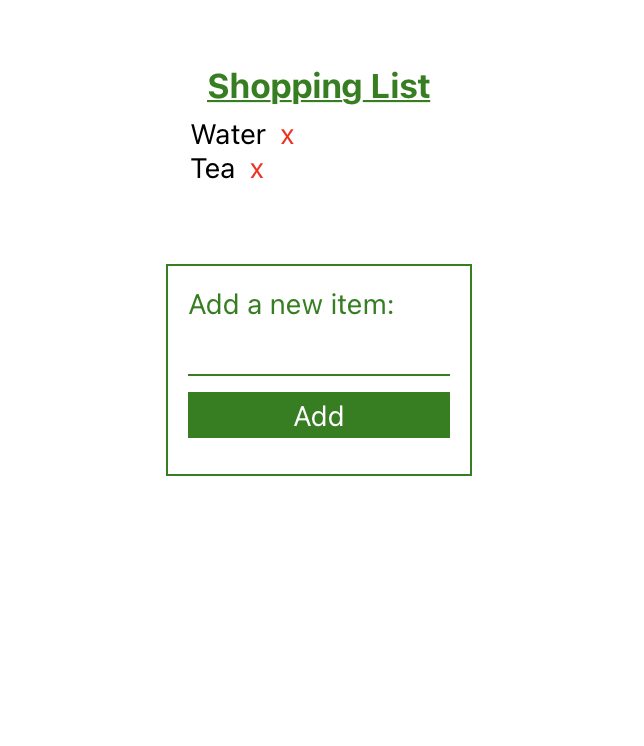
The React Native example above shows how basic components work. TextInput is used to get the user's input. onChangeText, the prop of TextInput, is called when the user's input (text) changes; you can see what the user types for a new item as in the example. FlatList is another important component for rendering list items. useState is the most common React Hook, and it makes the state management easy. It declares a state variable and updates the state. The "item" is declared and updated in the example above. If you want to learn more about useState, please check the useState section and the other examples. Only javascript is used for adding and deleting items. However, you can store string data in the Firestore as well.
Tip: If you need scrolling, you can also use ScrollView. However, ScrollView loads all its components at once, while FlatList renders items in a more efficient way and has a better performance.
If you want to test the app, you can use Expo.
Note: Using index as a key is fine for this small demo, but in real apps with dynamic or large lists, you should use a stable unique value to avoid rendering issues.
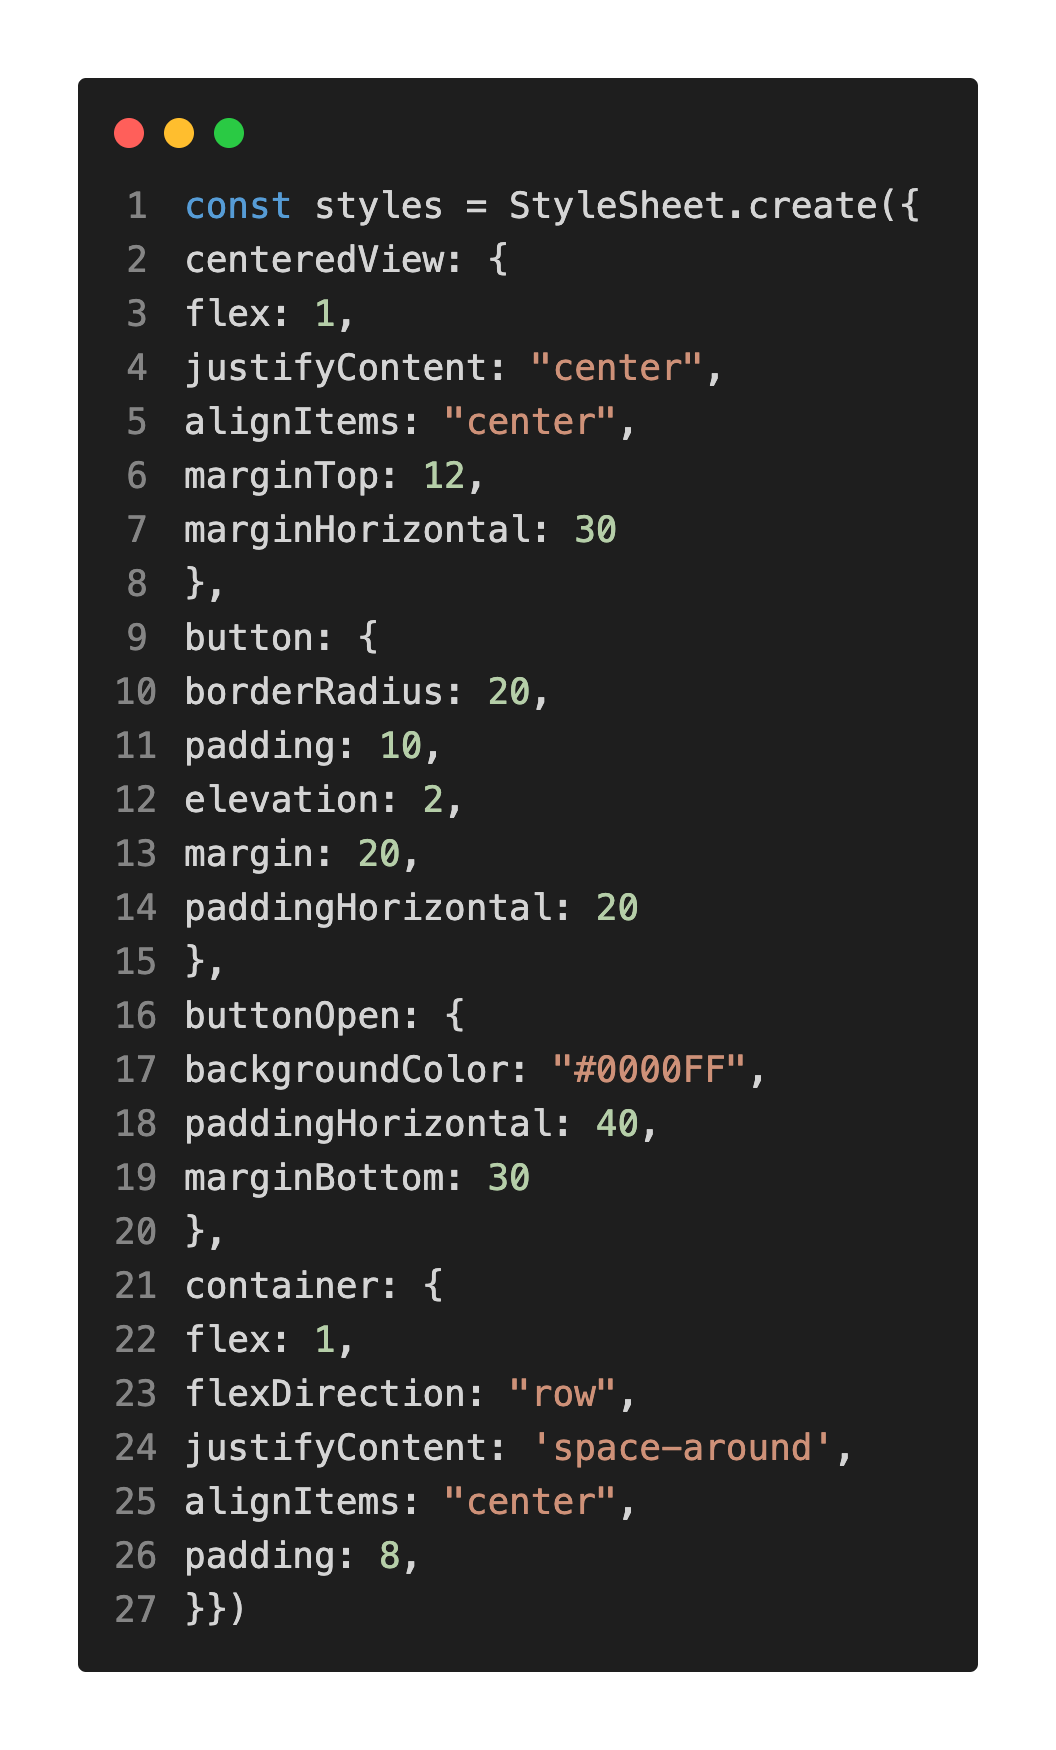
Style
There are two ways to style components. First option is to use style prop as in the example below. You can write style prop inside the component you want, you just need to add style name and the value.

Second option is to create a StyleSheet. You can also import and export StyleSheet.
useState Hook
useState is a React Hook that adds a state variable to function components and helps state management. You can read the example above. You need to import useState from React:
import React, {useState} from 'React'
The earlier examples use strings and arrays, but useState can also be used to manage image data. Although the initial state is empty in the examples above, you can also specify an initial state:
const [list, setList] = useState(["tea"])
You can change the state with Submit() and Delete() functions. You can update the state using the Submit() and Delete() functions. The TextInput component allows users to enter items, and FlatList displays the items stored in the list.
React Native Libraries
If you need extra functionality, you can use React Native libraries. You need to install the library you want. Some libraries require extra configuration.
React Native Image Crop Picker
React Native Image Crop Picker is a popular third-party library for React Native that enables developers to easily select images and videos from the device's gallery or camera, with built-in support for cropping, resizing, and compression. It provides a flexible and customizable API for handling media files while leveraging native iOS and Android capabilities for better performance and reliability. This library is commonly used in applications that require profile photo uploads, media sharing features, or basic image editing functionality. In this guide, we will be using react-native-image-crop-picker version 0.41.6. You need to install the library first with the following command:
npm i react-native-image-crop-picker
Then run the following command:
cd ios && pod install && cd ..
React Native Image Crop Picker keys and strings
You need to add keys and strings with values that describe why you need access to the device library. You can check the full list of key-value pairs. Open Info.plist (ios > "nameofyourapp" > Info.plist) in the ios folder of your project and add the necessary keys and strings. You can check the key and string example below for selecting and taking a photo:
<key>NSCameraUsageDescription</key>
<string>The app needs camera access to take a photo.</string>
<key>NSPhotoLibraryUsageDescription</key>
<string>The app requires access to photo library.</string>
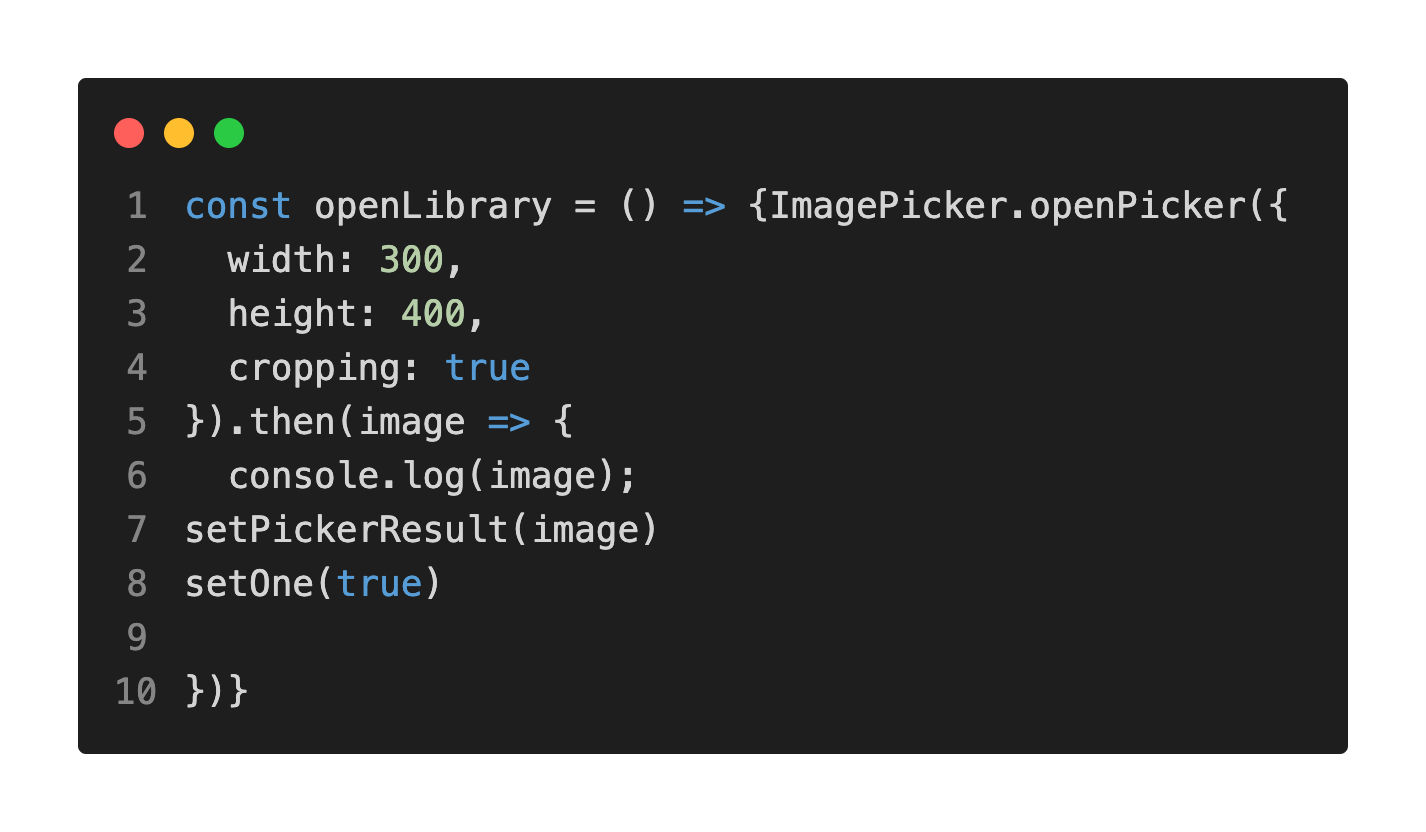
Open library and choose photo(s)
You can use openPicker method to open the user's library and choose one or more photos.
You can use the multiple property for allowing multiple photo selection. You can also limit the number of photo selections by using the maxFiles property. Please check the full react-native-image-crop-picker example.
Take a photo
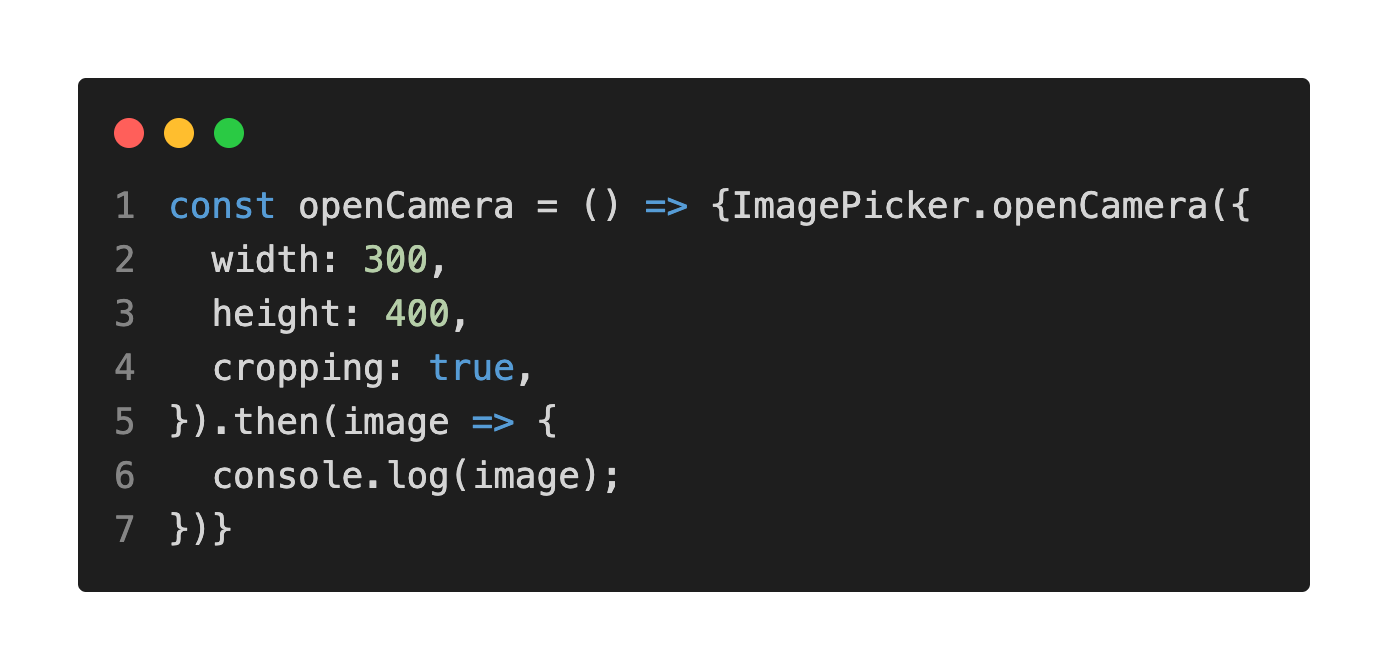
You can use openCamera method to take a photo instead of choosing a photo. You can see how to use properties inside function components in the example below:
You can find the full code for camera and image library:
import { StyleSheet, Modal, Alert, Text, View, SectionList, Button, TextInput, FlatList, Image, TouchableOpacity, Linking, ScrollView, TouchableHighlight, Platform, KeyboardAvoidingView } from 'react-native';
import React, {useState,  useContext, createContext,  useEffect,  useRef} from 'react'
import ImagePicker from 'react-native-image-crop-picker';

function App(){

   const [image, setImage] = useState([]);
   const [images, setImages] = useState([]);
   const [pickerResult, setPickerResult] = useState([])
   const [pickersResult, setPickersResult] = useState([])
   const [one, setOne] = useState(false)
   const [two, setTwo] =useState(false)

   const openLibrary = () => {
    ImagePicker.openPicker({
     width: 300,
     height: 400,
     cropping: true
    }).then(image => {
     console.log(image);
     setPickerResult(image)
     setOne(true)
  });}

//To select multiple images
   const openMultiple = () => {
    ImagePicker.openPicker({
      multiple: true,
 //   compressImageQuality: 0.8,
      compressImageMaxHeight: 400,
      compressImageMaxWidth: 300,
      maxFiles: 3,
      minFiles: 1
  }).then(images => {
   // console.log(images);
      setPickersResult(images)
      setTwo(true)
  })
    .catch((Error)=> console.log("Error: ", Error))
  }

   const openCamera = () => {ImagePicker.openCamera({
     width: 300,
     height: 400,
     cropping: true,
  }).then(image => {
     console.log(image);
  });}

  return(<View style={{marginTop: 70, marginHorizontal: 30}}><TouchableOpacity  onPress={openLibrary}><Text style={{color: "white", textAlign: "center", backgroundColor:  "#D2B3E8", padding: 10, margin: 10}}>Open Photo Library</Text></TouchableOpacity>
     <TouchableOpacity  onPress={openMultiple}><Text style={{color: "white", textAlign: "center", backgroundColor:  "#D2B3E8", padding: 10, margin: 10}}>Choose multiple photos</Text></TouchableOpacity>
     <TouchableOpacity  onPress={openCamera}><Text style={{color: "white", textAlign: "center", backgroundColor:  "#D2B3E8", padding: 10, margin: 10}}>Open Camera</Text></TouchableOpacity>
     {pickerResult != "" && <View><Image source={{ uri: pickerResult["path"] }} style={{ width: 40, height: 40, alignSelf: "center" }} /><TouchableOpacity onPress={()=> setPickerResult("")}><Text style={{textAlign: "center", borderWidth: 1, borderColor: "#e5b73b", padding: 1, color: "#e5b73b", marginHorizontal: 80, marginVertical: 8}}>Cancel</Text></TouchableOpacity></View>}
     {pickersResult && two && <View><FlatList horizontal={true} data={pickersResult} style={{ marginHorizontal: 70 }} keyExtractor={(item) => item.path} renderItem={({item}) =><View><Image  source={{uri: item.path }} style={{ width: 40, height: 40, alignSelf: "center", margin: 5, padding: 5 }} /></View> } /><TouchableOpacity onPress={()=> setPickersResult()}><Text style={{textAlign: "center", borderWidth: 1, borderColor: "#e5b73b", padding: 1, color: "#e5b73b", marginHorizontal: 80, marginVertical: 8}}>Cancel</Text></TouchableOpacity></View>}
     </View>
)}
export default App;
Please note that you may need to change the simulator's settings and give limited or full permission to access the user's library if you are using for the first time.
You can crop the selected image if needed.
You can also use clean() method to clean all tmp files, you can read the example below.
Note that the openCamera method does not work in the iOS simulator, but you can run it on a real iOS device. You can check how to run your React Native app on a device.
You can also use the react-native-image-picker library but it doesn't have cropping property.
You can store the selected photo in Firebase Storage. To learn how to upload an image using react-native-image-crop-picker with Firebase Storage, visit the Firebase course.
React Native Vector Icons
You can use react-native-vector-icons for your icon needs. It's a great library for React Native applications. If you already set up the library, you can see how to use react-native-vector icons in the example below. Otherwise, you need to set up the react-native-vector-icons library.
React Native Vector Icons Installation and Setup
There are different bundles and you can choose the bundle you want. You can find the react-native-vector-icons setup for iOS and react-native-paper example below. To install the react-native-vector icons library:
npm install --save react-native-vector-icons
How to set up react-native-vector-icons
React Native Vector Icons keys and strings
You need to open Info.plist (ios > "nameofyourapp" > Info.plist) and add the bundles you want to use.
You can see the list of all available fonts. After adding the react-native fonts you will use, run cd ios && pod install && cd .. command.
You need to import the react-native-vector-icons in your app and add the icon components.
React Native Vector Icons example
import AntDesign from 'react-native-vector-icons/AntDesign';
import MaterialCommunityIcons from 'react-native-vector-icons/MaterialCommunityIcons';
import Icon from 'react-native-vector-icons/FontAwesome'
<Icon name="photo" size={30} color="purple" />
<Icon name="bars" size={30} color="grey" />
<Icon name="user" size={30} color="black" />
<MaterialCommunityIcons name="bowl" size={30} color="#3e2465" />
<AntDesign name="shoppingcart" size={30} color="black" />
You can find the following icons in the example above:
FontAwesome - photo icon, FontAwesome - icon, FontAwesome - user icon, MaterialCommunityIcons - bowl icon, AntDesign - shoppingcart icon
You can use the react-native-vector-icons library with other React Native libraries. You can find an example of React Native Vector Icons with the React Native Paper library below.
If react-native-vector-icons are not showing up on the iOS simulator (it just displays a question mark), you should uninstall react-native-vector-icons and reinstall the library. You might have forgotten to add the necessary keys and strings as well.
React Native Paper Library
React Native Paper is a popular UI component library for React Native that implements Google's Material Design guidelines. It provides a wide range of customizable and production-ready components such as buttons, cards, dialogs, and text inputs, making it easier to build visually consistent and responsive mobile apps. The library is fully compatible with both Android and iOS, supports theming, and works seamlessly with React Navigation, helping developers create professional-looking interfaces quickly. You can find the react-native-paper setup for iOS below. You need to install the library with the following command:
npm install react-native-paper
Then run cd ios && pod install && cd ..
You can check the full list of react-native-paper components. Let's see how to implement Surface, Card, and Divider components. You need to import the components from react-native-paper:
import { Surface, Card, Divider } from 'react-native-paper';
React Native Paper and React Native Vector Icons example
import React from "react";
import { ScrollView, Text, View } from "react-native";
import { Card, Divider, Surface } from "react-native-paper";
import  MaterialCommunityIcons  from "react-native-vector-icons/MaterialCommunityIcons";
import Icon from "react-native-vector-icons/FontAwesome"

export default function App() {
  return (
    <ScrollView>
      <View style={{ margin: 20, marginTop: 50 }}>
        <Text style={{ color: "purple", marginStart: 10, textAlign: "center", fontSize: 20, marginBottom: 20,}}>
          React Native Paper
        </Text>
        <Text style={{ color: "purple", marginStart: 10, marginLeft: 30, fontSize: 16 }}>
          •Surface:
        </Text>
        <Surface style={{ marginHorizontal: 50, marginVertical: 30, padding: 5 }} elevation={4}>
          <Text style={{ textAlign: "center" }}>Hello</Text>
        </Surface>
        <Text style={{color: "purple", marginStart: 10, marginLeft: 30, fontSize: 16, marginBottom: 10 }}>
          •Card:
        </Text>
        <Card mode="elevated" style={{ backgroundColor: "#cec1e7", marginHorizontal: 30 }}>
          <Card.Cover source={require('./image.png')} />
          <Card.Content>
            <Text style={{ color: "white", textAlign: "center", padding: 5 }}>
              Hello
            </Text>
          </Card.Content>
        </Card>
        <Text style={{color: "purple", marginStart: 10, marginTop: 20, marginLeft: 30, fontSize: 16, marginBottom: 10}}>
          •Divider:
        </Text>
        <Divider style={{ marginHorizontal: 30 }} />
        <Text style={{ color: "purple", marginTop: 20, marginStart: 10, marginLeft: 20, fontSize: 16, marginBottom: 20 }}>
          •Icons:
        </Text>
        <View style={{ marginHorizontal: 150, marginVertical: 5, marginStart: 50 }}>
          <Text>Home</Text>
          <MaterialCommunityIcons name="home" size={24} color="#3e2465" />
          <Text>Paperclip</Text>
          <Icon name="paperclip" size={24} color="#3e2465" />
        </View>
      </View>
    </ScrollView>
  );
}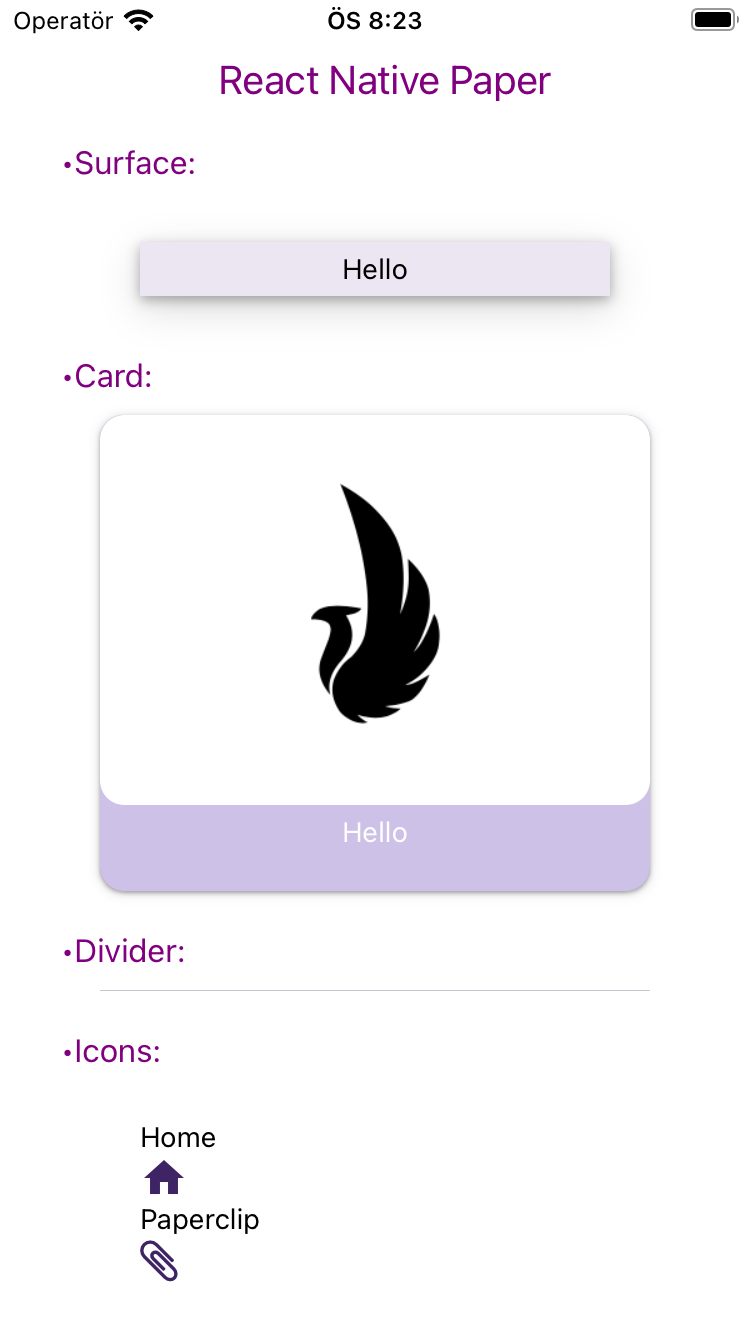
react-native-vector-icons/MaterialCommunityIcons and react-native-vector-icons/FontAwesome directories are used in the example above.
React Native Paper Icons, IconButton, Button
If you need icons for your React Native app but don't want to install and set up react-native-vector-icons, you can use React Native Paper icons. However, keep in mind that you can only use MaterialCommunityIcons. You can use the React Native Paper Icon component to create an icon. Let's see some examples of React Native Paper Icon:
<Icon source="heart" color="red" size={24} />
<Icon source="airplane" color="blue" size={24} />
<Icon source="barcode-scan" color="black" size={24} />
<Icon source="wifi" color="black" size={24} />
<Icon source="folder-search-outline" color="black" size={24} />
<Icon source="power" color="blue" size={24} />
<Icon source="bookmark-outline" color="bookmark-outline" size={24} />
<Icon source="calendar-search" color="green" size={24} />

Don't forget to import the Icon component. You can find the heart, airplane, barcode-scan, wifi, folder-search-outline, power, bookmark-outline, calendar-search icons of react-native-paper above.
If you need a button with an icon, you can use the IconButton component. You need to import IconButton and create an IconButton component.
<IconButton icon="camera" iconColor="black" size={20} onPress={() => console.log('Take a photo')} mode="outlined" />
<IconButton icon="alert" iconColor="red" size={20} onPress={() => console.log('Attention')} mode="contained" />
<IconButton icon="battery-charging" iconColor="grey" containerColor="lightgreen" size={20} onPress={() => console.log('Charging')} mode="contained-tonal" />
<IconButton icon="microphone" iconColor="white" containerColor="blue" size={20} onPress={() => console.log('Microphone enabled')} mode="contained-tonal" />
<IconButton icon="send" iconColor="white" containerColor="green" size={20} onPress={() => console.log('Send')} mode="contained-tonal" />
<IconButton icon="plus" iconColor="green" containerColor="lightgrey" size={20} onPress={() => console.log('Add')} mode="contained-tonal" />

You can find the camera, alert, battery-charging, microphone, send, plus IconButton components above. You can use mode prop to style your IconButton. There are three options: outlined, contained, and contained-tonal. You can see all three options above.
You can also use the Button component:
<Button icon="calendar-search" style={{margin: 5}} buttonColor='white' mode="contained-tonal" textColor='black' > Choose a date </Button>

Keep in mind that you can import the Button component only once. For example, if you import the Button component from React Native Paper, you can't import it from React Native (or React Native Elements). Otherwise, you will have an error. It isn't only for the Button component but for all the components with the same name.
If you want to use icons other than MaterialCommunityIcons you need to import them.
You can use React Native Paper with Expo as well.
React Native Elements
React Native Elements is a popular UI toolkit for React Native that provides a collection of ready-made, customizable components to help you build modern and consistent mobile user interfaces more efficiently. It includes commonly used UI elements such as buttons, avatars, search bars, ratings, and cards, making it easier to design and develop applications without building everything from scratch. You can explore the full guide and examples in our React Native Elements tutorial.
React Native Navigation
React Navigation is a popular routing and navigation solution for React Native applications, providing a flexible way to move between screens and manage navigation state. It supports common patterns like stack, tab, and drawer navigation, making it suitable for a wide range of app architectures. React Navigation focuses on a JavaScript-driven approach that integrates closely with the React ecosystem, allowing developers to build predictable and customizable navigation flows across platforms. For a detailed walkthrough of setup, configuration, and common navigation patterns, see our full React Navigation guide.
How to run a React Native app on a device
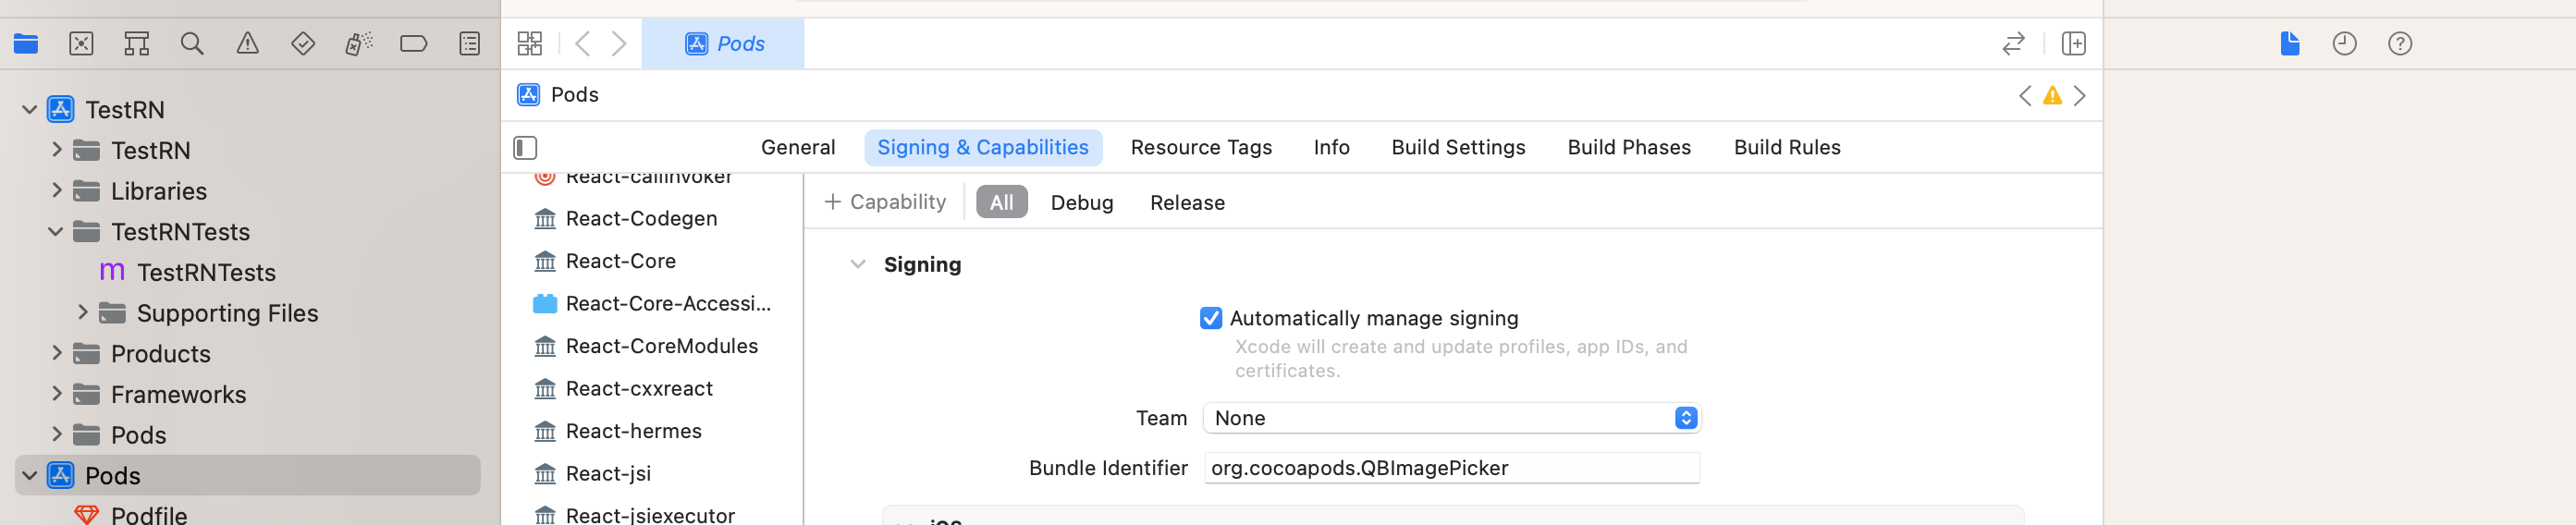
You can test your app on your iOS device by connecting it to your computer. Navigate to the ios folder and open the .xcworkspace file (you can right-click the folder and select "Reveal in Finder", then open the .xcworkspace file). If you don't have one yet, register for an Apple Developer account by following the instructions provided. Once Xcode is open, go to the Signing & Capabilities tab. Select a development team, and Xcode will handle the signing automatically.
Select the device you want to run the app:
Product > destination > iOS device > the device you want
You can run the app either from Xcode or from the terminal. Just make sure to plug your phone into your computer.
How to solve possible Xcode errors
• If you have run apps before, you might see the message: "Please delete apps signed with your free account from this device to remain under the limit." If you don't want to delete other apps, just remove them from the device (your phone) where you want to run the app.
• If you use third-party bundles, libraries, or packages, you may also be asked to sign them.
React Native with TypeScript
Installation and Setup
New projects created with React Native CLI use TypeScript by default. If you need to add TypeScript to an existing React Native project, refer to the official website. If you'd prefer to use JavaScript instead of TypeScript, simply the TypeScript files.
If you want to learn TypeScript from scratch, please visit TypeScript page.
React Native app with core components - TypeScript
You can refer to the React Native examples above written in JavaScript. Consider using TypeScript with your React Native app for better performance. Now let's take a look at the TypeScript version of the examples above.
You can refer to the React Native app example with core components (using JavaScript) above. Now, let's create the same React Native app with core components using TypeScript. Since you need to specify the types of variables, you'll need to update the useState and functions as follows:
The item variable is assigned the type string, and the items variable is assigned to type string array.
You'll also need to update the FlatList component:

You can leave the rest of the code unchanged.
react-native-vector-icons with TypeScript
For the react-native-vector-icons example, you can use the same code. However, you need to install a different react-native-vector-icons package for TypeScript:
npm i @types/react-native-vector-icons
React Native Navigation with TypeScript
You can use the same code for the React Native Navigation example, but make sure to install the TypeScript package for react-native-vector-icons as mentioned above and add necessary key-value pairs into Info.plist file.
react-native-image-crop-picker with TypeScript
react-native-image-crop-picker is slightly more complicated than the examples above. You can use the same libraries and add the same key-value pairs, but you'll also need to consider the methods from the react-native-image-picker library and include the appropriate type annotations. You need to update the useState hooks and FlatList component:
import { StyleSheet, Modal, Alert, Text, View, SectionList, Button, TextInput, FlatList, Image, TouchableOpacity, Linking, ScrollView, TouchableHighlight, Platform, KeyboardAvoidingView } from 'react-native';
import React, {useState,  useContext, createContext,  useEffect,  useRef} from 'react'
import ImagePicker from 'react-native-image-crop-picker';
function App(){

const [image, setImage] = useState<object>({});
const [images, setImages] = useState<object[]>([]);
const [pickerResult, setPickerResult] = useState<any>()
//const [pickersResult, setPickersResult] = useState<any[]>([])
const [one, setOne] = useState(false)
const [two, setTwo] =useState(false)

  const openLibrary = () => {ImagePicker.openPicker({
    width: 300,
    height: 400,
    cropping: true
  }).then(image => {
    console.log(image);
    setPickerResult(image)
    setOne(true)
    setTwo(false)

  });
  ImagePicker.clean().then(() => {
   console.log('removed all tmp images from tmp directory');
  }).catch(e => {
  console.log(e);
  });
   setPickerResult("")
   setOne(one!)
}

const openMultiple = () => {

  ImagePicker.openPicker({
    multiple: true,
 //   compressImageQuality: 0.8,
    compressImageMaxHeight: 400,
    compressImageMaxWidth: 300,
    maxFiles: 3,
    minFiles: 1
  }).then(images => {
    console.log(images);
    setPickerResult(images)
    setTwo(true)
    setOne(false)
  })
  .catch((Error)=> console.log("Error: ", Error))

  ImagePicker.clean().then(() => {
  console.log('removed all tmp images from tmp directory');
}).catch(e => {
  console.log(e);
});
  setPickerResult("")
  setTwo(two!)
  }

  const openCamera = () => {ImagePicker.openCamera({
    width: 300,
    height: 400,
    cropping: true,
  }).then(image => {
    console.log(image);
  setPickerResult(image)
  });
  setPickerResult("")
  ImagePicker.clean().then(() => {
  console.log('removed all tmp images from tmp directory');
}).catch(e => {
  console.log(e);
});
}

  return(<View style={{marginTop: 70, marginHorizontal: 30}}><TouchableOpacity  onPress={openLibrary}><Text style={{color: "white", textAlign: "center", backgroundColor:  "#D2B3E8", padding: 10, margin: 10}}>Open Photo Library</Text></TouchableOpacity>
  <TouchableOpacity  onPress={openMultiple}><Text style={{color: "white", textAlign: "center", backgroundColor:  "#D2B3E8", padding: 10, margin: 10}}>Choose multiple photos</Text></TouchableOpacity>
  <TouchableOpacity  onPress={openCamera}><Text style={{color: "white", textAlign: "center", backgroundColor:  "#D2B3E8", padding: 10, margin: 10}}>Open Camera</Text></TouchableOpacity>
  {pickerResult && one && <View><Image source={{ uri: pickerResult["path"] }} style={{ width: 40, height: 40, alignSelf: "center" }} /><TouchableOpacity onPress={()=> setPickerResult(image)}><Text style={{textAlign: "center", borderWidth: 1, borderColor: "#e5b73b", padding: 1, color: "#e5b73b", marginHorizontal: 80, marginVertical: 8}}>Cancel</Text></TouchableOpacity></View>}
  {pickerResult && two && <View><FlatList horizontal={true} data={pickerResult} style={{ marginHorizontal: 70 }} keyExtractor={(item, index) => index.toString()} renderItem={({index, item}) =><View key={pickerResult[index]} ><Image  source={{uri: pickerResult[index]["path"] }} style={{ width: 40, height: 40, alignSelf: "center", margin: 5, padding: 5 }} /></View> } /><TouchableOpacity onPress={()=> setPickerResult(images)}><Text style={{textAlign: "center", borderWidth: 1, borderColor: "#e5b73b", padding: 1, color: "#e5b73b", marginHorizontal: 80, marginVertical: 8}}>Cancel</Text></TouchableOpacity></View>}
  </View>
)}
export default App;
image variable represents the image chosen by the method openLibrary or openCamera, and it is assigned to type object. images variable represents the images chosen by the method openMultiple, and it is assigned to type object (array). However, the type for the pickerResult is any because FlatList requires different properties (like "path" and "index") of images to display image(s), and the properties have different types. If you assign them to an object or an object array, you will receive an error. react-native-image-crop-picker library displays cancel button text with the picked image(s). If the user gives up and wants to choose another image, the images chosen by the user and the cancel button should be removed. Therefore, you need to use the clean() method and reset the state.
Please note that openCamera method does not work in the iOS simulator.
How to add iOS App Icon to React Native
The app icon is the image that represents your app on the user's Home Screen and in the App Store. iOS requires app icons in specific sizes so they look sharp on all devices. Setting it up correctly ensures your app looks professional and consistent across iPhones and iPads.
Learn how to add and configure an app icon in iOS.
How to add Launch Screen for iOS React Native app
The launch screen is the static screen iOS shows while your app is starting. It gives users a quick visual cue that your app is loading and helps make the transition into the app feel smooth. Launch screens must be simple and static, and they are configured using native iOS tools.
For a step-by-step explanation, explore the article on how to add an iOS launch screen.
Data fetching in React Native: Axios and fetch
How to Fetch Data in React Native Apps Using the Fetch API
Your React Native app will often need to communicate with external APIs. There are several approaches for making API requests, and we'll start with the most common one: using the fetch() method. For a concise comparison of Axios and fetch, you can read the section below. Although fetch() is simple and easy to use, it requires you to manually process the response and handle errors. In the example below, we'll use the Open Library API to demonstrate how it works.
React Native API Example: Fetching Data Step-by-Step
import React, { useEffect, useState } from 'react';
import { View, Text, ActivityIndicator, StyleSheet, FlatList } from 'react-native';

export default function App() {
  const [data, setData] = useState([]);
  const [loading, setLoading] = useState(true);
  const [error, setError] = useState(null);

  useEffect(() => {
    fetchData();
  }, []);

  const fetchData = async () => {
    try {
      const response = await fetch('https://openlibrary.org/search/authors.json?q=j%20k%20rowling')
      const res = await response.json()
      console.log(res)

      if (res){
      setData(res.docs[0]["top_subjects"]);

      console.log(res.docs[0]["top_subjects"])}
      console.log("data: ", data)
    } catch (err) {
      setError(err.message || 'Something went wrong');
    } finally {
      setLoading(false);
    }
  };

  if (loading) return <ActivityIndicator  size="large" />;

  if (error) return <Text style={{margin: 50}}>Error: {error}</Text>;

  return (
    <View margin={{marginTop: 250, marginHorizontal: 50}}>{(data?.length) > 0 ? (<FlatList data={data} keyExtractor={(item) => item.toString()} renderItem={({item}) => <View style={{margin: 50}}><Text>{item}</Text></View>} /> ): (<Text style={{marginTop: 150, marginHorizontal: 50}}>No subjects available</Text>) }</View>) }
This example is designed to help you understand the basics of working with APIs. You can write your code and try the API endpoint shown above, and because it doesn't require authentication, it's perfect for beginners. Remember to use the json() method to parse the response, and always review the structure of the API response to know which fields you need. In our example, we fetch the first doc (docs[1]) inside docs and access the "top_subjects" field. The fetchData function shows the general syntax for making a request with fetch(). The response is ["Wizards", "Juvenile fiction", "Harry Potter (Fictitious character)"].
The Open Library API is one of the best free resources for learning and testing APIs. If you're practicing API integration, you can also explore many other free public APIs—some that require authentication and others that don't.
Some APIs use authentication keys or query parameters. When that happens, you must embed the authentication token directly into the API endpoint. In the next example, we'll use the Weather API to demonstrate how to add authentication to your requests. You can modify the previous example to add authentication.
const response = await fetch('http://api.weatherapi.com/v1/forecast.json?key=YOUR_API_KEY&q=Tokyo&days=1&aqi=no&alerts=no')
The following example demonstrates how to fetch data using authentication and dynamic query parameters.
Fetching Data with Authentication and Dynamic Query Parameters
import React, { useEffect, useState } from 'react';
import { View, Text, ActivityIndicator, StyleSheet, FlatList, TextInput,Button } from 'react-native';

export default function App() {
  const [data, setData] = useState([]);
  const [loading, setLoading] = useState(true);
  const [error, setError] = useState(null);
  const [city, setCity] = useState("")
  const [cond, setCond] = useState("")
  const [result, setResult] = useState(false)

  const fetchData = async () => {
    try {
      //Replace YOUR_API_KEY
      const response = await fetch('https://api.weatherapi.com/v1/forecast.json?key=YOUR_API_KEY&q={city}&days=1&aqi=no&alerts=no')

      const res = await response.json()
      console.log(res)
      setResult(true)

      if (res){
        setData(res.current);
        setCond(res.current.condition)
    }
    } catch (err) {
        setResult(true)
        setError(err.message || 'Something went wrong');
        console.log(error)
    } finally {
        setLoading(false);
    }
  };

  if (error) return <Text style={styles.error}>Error: {error}</Text>;

  return (
    <View style={{marginHorizontal: 20, marginTop: 120}}>
    {(result == false) ? (<View><TextInput style={styles.input} placeholder="Enter city" value={city} onChangeText={setCity} />
    <Button title="Get Forecast" onPress={fetchData} /></View>) : (((data && city != "") ? <View><Text>{city} {data.temp_c} {cond.text}</Text></View> : (<Text>No information available</Text>)))}</View>
)}

const styles = StyleSheet.create({
  container: { padding: 20, marginTop: 40 },
  loader: { flex: 1, justifyContent: 'center', alignItems: 'center' },
  title: { fontSize: 22, fontWeight: 'bold', marginBottom: 10 },
  error: { color: 'red', padding: 20, marginTop: 120 }
});
To access weather data from WeatherAPI.com, you need to sign up and obtain your API key from your account dashboard. When making requests with JavaScript's fetch() method, include your API key in the API URL to avoid errors. The forecast.json method provides forecast data, and parameters such as aqi (air quality) and alerts can be included in the request. Check the official WeatherAPI documentation for other available methods.
In this example, we use Tokyo as the city query. You can also make the city dynamic by allowing users to specify their preferred location using query parameters. This approach works for building interactive weather apps in React Native or Expo.
const response = await fetch(`http://api.weatherapi.com/v1/forecast.json?key=Your_API_KEY&q=${city}&days=1&aqi=no&alerts=no`)
The "city" value should be specified for the q parameter in the forecast.json method. You can use useState to manage the city variable.
Keep in mind that this API uses API keys for authentication. Other APIs may use different authentication methods.
The codes for fetching data using fetch are the same in both React Native and Expo.
Axios in React Native Apps: How to Fetch Data
You can also use the Axios library in your React Native app. Axios is used to make HTTP requests. First, install the Axios library:
npm install axios
How to Set Up Axios in React Native for API Requests on iOS
You need to set up the Axios library in React Native for iOS devices. Open your Info.plist file and add the following lines.
<key>NSAppTransportSecurity
<dict>
<key>NSAllowsArbitraryLoads
<false/>
<key>NSAllowsLocalNetworking
<true/>
</dict>
React Native will use these settings to update the app's Info.plist with the required permissions. The code for fetching data using Axios is the same in both React Native and Expo; however, the setup process differs between the two.
Using Axios in React Native: API Request Examples
To retrieve data, we will use the axios.get method. Let's recreate the first Open Library example using Axios:

How to Use Params with Axios API in React Native
You can also add query parameters to your Axios requests. params are the URL parameters sent with the request. They can be either a plain object or a URLSearchParams object. For more detailed information, see the Axios API documentation. Let's recreate the Weather API example above, this time using Axios:
Axios Example in React Native: Using URL Params in API Requests
import React, { useEffect, useState } from 'react';
import { View, Text, ActivityIndicator, StyleSheet, FlatList, TextInput,Button } from 'react-native';
import axios from 'axios';

export default function App() {
  const [data, setData] = useState([]);
  const [loading, setLoading] = useState(true);
  const [error, setError] = useState(null);
  const [city, setCity] = useState("")
  const [cond, setCond] = useState("")
  const [result, setResult] = useState(false)


// Axios example in React Native
const fetchData = async () => {
  try {
    const response = await axios.get("https://api.weatherapi.com/v1/forecast.json", {
      params: {
        key: "YOUR_API_KEY",
        q: city,
        aqi: 'no',
        alerts: 'no'
      },
    });

    console.log('Axios data:', response.data.current);
    console.log('Axios data:', response.data.current.condition.text);
    setData(response.data.current)
    setCond(response.data.current.condition)
    setResult(true)

  } catch (error) {
    if (error.response) {
      // Server responded with status code outside 2xx
      console.log("err res: ", error.response.data.error.message)
      console.error('Axios response error:', error.response.status, error.response.data);
      setError(error.response.data.error.message)
    } else if (error.request) {
      // Request was made but no response received
      console.error('Axios no response:', error.request);
    } else {
      // Something else went wrong
      console.error('Axios error:', error.message);
    }
  }
};


  if (error) return <Text style={styles.error}>Error: {error}</Text>;

  return (
    <View style={{marginTop: 120, marginHorizontal: 50}}>
    {(result == false) ? (<View><TextInput style={styles.input} placeholder="Enter city" value={city} onChangeText={setCity} />
    <Button title="Get Forecast" onPress={fetchData} /></View>) : (((data && city != "") ? <View><Text>{city} {data.temp_c} {cond.text}</Text></View> : (<Text>{error}</Text>)))}</View>
)}

const styles = StyleSheet.create({
  container: { padding: 20, marginTop: 40 },
  loader: { flex: 1, justifyContent: 'center', alignItems: 'center' },
  title: { fontSize: 22, fontWeight: 'bold', marginBottom: 10 },
  error: { color: 'red', padding: 20 }
});
In the example above, we added the "API key" and "city" query as Axios parameters, allowing users to select the city. The forecast.json method returns the current temperature for the selected city. There are also other options—check the available methods in the documentation to retrieve different types of information and include them in params as shown in the example above.
Here is an example of the response you might receive: response.data.current returns {"cloud": 0, "condition": {"code": 1003, "icon": "//cdn.weatherapi.com/weather/64x64/day/116.png", "text": "Partly Cloudy"}, "dewpoint_c": 10.3, "dewpoint_f": 50.5, "diff_rad": 66.7, "dni": 142.03, "feelslike_c": 19.3, "feelslike_f": 66.7, "gti": 32.23, "gust_kph": 15.2, "gust_mph": 9.4, "heatindex_c": 17.8, "heatindex_f": 64, "humidity": 68, "is_day": 1, "last_updated": "2025-11-19 17:30", "last_updated_epoch": 1763562600, "precip_in": 0, "precip_mm": 0, "pressure_in": 30.06, "pressure_mb": 1018, "short_rad": 131.66, "temp_c": 19.3, "temp_f": 66.7, "uv": 0.2, "vis_km": 10, "vis_miles": 6, "wind_degree": 206, "wind_dir": "SSW", "wind_kph": 7.9, "wind_mph": 4.9, "windchill_c": 17.8, "windchill_f": 64}. response.data.current.condition.text returns Partly Cloudy. The data included in the response depends on the parameters you send.
Note: If you encounter an "Error: Network request failed." error (or any other error) despite having the correct code, replace http with https in the API endpoint.
Fetch vs Axios
After exploring both methods, here is a summary of the key differences to help you choose the most suitable option for your project:
• You need to call .json() manually to parse responses in fetch().
• In fetch(), you need to handle errors manually.
• You must manually construct the URL with query parameters in fetch(), while Axios supports a params object for simple parameter handling.
• Both are supported in Expo/React Native projects.
Next Steps
You've now covered the fundamentals and important React Native libraries. To explore advanced concepts, check out our separate articles covering advanced React Native libraries.