
Free MongoDB Realm with React Native Course (2026)
2.Setting up an Atlas Deployment
3.Setting up Atlas App Services
4.Install Realm
5.How to create, update, delete data with Realm
6.Define and change an object model
7.How to initialize Realm and read data
8.How to sync data
9.Configure a Synced Realm
10.Realm Flexible Sync Database with React Native Example
11.Atlas App Services Rules
12.How to use Realm as a local database
a.MongoDB Local Realm database with React Native example
13.Realm Query Language / How to query in Realm
MongoDB Realm (Atlas Device SDK) with React Native
In this course, you'll learn how to integrate Realm into your React Native applications to build fast and efficient mobile experiences. We will briefly explore the Atlas Device SDK — including installation, setup, CRUD operations, data synchronization, and rules — while acknowledging that it has been deprecated. The primary focus of this course, however, is on using Realm as a local on-device database, where you'll learn how to design schemas, perform CRUD operations, and write powerful queries using the Realm Query Language (RQL). By the end, you'll have a strong understanding of how to leverage local Realm for high-performance, offline-first React Native applications.
Realm is an object-oriented database that helps you build real-time applications. You can use Realm with React Native locally. You can also connect it with Atlas App services and sync data across devices. Please note that Realm and Atlas App Services require different configuration and deployment from other MongoDB databases and services. Setting up a MongoDB Atlas account and integrating it with a React Native app can be complex. In this guide, we'll learn how to use Realm with React Native step by step.
Setting up an Atlas Deployment step-by-step
If you don't have a MongoDB accout, you need to create a free MongoDB account and a cluster:
1. Register for an account
2. Deploy a cloud database > choose the shared cluster for free
3. Create a shared cluster > choose Cloud Provider and Location (you can choose the recommended cloud provider and location)
4. Security Quick Start > username & password > My Local Environment > write your IP address and click "add my Current Ip Address"
5. Finish & Close
Atlas App Services
Important Update
The Atlas App Services landing page has moved to the Triggers section. To view all your apps, follow the steps below:
Trigger > View All Apps
Setting up an Atlas App Service
To create an Atlas App Service:
Atlas > App Services > Name > Link Your Database > Create App Service
You can see the apps you created under the App Services category. You can see the details of an app by clicking on it, you can find the App Id of an app under the name of the app. If you want to see the current databases:
Data Services > Database > Database Deployments > Browse Collections
The organization of the data structure is similar to Firebase:
database > collection > document
When you insert new data, a new document is created inside a collection. To view your data, navigate to the Database section. There, you'll see a list of your databases. Click on a database name to reveal its collections. Then, click on a colection name to view the documents stored within.
You can also manually create, update, or delete documents directly from the interface.
*If you want to add a new document, you can click Insert Document, write the data and click insert.

*If you want to edit a document, click on the pen icon, make the change and click update.
*If you want to delete a document, click on the trash icon.
Install Realm for React Native
You need to create a React Native project.
To install Realm, navigate to the project and run the command below:
npm install realm
Run pod install command:
cd ios && pod install && cd ..
Install @realm/react:
npm install @realm/react
How to create, update, delete data with Realm
How to create data
let task1;
realm.write(()=> {
task1 = realm.create("Task", {
_id: 1,
description: "Learn MongoDB",
})})
How to read data
There are different methods to read data. objects query is one of them:
const profs = realm.objects('Task');
You can access a Realm instance using the useRealm() hook in your React Native app. Make sure to call the useRealm() hook before performing any database operations, such as creating, updating, or deleting documents.
const realm = useRealm()
How to update data
To update a document, you need to provide its primary key (primaryKey property).
realm.write(()=> {
let update = realm.objectForPrimaryKey("Task", 1)
update.description = "Learn coding"
})
How to delete data
You need to specify the primary key ("_id") to delete data:
realm.write(()=> {
let del = realm.objectForPrimaryKey("Task", 1)
realm.delete(del)
})
You can use Realm objects above locally. You can also use them with Atlas App Services, but you will need to connect your app with Atlas.
Define an object model for React Native
You need to define the data types for the fields you want to store in a Realm database:
const TaskSchema = {
name: 'Task',
primaryKey: '_id',
properties: {
_id: 'int',
description: 'string',
}
};
To define a Realm object schema, you must first specify the schema name and the primary key.
Next, define the data types for each property in the object. You are required to include an _id property, which serves as the primary key. In the example above, the _id is defined with the "int" type to represent an integer.
For other properties, such as description, the data type is defined as "string".
Important: The object model (schema) should be defined outside of the main application function for proper usage and maintainability.
How to change an object model of a local realm (React Native SDK)
If you change the object model, the version of the schema changes and you need to increment schemaVersion. You need to specify the schema version in the object model. If you didn't make any changes, you don't need to specify the version.
Some changes require migration. Please visit the migrations page of the official website. You need to update the existing objects. Changing the data model may cause data loss. Therefore, if you have another option, don't change your object model.
Before making a change, create a Configuration with a schema version:
const config = {
schema: [TaskSchema],
schemaVersion: 1,
};
Pass the configuration object with the updated 'schemaVersion' to createRealmContext():
const {RealmProvider} = createRealmContext(config);
Add a property
You can add a property to your schema and increment schemaVersion. For example, you can add the property below:
notes: 'string'
Delete a property
You can delete the property you want and increment the schema.
Change property name
You can use mapTo method to change a property's name. Let's remap the notes property to description:
notes: {type: "string",
mapTo: "description"}
Change a property type
You can change a property type but keep the name:
notes: {type: "mixed"}
The value of existing documents will be null. It's a breaking change and it's not recommended. After you change a property type, you should update existing objects.
Adding a default value
When you add a default value to your object model, it does not change the existing documents. The default value is applied to future documents.
Changing a property's status between optional and required
Changing a property's status is a breaking change and not recommended.
How to change data model of a sync realm (React Native SDK)
According to the Atlas Device SDK guide, there are two types of changes: "breaking" and "non-breaking". Please visit the official website for more information about "breaking" and "non-breaking" changes. "A breaking change is a change that you make in your server-side schema that requires additional action to handle." As it may cause data loss and inconsistency between client-side application and server-side documents, applying non-breaking changes is not recommended by Realm. "A non-breaking change is a change that you can make in your server-side schema or your object model without requiring additional handling in your app." You can find methods and examples for non-breaking changes in this section. You should turn development mode on before making a change. The changes below will be made to the client object model.
Add a property
You can directly add a property to your schema.
Remove a property
You can delete the property you want.
Change property name
You can use the mapTo method to change a property's name. Let's change the description property name with notes:
notes: {type: "string",
mapTo: "description"}
Add a default value
You can also add a default value to a property:
notes: {type: "string", default: "none"}
When you add a default value to your object model, it does not change the existing documents. The default value is applied to future documents and you need to update existing documents.
How to initialize Realm
To start working with Realm, you need to initialize Realm:
const realm = await Realm.open({
path: 'myrealm',
schema: [ProfileSchema],
})
Configure User Authentication in Client
If you want to use Synced Realm, you need user authentication. You can choose an authentication method and add a login method. You can find an example of anonymous authentication below:
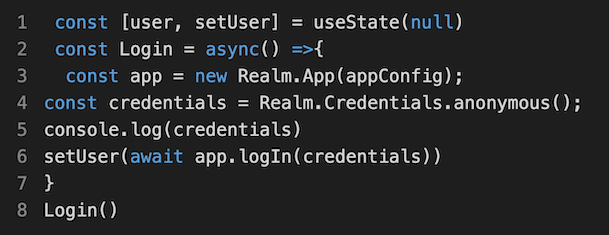
How to sync data/ Flexible Sync
Connect to an Atlas App Services App
Open your Atlas account, navigate to App Services, and choose the app you want. You need to navigate to BUILD > Device Sync:
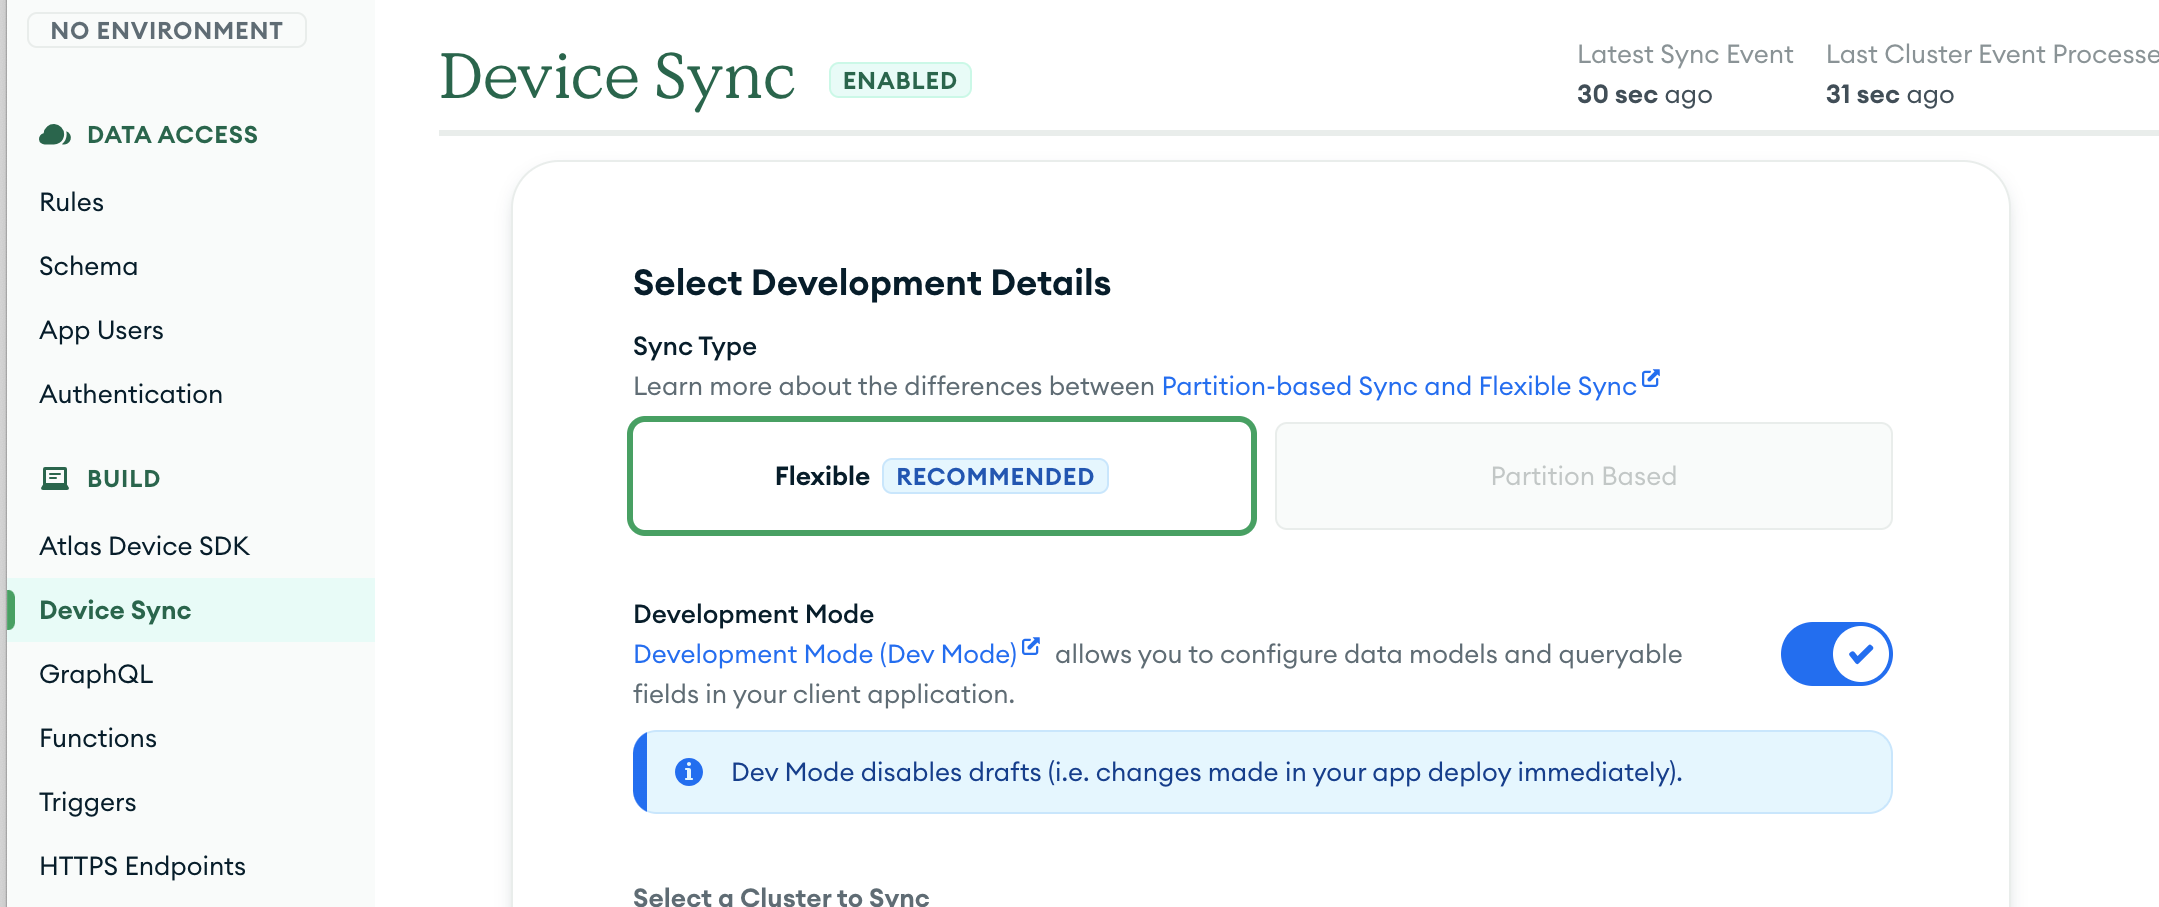
Realm recommends the Flexible Sync Type. You can turn the development mode on. Other fields are automatically selected. You can edit Queryable Fields. For example, you can add "description" field for the example above. You can click Save Changes and your flexible sync database is ready.
Important Update
MongoDB team has announced the depreciation of Device Sync in September 2024. This service will be removed on September 30, 2025.
Configure a Synced Realm
The @realm/react package is used to manage a Realm Database, Atlas App Services, and Atlas Device Sync. Please visit @realm/react website for more information. App and AppWrapper functions will be used for the example below. You can embed your app inside the App function. The AppWrapper function wraps the App component and handles data synchronization.
Create Realm Context
We need to import AppProvider and UserProvider, createRealmContext:
import {AppProvider, UserProvider, createRealmContext} from '@realm/react';
Create a Realm Context inside AppWrapper:
const {RealmProvider, useRealm, useQuery} = createRealmContext({schema: [TaskSchema]});

You need to define the App Id to integrate the React Native app with Realm.
Please check the React Native with Realm database example below.
Realm Flexible Sync Database with React Native Example
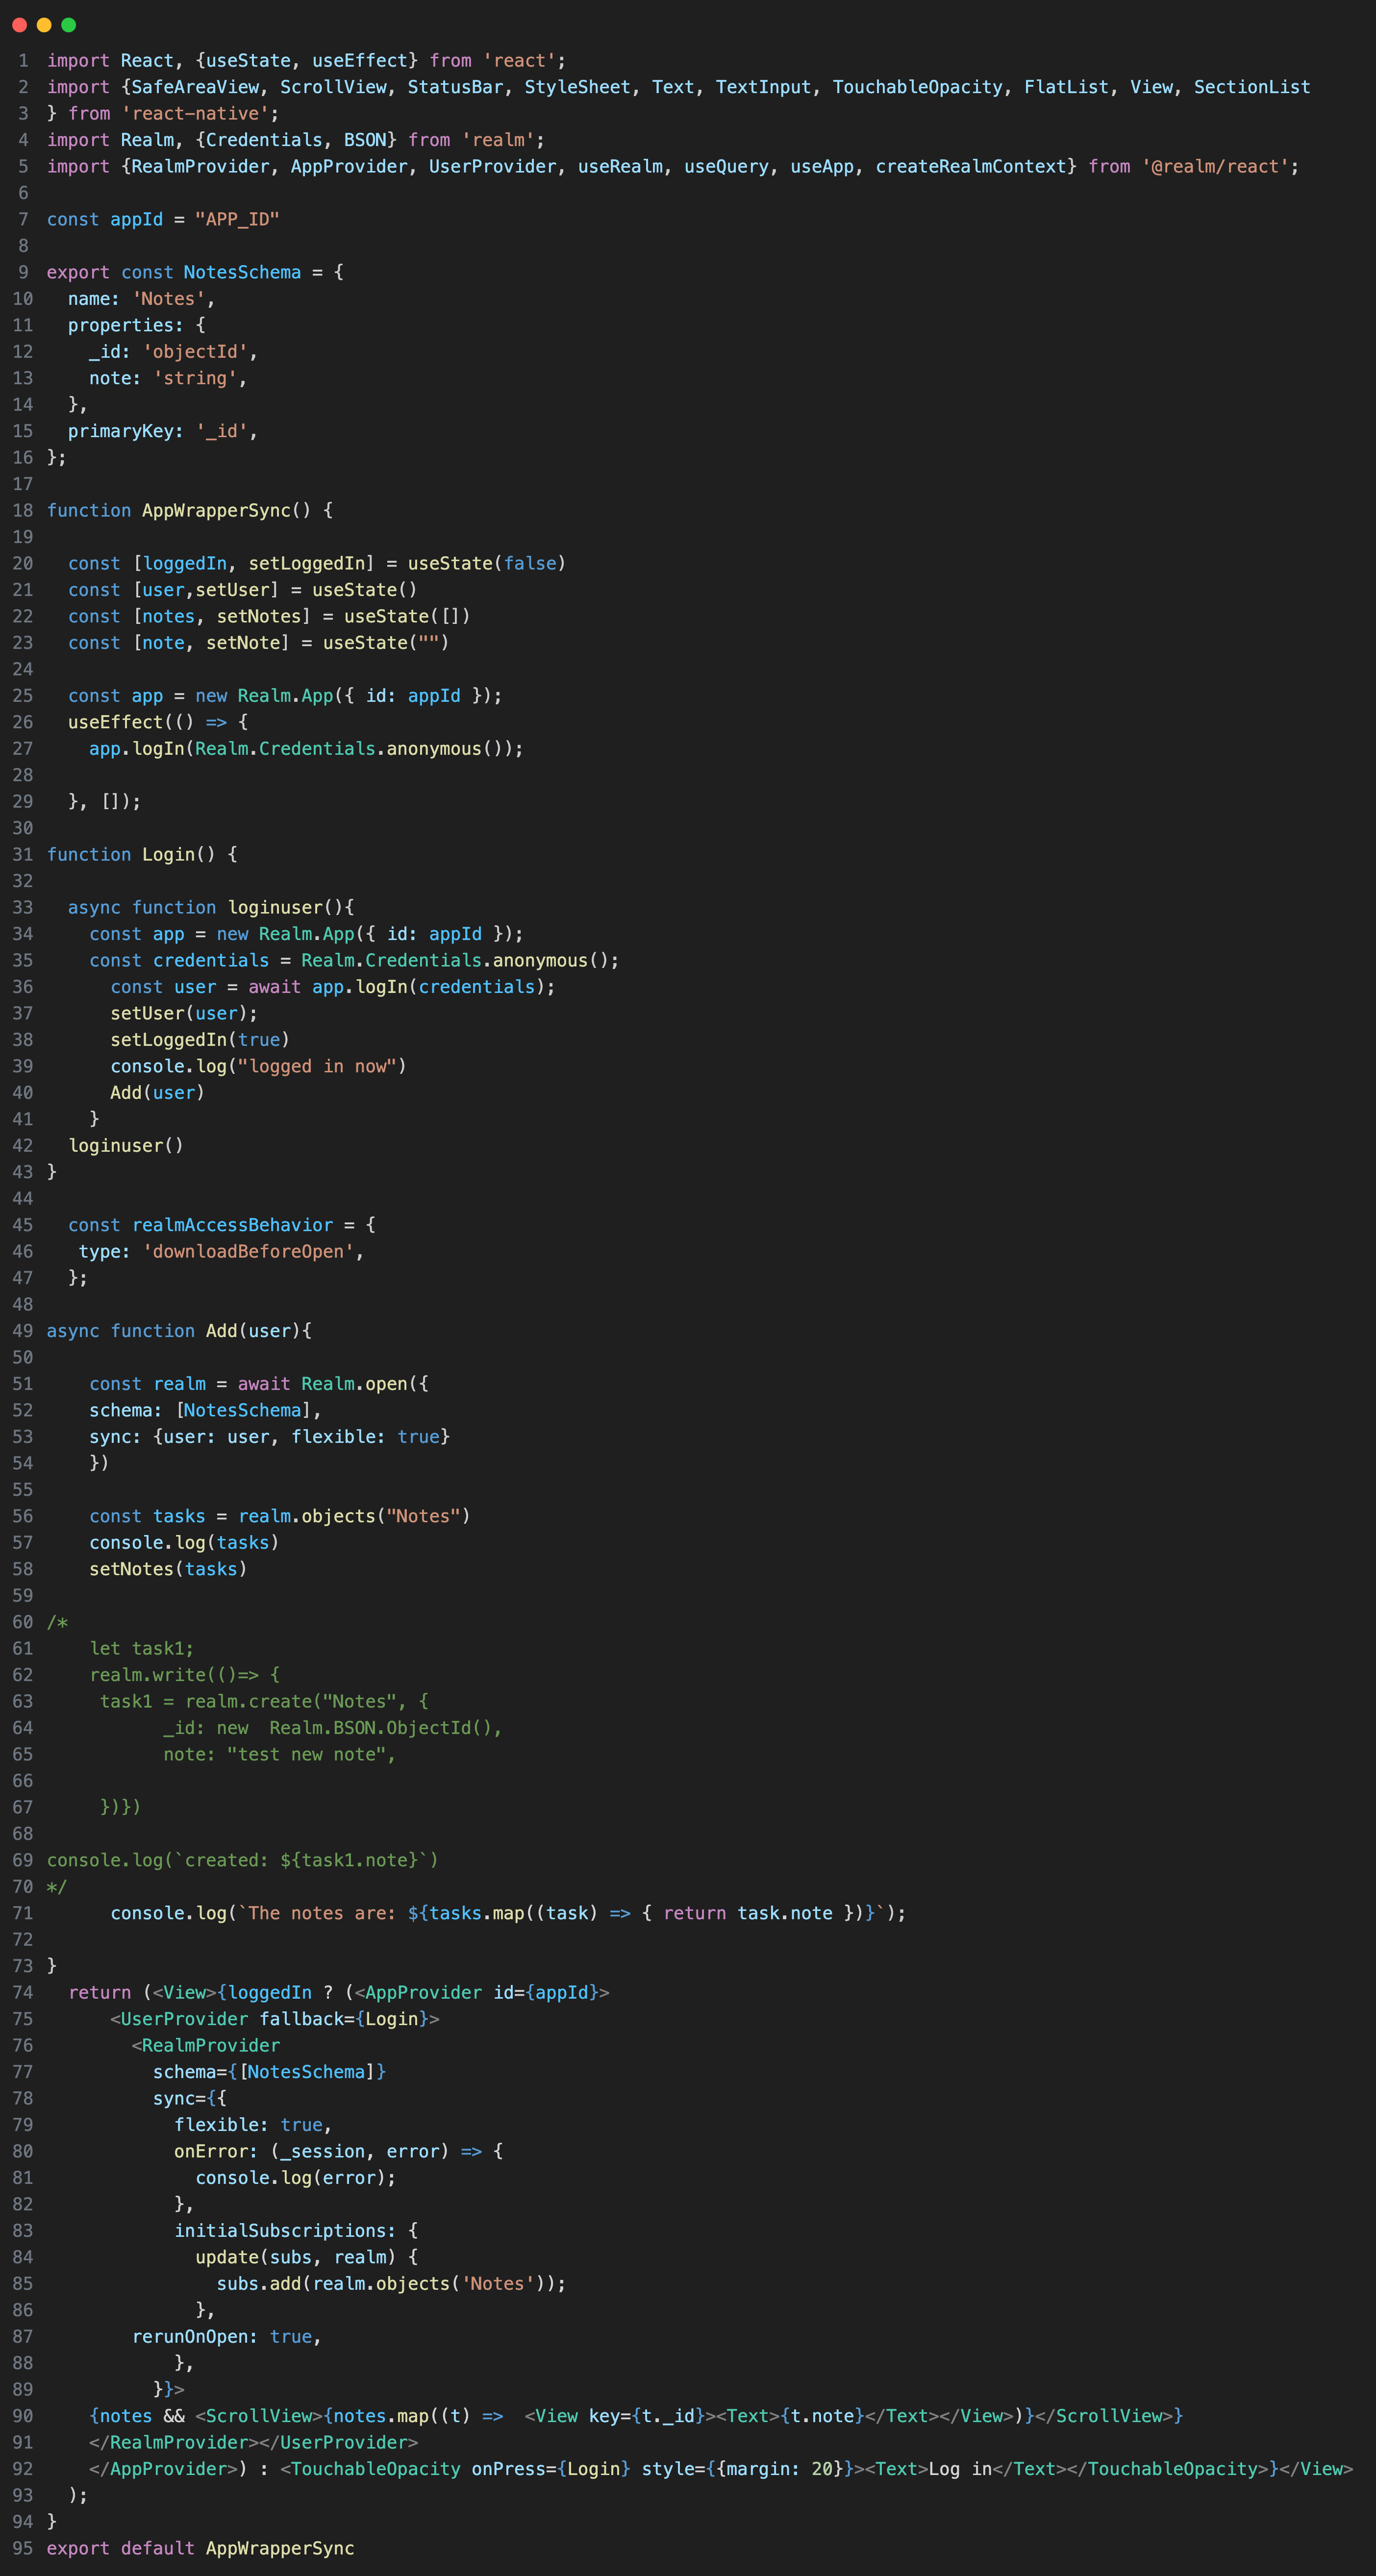
To create a Flexible Sync Realm database, you first need to authenticate a user. For simplicity, you can use anonymous authentication, but it's important to authenticate the user only once. To achieve this, use the useEffect hook with an empty dependency array ([]), which ensures the login runs only when the component mounts.
If you attempt to authenticate multiple users simultaneously, you will encounter an error.
Once the user is authenticated, you can open and configure the synchronized Realm database. During this setup, you may also specify properties like realmAccessBehavior to control how Realm manages synchronization and access.
If users are allowed to write, they can add a new note, like in the example above. Uncomment the code to try it out.
rerunOnOpen property is used in the example above. "By default, initial subscriptions are only created the first time a realm is opened. If your app needs to rerun this initial subscription every time the app starts, you can set rerunOnOpen to true." You need to use rerunOnOpen to use the database in another project and follow the database changes.
Let's review the Flexible Sync Realm database from step-by-step:
1.Set up React Native
2.Create a MongoDB account
3.Install the necessary packages
4.Import React Native components and Realm hooks (like in the example above)
5.Specify your app id and define your schema
6.Enable Flexible Sync on the backend
7.Change the rules, if you want to add a new Realm object.
Atlas App Services Rules
You can customize the access to data in your cluster. You can find popular presets that deny all access, allow all to read, and allow all to read and write.
App Services > Choose the App > Data Access (on the left side of the page) > Rules > Choose the Collection
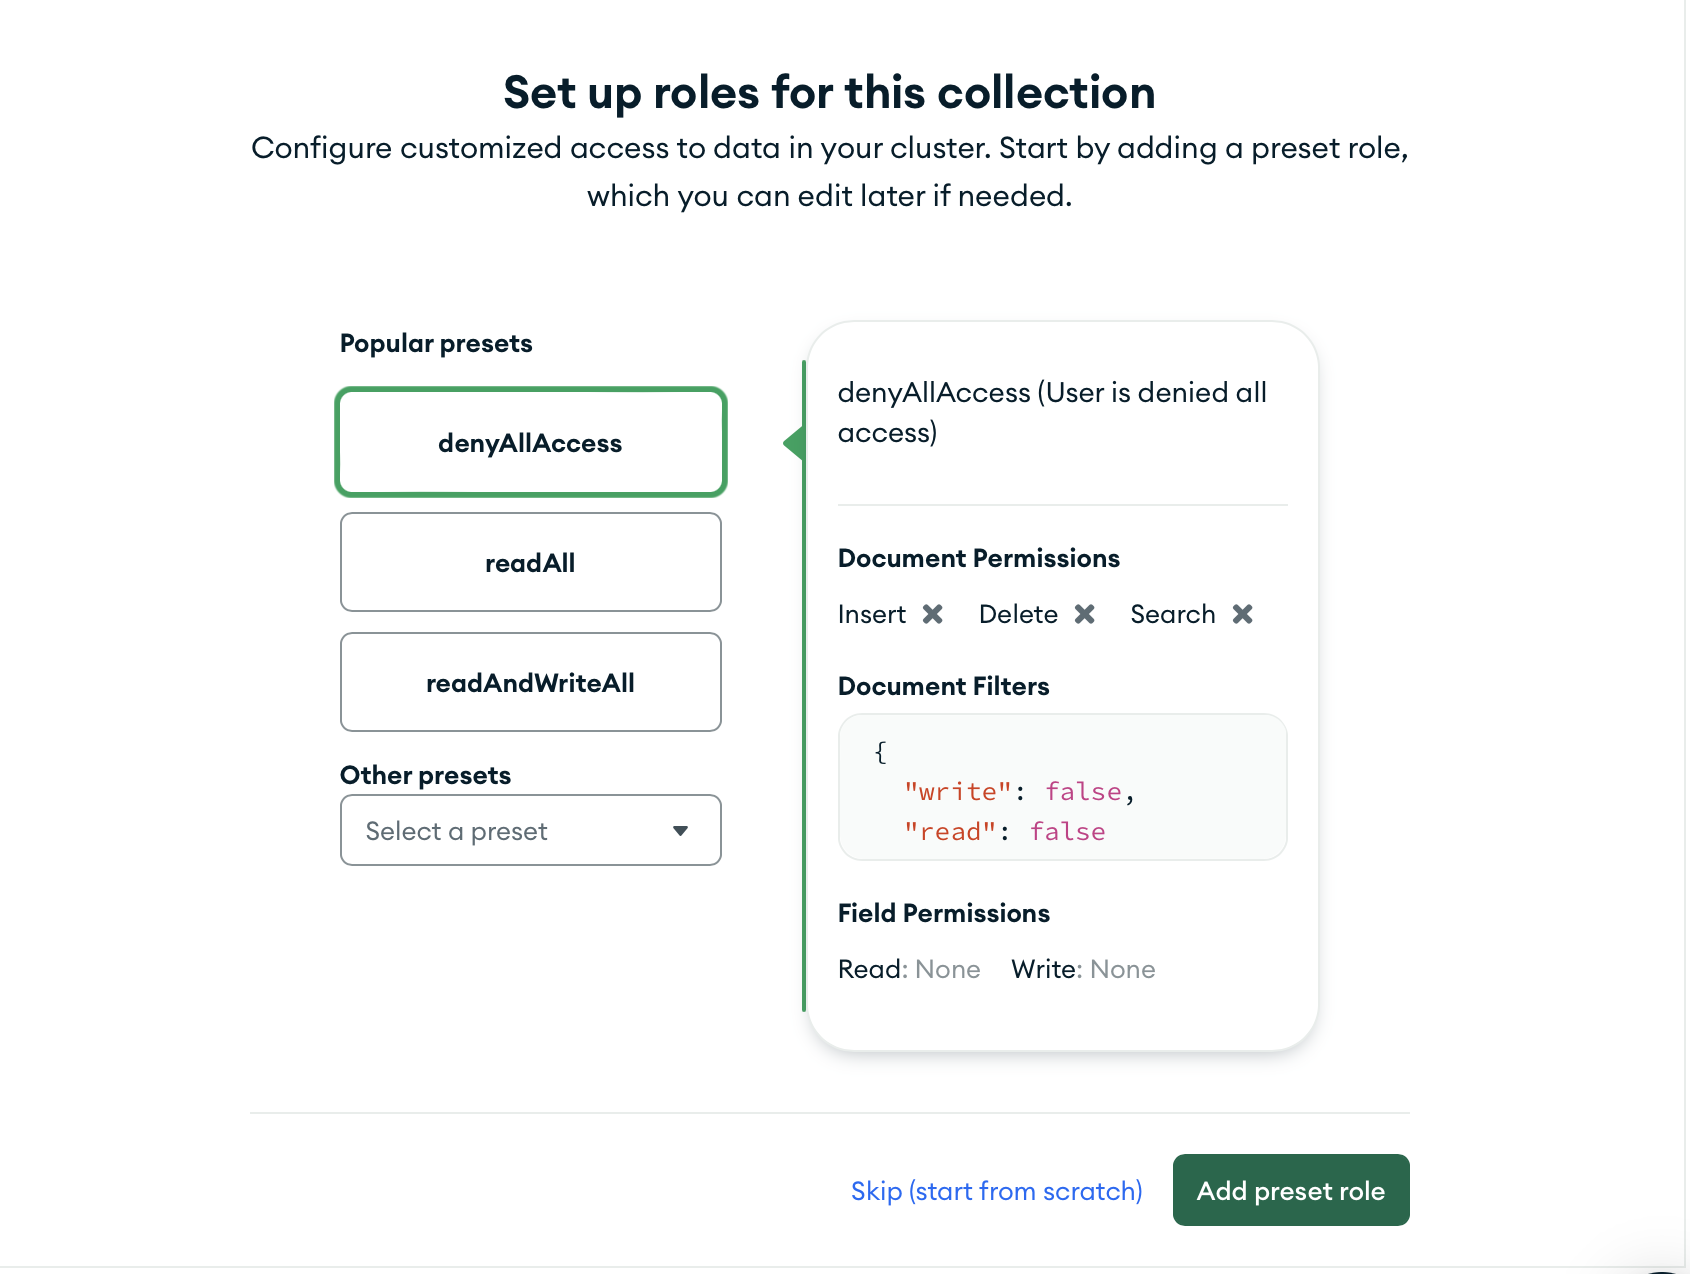
After choosing the preset, click Add preset role.
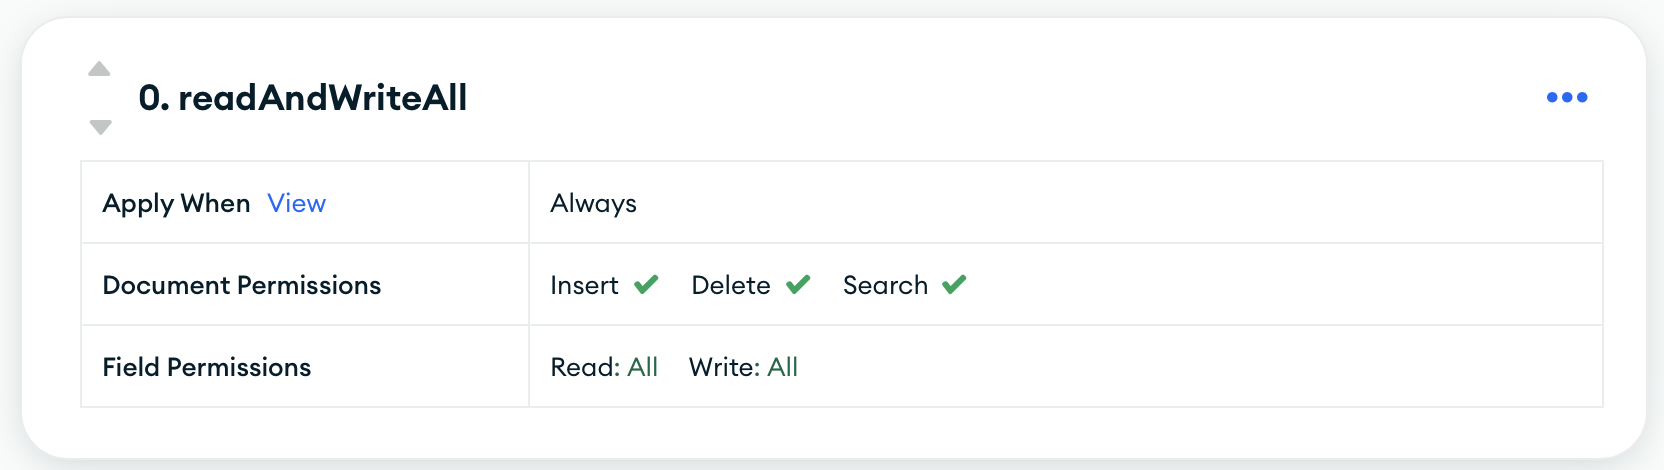
The preset above allows all to read and write.
If you forget to choose the preset, and try to add/read data from your editor, you will get an error.
If you encounter a problem related to your app's backend, the Logs section of your app can be helpful. When you choose the app from your App Services page in MongoDB, check the Logs section. You can view all activity logs and learn the details of your logs.
How to use Realm as a local database
We already learned how to define an object schema for the local Realm. We also saw how to create, read, update, and delete realm data. Let's make a react-native app with the local Realm database. As mentioned earlier, you need to define an object schema and initialize Realm. You can find the details of ProfileSchema in the example below. You can use realm.objects method to get all the data.
MongoDB Local Realm database with React Native example
import React, {useState, useEffect} from "react"
import {FlatList, StyleSheet, Text, View, SafeAreaView, ScrollView, useColorScheme} from "react-native"
import Realm from "realm"

const ProfileSchema = { name: "Profile", primaryKey: "_id",
      properties: { _id: "int",
                    name: "string",
                    surname: "string",
                    age: "int",
                    sex: "string",
                    profession: "string",
                    country: "string",
                    language: "string <>",
                    skills: "string <>" }, }

export default function App () {
  const [profiles, setProfiles] = useState([])
  useEffect(() => { (async() => { const realm = await
    Realm.open({path: "myrealm", schema: [ProfileSchema]})
    .then(realm => { const
    profiles = realm.objects("Profile") setProfiles([...profiles])
    console.log("profiles: ", profiles)
    /* realm.write(() => { prof = realm.create("Profile", { _id: 3,
                                                            name: "John",
                                                            surname: "Smith",
                                                            age: 21,
                                                            sex: "male",
                                                            profession: "athlete",
                                                            country: "United States",
                                                            langauge: ["English", "Spanish"],
                                                            skills: ["Dancing"] })
    console.log(`${prof.name} created.`) }) */

    })})() },[])
  return( <View schema={[ProfileSchema]} style={{margin: 120}}>
   <Text>Profiles </Text> {profiles && <ScrollView>{profiles.map((p) =>
   <View key={p._id}> <Text>{p.name} / {p.age} / {p.id} </Text>
   </View>)} </ScrollView>} </View>) }
Uncomment the example above to see how to add a new profile. You can use this same syntax to write any new data to your local database.
Please note that all primaryKeys should be unique. Otherwise, you will encounter an error. As we use primaryKeys for deleting and updating data, profiles with the same primaryKeys can cause data loss.
Realm Query Language
How to query in Realm
You can't use JavaScript for querying in Realm. You should construct queries with Realm Query Language.
Construct a Query
You need to use the filtered query in Realm. Let's see the syntax of Realm Query Language:
results.filtered("...")
You need to use operators to complete your query.
Operators
There are several types of operators available to filter a Realm collection: comparison, logical, string, aggregate, and set (collection) operators. We will be using the Profiles example above for the following tutorial.
Comparison Operators
Comparison operators are ==, >, >=, in, <, <=, and !=.
let answers = profiles.filtered("age > 30")
console.log("The profiles older than 30 are ", answers)
Logical Operators
Logical operators are AND (&&), OR (||), and NOT (!).
let answers = profiles.filtered(`language == 'English' && country != "Italy"`)
The query above should satisfy two conditions: the profiles should speak English and their country should not be Italy. Let's make another query:
let answers = profiles.filtered(`language == 'English' || age > 30`)
The query above should return both the profiles who can speak English and the profiles older than 30. The query with an or (||) operator returns objects that satisfy at least one condition.
String Operators
String operators are used for string values.
m_names = profiles.filtered(`name BEGINSWITH[c] 'm'`).map(n => n.name)
We have to use the map method after the query because the query returns an object. We need to use [c] for case-insensitivity.
el_names = profiles.filtered(`name CONTAINS 'el'`).map(n => n.name )
The second example above shows the names that contain "el". You can use the same syntax for == and endsWith operators as well.
Aggregate Operators
Aggregate operators are used to traverse a collection and reduce it to a single value.
let answer = profiles.filtered("language.@count > 1")
console.log("The profiles who speak more than one language: ", answer)
The query above shows the profiles who speak more than one language. Aggregate operators may not be very useful for our example because we have mostly string values. Aggregate operators may be more valuable if you have properties that consist of a list of numbers. You can use the syntax above for @avg, @max, @min, @sum operators as well.
Collection (set) Operators
A collection operator lets you query list properties within a collection of objects. You can use collection operators for a list property of the object.
let answer = profiles.filtered("NONE language == 'English'")
The query above returns the profiles who do not speak English.
let answer = profiles.filtered("ANY language == 'Chinese'")
The query returns profiles who speak Chinese. The collection operator queries the language list of profiles.