
React Navigation with Expo Router (2026): Stack, Tabs, Nested Routes, and Drawer Guide
Expo Router Navigation: Pros and Cons You Should Know
2.Stack Navigation in Expo Router
a.Stack Navigation in Expo Router Example
router.push() vs Link
Dynamic Routes with Route Parameters
3.Bottom Tabs Navigation in Expo Router
a.Bottom Tabs Navigation in Expo Router Example
4.Drawer Navigation in Expo Router
a.Drawer Navigation in Expo Router Example
router.replace()
React Navigation with Expo Router (2026)
Navigation is a fundamental part of mobile app development, as it determines how users move between different screens and features within an application. In React Native projects, handling navigation efficiently is essential for creating a smooth and intuitive user experience. Developers often rely on well-established libraries such as React Navigation to manage screen transitions, routing, and different navigation patterns like stacks, tabs, and drawers. Expo Router introduces a new, file-based approach to navigation that simplifies routing while supporting complex patterns like stack, drawer, and bottom tab navigation. Unlike traditional libraries where you manually declare every navigator, Expo Router automatically maps your folder structure to routes, making deep linking, nested navigation, and cross-platform consistency much easier. In this article, we'll explore how to implement stack, drawer, and bottom tab navigation using Expo Router and highlight how it compares to the patterns you might already know from React Navigation.
Expo Router is built on top of React Navigation and uses it internally as the navigation engine. Rather than replacing React Navigation, Expo Router provides a higher-level routing layer that simplifies how navigation is configured in React Native applications. With React Navigation alone, developers typically need to manually define navigators, screens, and configuration using code, which can become complex as an application grows. Expo Router removes much of this boilerplate by introducing a file-based routing system where the structure of the app directory automatically defines the available routes in the application. Under the hood, Expo Router converts this file structure into the appropriate React Navigation configuration, meaning that features such as stack navigation, tab navigation, drawer navigation, screen transitions, and gesture handling are still powered by React Navigation. In practice, Expo Router focuses on improving the developer experience by simplifying routing and project structure, while React Navigation continues to handle the core navigation logic that drives the app.
If you haven't set up your project yet, make sure to follow the setup and installation guide before continuing. This article was written using **Expo SDK 54.0.33 and **Expo Router v6.0.23.
In recent versions of Expo, Expo Router is included by default in new Expo projects, so in most cases no additional installation is required. However, if you are working with an existing project where Expo Router is not yet installed, you can easily add it by installing the required packages. The following command will install Expo Router along with the necessary dependencies used for navigation.
npx expo install expo-router react-native-safe-area-context react-native-screens expo-linking expo-constants expo-status-bar
Expo Router Navigation: Pros and Cons You Should Know
Expo Router navigation is a powerful tool for building routes in Expo apps, offering several advantages. Its file-based routing system makes it easy to create pages and nested routes without writing a lot of boilerplate code, and it supports dynamic routes seamlessly using folder and file names. Integration with Expo is smooth, and features like automatic linking and deep linking reduce manual route management. This approach helps developers build scalable navigation structures more quickly, while keeping the code organized and consistent.
After trying Expo Router for a while, the main advantages are:
A file-based navigation system that simplifies route management
Built-in support for dynamic routes
Seamless integration with the Expo ecosystem
Convention over configuration, letting folder structure define routes automatically
Easy linking and deep linking for app URLs
However, Expo Router navigation also has some challenges. Developers familiar with React Navigation may find the file-based system unfamiliar at first, and advanced customization—such as conditional routes or complex nested navigators—can be more difficult. In larger projects, the folder structure can become deep and confusing, and renaming or restructuring routes may require moving multiple files. Additionally, the documentation and community examples are still smaller than React Navigation's ecosystem. Personally, I also found it a bit challenging at first; while Expo Router simplifies many tasks, customizing navigation or managing larger projects can feel harder, and the file-based approach may take some getting used to.
A few drawbacks I noticed are:
Less direct control over navigation compared to using React Navigation manually
Debugging nested routes can be tricky if folder structure is complex
Steeper learning curve for developers used to traditional navigation
Potential conflicts with React Navigation
Customization can be more complex
Stack Navigation in Expo Router
Stack navigation is one of the most fundamental navigation patterns in mobile apps, and it is fully supported in Expo Router. It allows screens to be pushed onto a stack and popped off, creating a natural “forward and back” flow similar to a web browser. In Expo Router, setting up a stack is simple — you define your screens as files inside the app directory, and the router automatically generates the stack navigator behind the scenes. This makes it easy to manage multiple screens while keeping the code clean and organized.
Stack Navigation in Expo Router Example
Before we dive into stack navigation, let's examine the folder structure of our example:
  app/
  ├─ _layout.js → Root Stack
  ├─ index.js. → /home (index.js)
  ├─ details.js → /(details.js)
  ├─ info.js → /(info.js)
  ├─ members.js →  member folder
    ├─ [abc].js → Dynamic page that receives an abc parameter from the route.
_layout.js
import { Stack } from "expo-router";

export default function Layout() {
  return (
    <Stack
      screenOptions={{
        headerStyle: { backgroundColor: "#AFE1AF" },
        headerTintColor: "#fff",
      }}
    >
      <Stack.Screen
        name="index"
        options={{ title: "Home", headerBackVisible: false }}
      />
      <Stack.Screen name="details" options={{ title: "Details" }} />
      <Stack.Screen name="info" options={{ title: "Members" }} />
    </Stack>
  );
}
In Expo Router, the Link component provides a declarative way to navigate between screens, similar to an HTML tag. Instead of calling router.push() programmatically, you wrap a clickable element with Link and specify the href prop to indicate the target route. This makes navigation more readable and easier to maintain, especially for static links in your UI. For example, Go to Details automatically handles the navigation and preserves the navigation stack.
index.js
import { Link } from "expo-router";
import { StyleSheet, Text, View } from "react-native";

export default function HomeScreen() {
  return (
    <>
      <View style={styles.container}>

        <Text style={{ color: "#097969", fontSize: 24, marginBottom: 180 }}>
          Home
        </Text>

        <Link href="./details" style={styles.link}>
          Details
        </Link>

        <Link href="./info" style={styles.link}>
          Info
        </Link>

      </View>
    </>
  );
}

const styles = StyleSheet.create({
  container: { flex: 1, alignItems: "center", justifyContent: "center" },
  title: { fontSize: 24, fontWeight: "bold" },
  link: { marginTop: 15, color: "green", fontSize: 18 },
});
In Expo Router, router.push() is used to programmatically navigate to a new route. When you call router.push('/path'), the router pushes a new screen onto the navigation stack, allowing the user to move forward without replacing the current screen. This is especially useful for dynamic routes or when navigation depends on user interactions, such as clicking a button to view details. Unlike router.replace(), which replaces the current screen, router.push() preserves the history, so users can navigate back using the back gesture or button. For dynamic pages, you can include route parameters directly in the path; for example, router.push(/members/${abc}) navigates to a member-specific page based on the abc value, allowing the same screen component to display different content depending on the parameter (see the example below).
router.push() vs Link
In Expo Router, both router.push() and the Link component are used to navigate between screens, but they serve slightly different purposes. router.push() is a programmatic approach, allowing you to navigate in response to events like button presses, API calls, or conditional logic. It's ideal when navigation depends on user interaction or dynamic data, such as pushing a product page with a specific productId. On the other hand, Link is a declarative component that wraps UI elements and automatically handles navigation when the user interacts with it. It is best suited for static links in your interface, such as menus or inline text links. While router.push() requires writing a function and calling it, Link allows you to specify the destination directly via the href prop, keeping your code more readable for straightforward navigation paths.
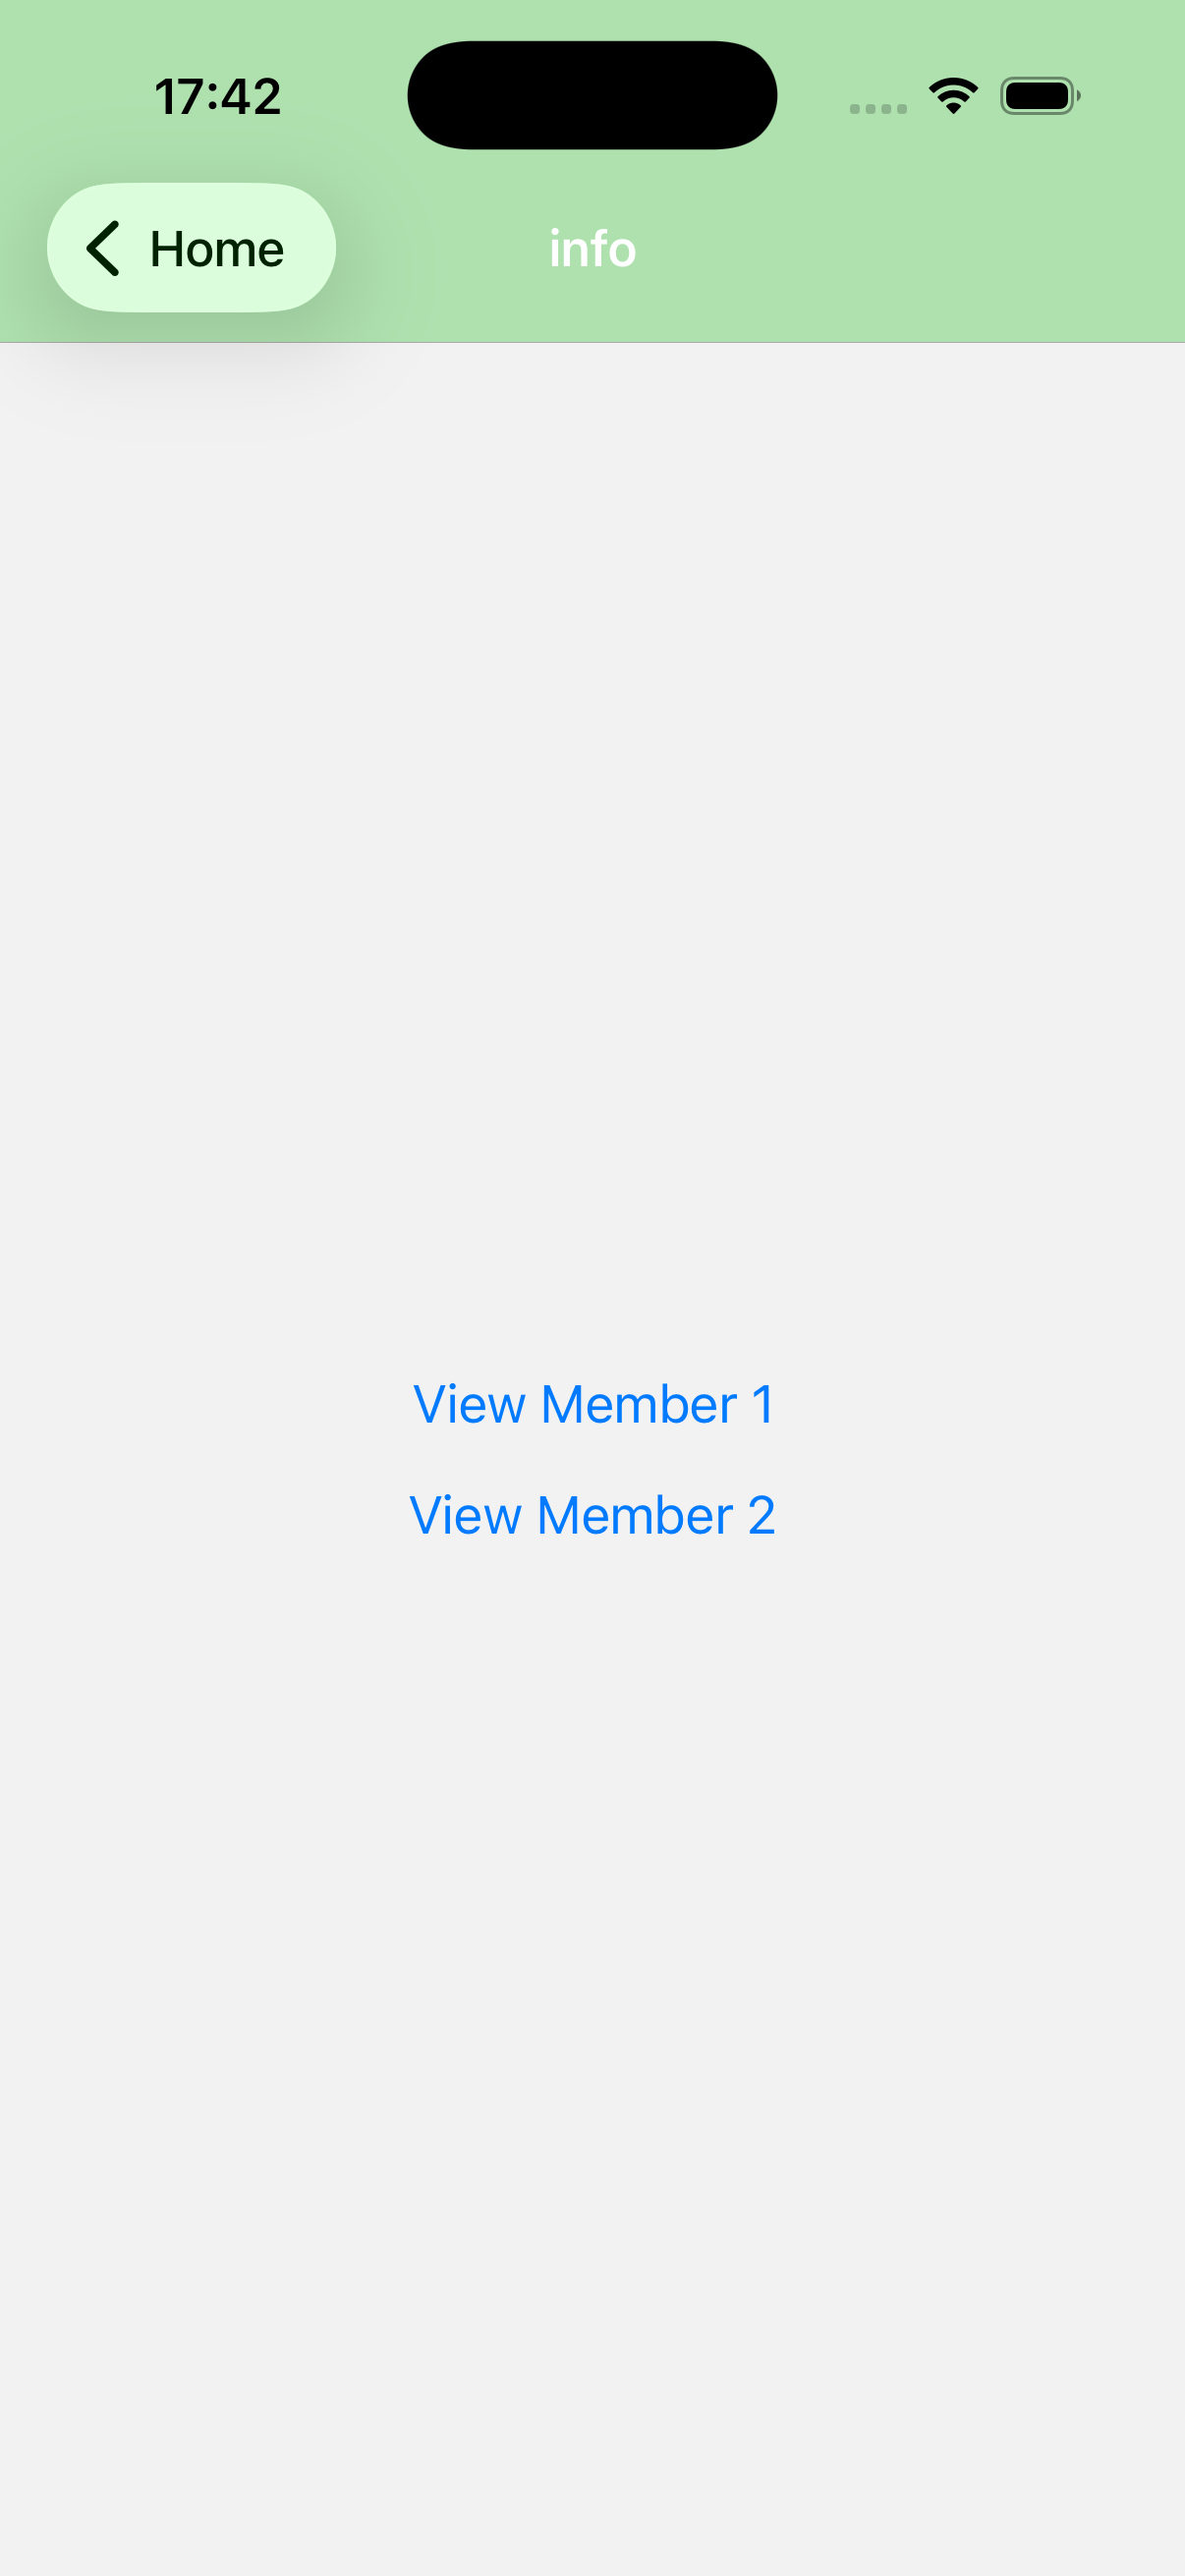
info.js
import { useRouter } from "expo-router";
import { Button, View } from "react-native";

export default function List() {
  const router = useRouter();

  return (
    <View style={{ flex: 1, alignItems: "center", justifyContent: "center" }}>
      <Button
        title="View Member 1"
        onPress={() =>
          router.push({
            pathname: "/members/[abc]",
            params: { abc: "John", age: 55 },
          })
        }
      />
      <Button
        title="View Member 2"
        onPress={() =>
          router.push({
            pathname: "/members/[abc]",
            params: { abc: "Maria", age: 30 },
          })
        }
      />
    </View>
  );
}

Dynamic Routes with Route Parameters
Dynamic routes allow a page to display different content based on parameters provided in the URL. In Expo Router, this is achieved by using square brackets in the file name to define a route parameter. When a file is named with brackets, such as [abc].js, the value in that position of the URL is captured and passed to the screen as a parameter. This makes it possible to create reusable pages that display different data depending on the route. The members[abc].js page in the example below shows details for different members using the same screen component, while the specific member is determined by the abc parameter in the URL.
members/[abc].js
import { Stack, useLocalSearchParams, useRouter } from "expo-router";
import { Button, Text, View } from "react-native";

export default function ProductPage() {
  const params = useLocalSearchParams();
  const router = useRouter();

  return (
    <>
      <Stack.Screen
        options={{
          headerShown: false,

          headerBackTitle: "Home",
        }}
      />
      <View style={{ flex: 1, alignItems: "center", justifyContent: "center" }}>
        <Text style={{ color: "green", marginBottom: 10, fontSize: 18 }}>
          Member: {params.abc}
        </Text>
        <Text style={{ color: "green", marginBottom: 10, fontSize: 18 }}>
          Age: {params.age}
        </Text>
        <Button title="Return" onPress={() => router.push("/")} />
      </View>
    </>
  );
}

useLocalSearchParams() is a React hook that lets you access the parameters of the current route or URL in functional components. It returns an object containing all dynamic route segments or query parameters, allowing your page to display content or fetch data based on those values. This hook is read-only and works only inside functional components, making it the standard way to handle route parameters in React-based navigation
*A details.js page is also included in the project structure, but its content is minimal and not essential for understanding the navigation setup, so its code is not shown.
Bottom Tabs with Nested Stacks
Bottom Tab Navigation is a common pattern in mobile apps that lets users quickly switch between major sections of the application. In Expo Router, creating bottom tabs is simple and intuitive: each tab can have its own stack of screens, allowing you to combine the best of tabbed navigation and stack navigation. This makes it easy to organize your app into separate areas, such as Home, Profile, and Settings, while maintaining a smooth and consistent navigation experience across the entire app. With just a few files and a clean folder structure, Expo Router automatically sets up the tab navigation for you.
Bottom Tabs with Nested Stacks Example
Here's the folder structure:
 app/
  ├─ _layout.js → Root Stack
  ├─ tabs.js → member folder
    ├─ _layout.js → defines the tab layout
    ├─ index.js → /home (index.js)
    ├─ shopping.js → /(shopping.js)
_layout.js
import { Stack } from "expo-router";

export default function RootLayout() {
  return (
    <Stack
      screenOptions={{
        headerShown: false,
        headerTintColor: "purple",
        headerbackgroundColor: "#B19CD9",
      }}
    />
  );
}
tabs/_layout.js
import { AntDesign, Ionicons } from "@expo/vector-icons";
import { Tabs } from "expo-router";
import React from "react";

export default function TabLayout() {
  return (
    <Tabs
      screenOptions={{
        tabBarActiveTintColor: "#3e2465",
        headerTintColor: "purple",
        headerShown: false,
        tabBarStyle: { backgroundColor: "#D5CAEB" },
      }}
    >
      <Tabs.Screen
        name="index"
        options={{
          title: "Home",
          color: "purple",
          headerShown: false,
          tabBarIcon: ({ color }) => (
            <Ionicons name="home" size={28} color="#3e2465" />
          ),
        }}
      />
      <Tabs.Screen
        name="shopping"
        options={{
          title: "Shopping",
          tabBarIcon: ({ color }) => (
            <AntDesign name="shopping-cart" size={24} color="#3e2465" />
          ),
        }}
      />
    </Tabs>
  );
}
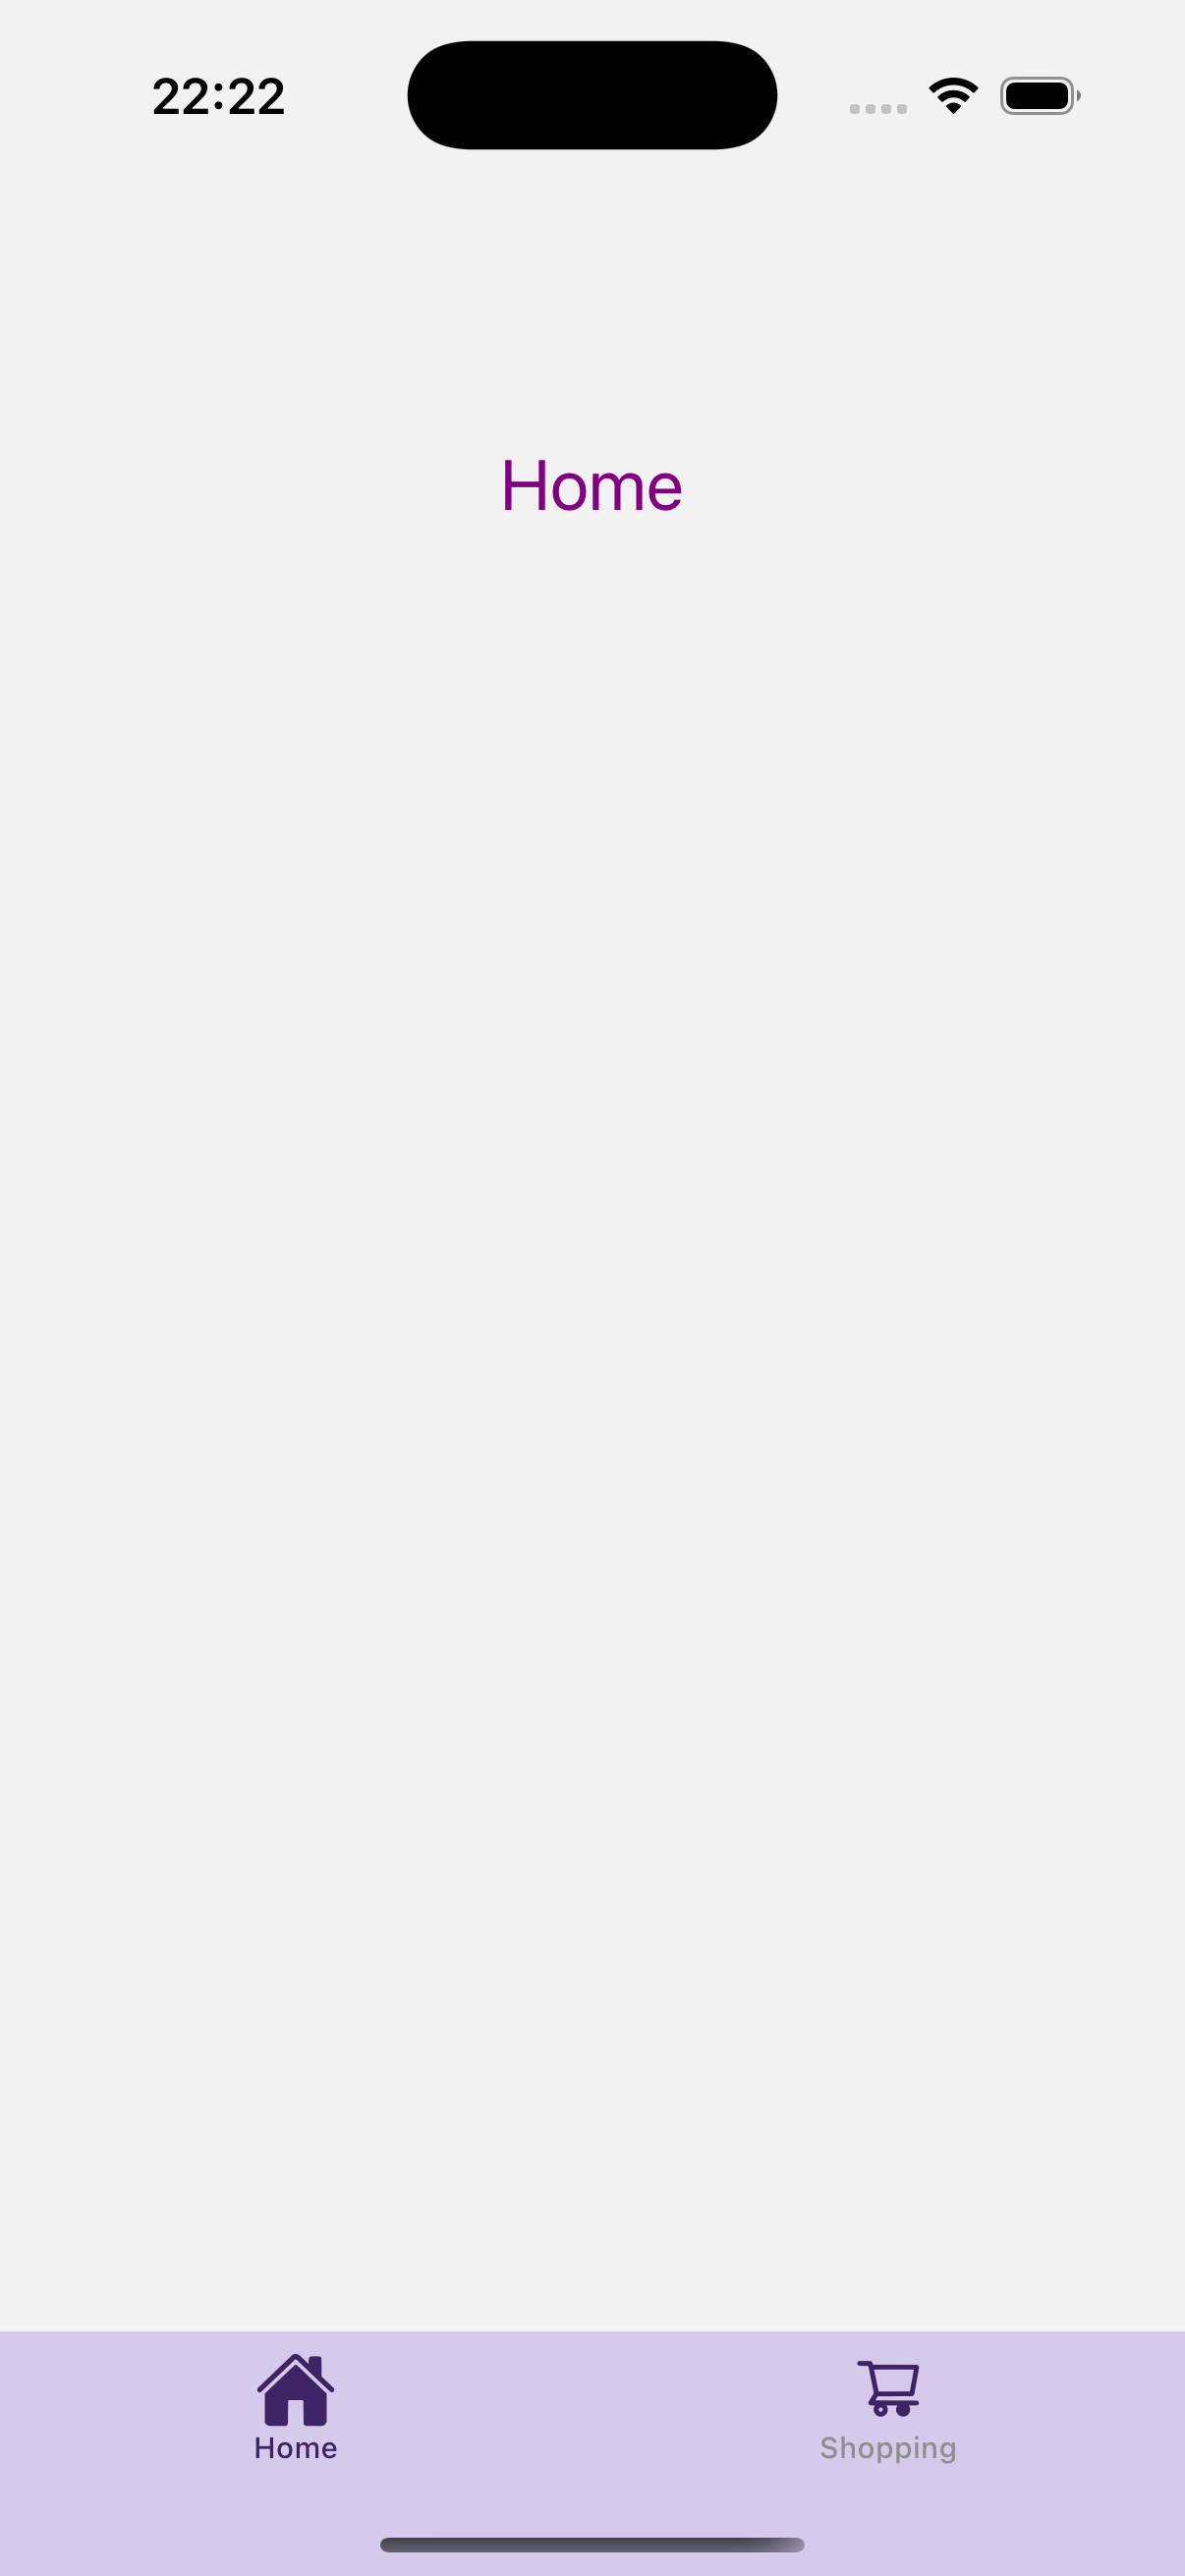
index.js
import { StyleSheet, Text, View } from "react-native";

export default function HomeScreen() {
  return (
    <View style={{ marginVertical: 150 }}>
      <Text style={{ textAlign: "center", color: "purple", fontSize: 24 }}>
        Home
      </Text>
         <Link href="./shopping" style={{ color: "blue", marginTop: 20 }}>
        Shopping
      </Link>
    </View>
  );
}

const styles = StyleSheet.create({
  container: {
    flex: 1,
    justifyContent: "center",
    alignItems: "center",
  },
  text: {
    fontSize: 18,
    fontWeight: "bold",
  },
});
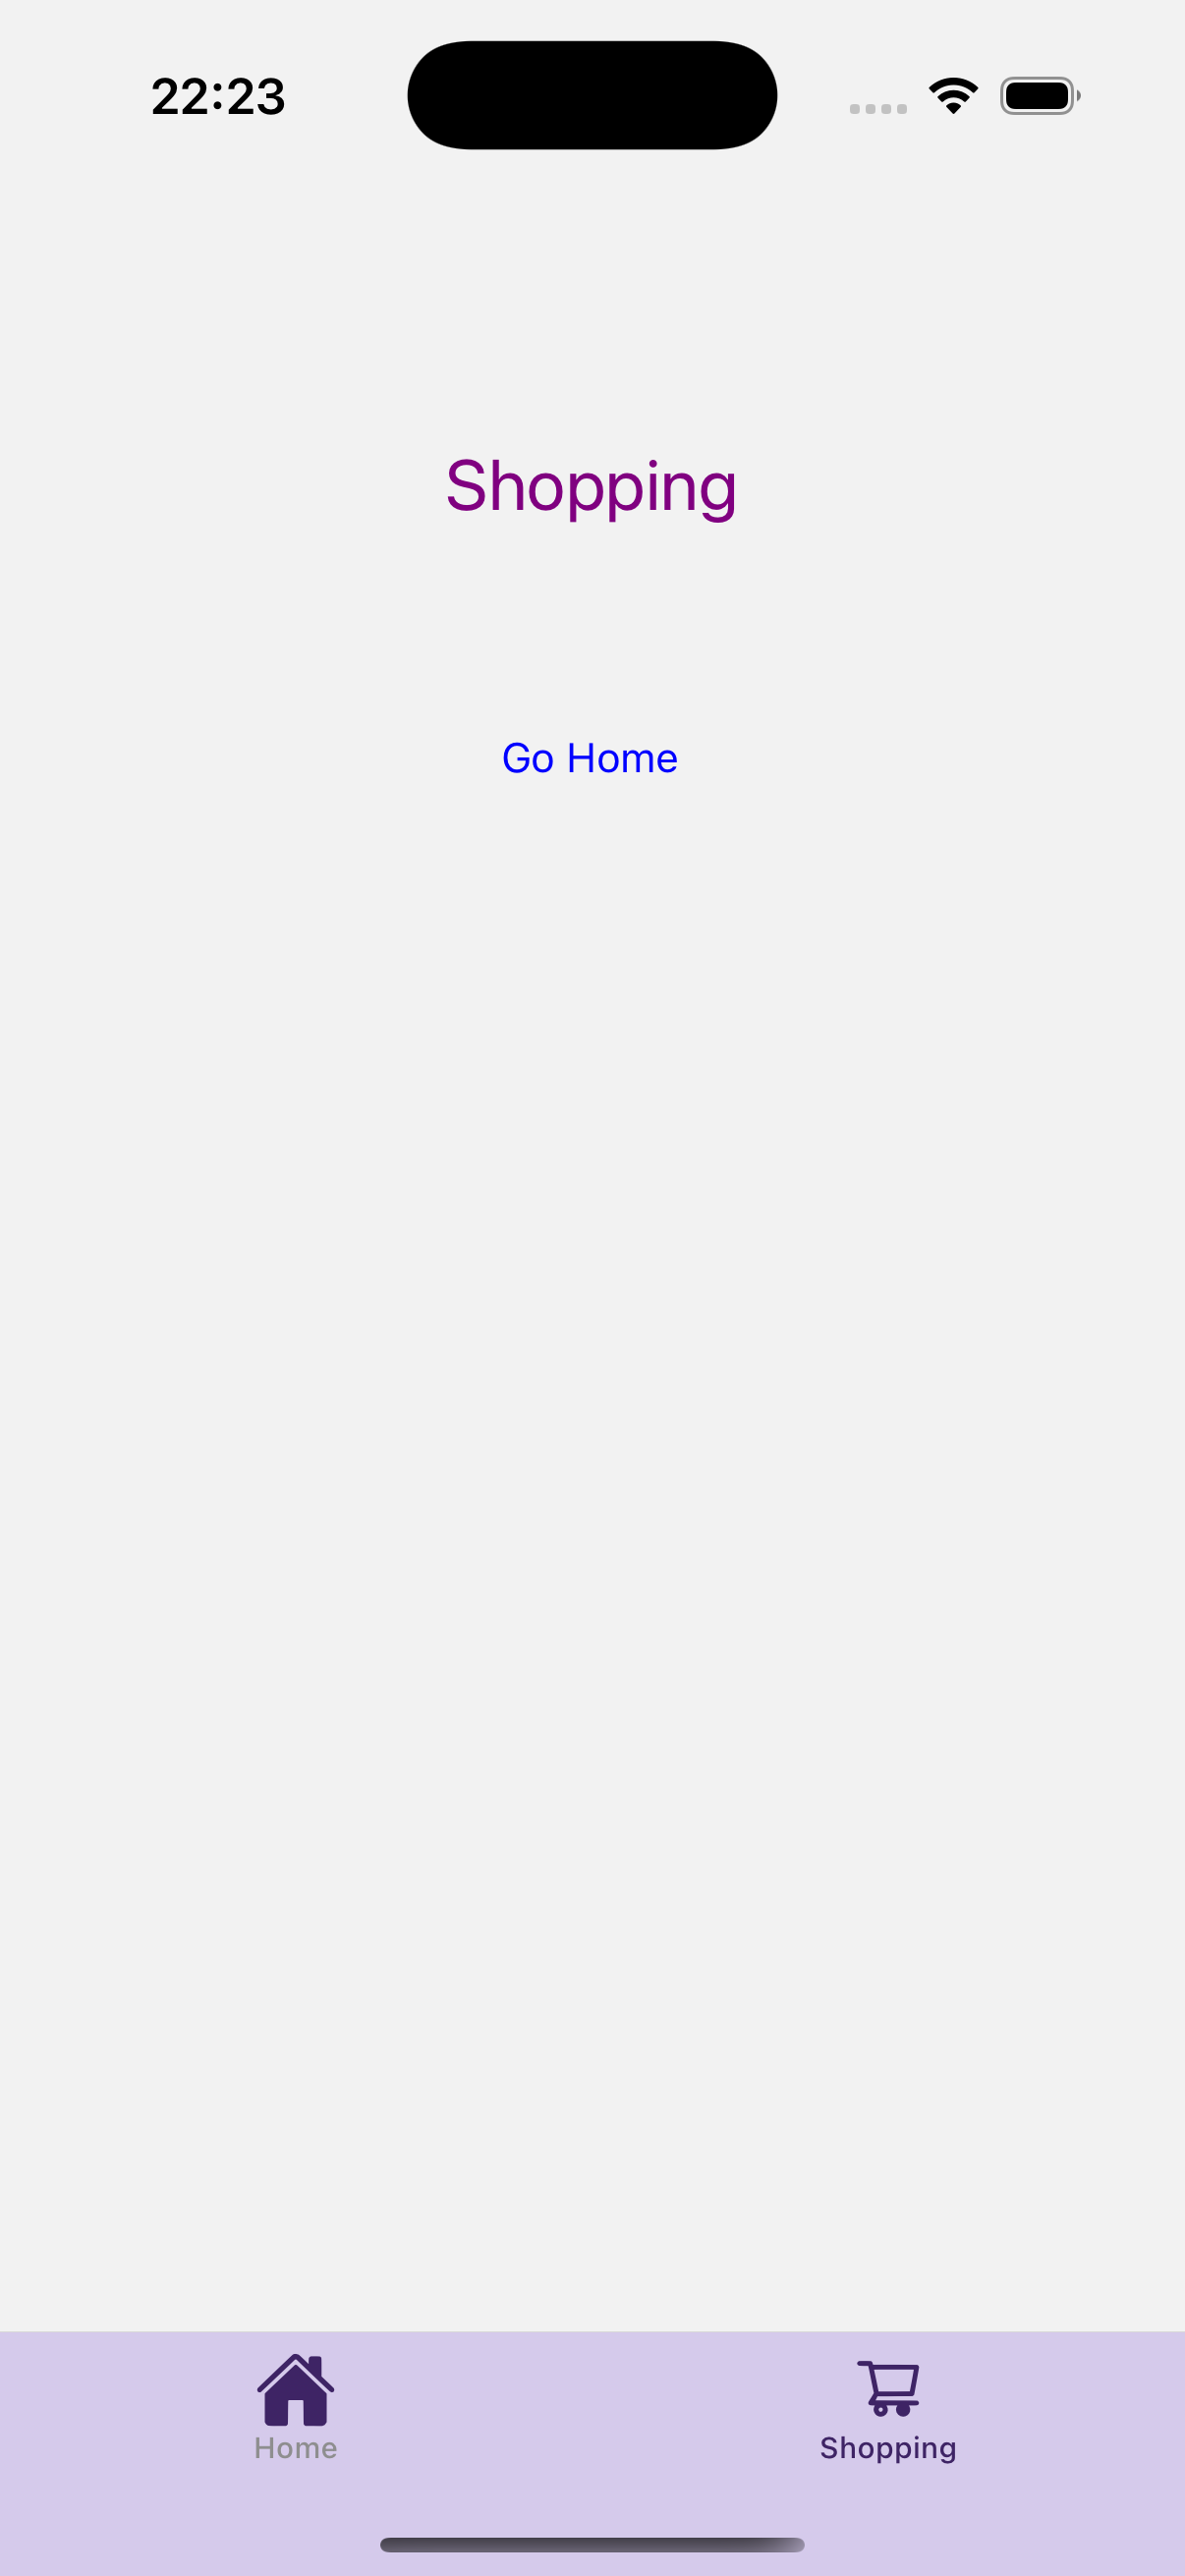
shopping.js
import { Link } from "expo-router";
import { StyleSheet, Text, View } from "react-native";

export default function ShoppingScreen() {
  return (
    <View style={{ marginVertical: 150 }}>
      <Text style={{ textAlign: "center", fontSize: 24, color: "purple" }}>
        Shopping
      </Text>
      {/* This is how you navigate to the settings tab via code */}
      <View style={{ marginTop: 50, marginHorizontal: 170 }}>
        <Link href="/" style={{ color: "blue", marginTop: 20 }}>
          Go Home
        </Link>
      </View>
    </View>
  );
}

const styles = StyleSheet.create({
  container: {
    flex: 1,
    justifyContent: "center",
    alignItems: "center",
  },
  text: {
    fontSize: 18,
    fontWeight: "bold",
  },
});
You can also check the same example implemented with React Navigation for comparison.
Drawer Navigation in Expo Router
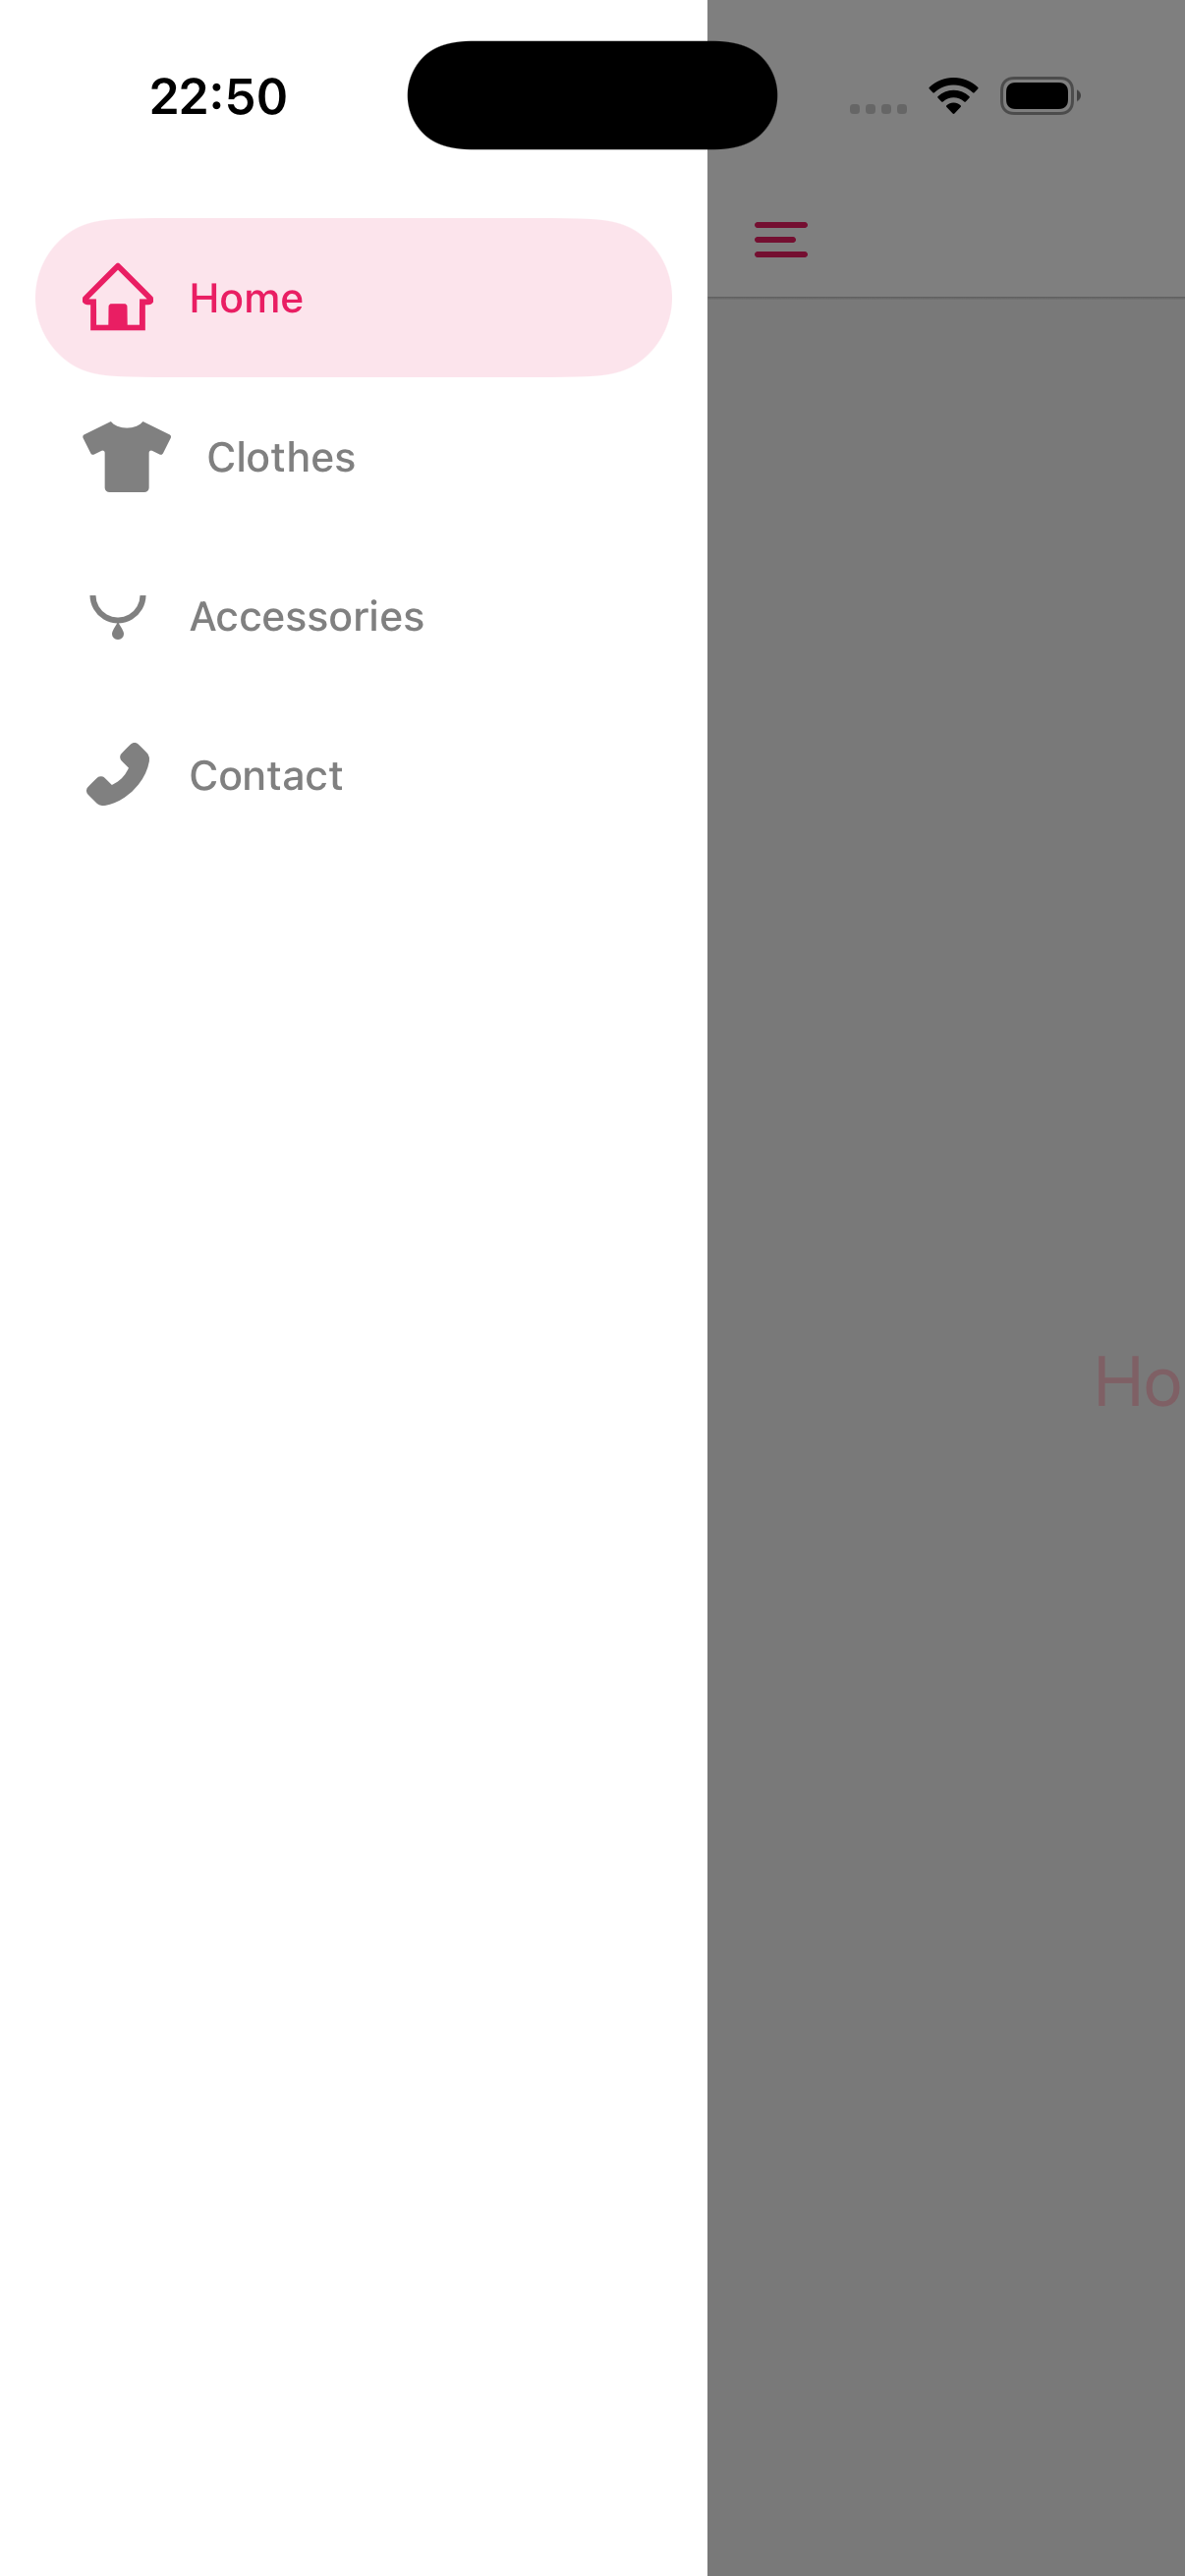
Drawer navigation is another common pattern used in mobile applications to provide access to different sections of the app through a sliding side menu. In Expo Router, a drawer can be easily implemented using a layout file that defines the drawer navigator and the screens it contains. When the user opens the drawer, they can quickly navigate between pages such as Home, Profile, or Settings. Since Expo Router is built on top of React Navigation, it supports the same powerful drawer features while keeping the configuration simple through the file-based routing system.
Drawer Navigation in Expo Router Example
Let's look at the folder structure:
 app/
  ├─ _layout.js → Root Stack
  ├─ index.js → /home (index.js)
  ├─ clothes.js → /(clothes.js)
  ├─ accessories.js → /(accessories.js)
  ├─ contact.js → /(contact.js)
_layout.js
import AntDesign from "@expo/vector-icons/AntDesign";
import FontAwesome5 from "@expo/vector-icons/FontAwesome5";
import MaterialCommunityIcons from "@expo/vector-icons/MaterialCommunityIcons";
import { Drawer } from "expo-router/drawer";
import { GestureHandlerRootView } from "react-native-gesture-handler";

export default function Layout() {
  return (
    // Drawer requires GestureHandlerRootView to work properly
    <GestureHandlerRootView style={{ flex: 1 }}>
      <Drawer
        screenOptions={{
          drawerActiveTintColor: "#e91e63",
          drawerInactiveTintColor: "grey",
          drawerStyle: {
            backgroundColor: "#fff",
            color: "#e91e63",
            width: 240,
          },
          headerTintColor: "#e91e63",
          headerTitleStyle: { color: "#e91e63" },
        }}
      >
        <Drawer.Screen
          name="index"
          options={{
            drawerLabel: "Home",

            title: "Home",

            drawerIcon: ({ focused, size, color }) => (
              <AntDesign name="home" size={24} color={color} />
            ),
          }}
        />

        <Drawer.Screen
          name="clothes"
          options={{
            drawerLabel: "Clothes",
            title: "Clothes Page",
            headerTitleStyle: { color: "pink" },
            drawerIcon: ({ focused, size, color }) => (
              <FontAwesome5 name="tshirt" size={24} color={color} />
            ),
          }}
        />
        <Drawer.Screen
          name="accessories"
          options={{
            drawerLabel: "Accessories",
            title: "Accessories Page",
            drawerIcon: ({ focused, size, color }) => (
              <MaterialCommunityIcons name="necklace" size={24} color={color} />
            ),
          }}
        />
        <Drawer.Screen
          name="contact"
          options={{
            drawerLabel: "Contact",
            title: "Contact Page",
            drawerIcon: ({ focused, size, color }) => (
              <AntDesign name="phone" size={24} color={color} />
            ),
          }}
        />
      </Drawer>
    </GestureHandlerRootView>
  );
}
index.js
import { DrawerActions } from "@react-navigation/native";
import { useNavigation } from "expo-router";
import { Button, Text, View } from "react-native";

export default function HomeScreen() {
  const navigation = useNavigation();

  return (
    <View style={{ flex: 1, justifyContent: "center", alignItems: "center" }}>
      <Text style={{ color: "pink", fontSize: 24 }}>Home Screen</Text>
      <Button
        title="Menu"
        onPress={() => navigation.dispatch(DrawerActions.openDrawer())}
      />
    </View>
  );
}
navigation.dispatch(DrawerActions.openDrawer()) is used to programmatically open the drawer menu in a screen. In navigation systems based on React Navigation (and therefore also in Expo Router), the dispatch function sends a navigation action to the navigator. DrawerActions.openDrawer() creates an action that tells the drawer navigator to open. When this line is executed—for example inside a button press handler—the drawer menu slides in from the side, just as if the user had opened it with a gesture. This approach is useful when you want to trigger the drawer from a custom button in the header or anywhere inside your screen instead of relying only on swipe gestures.
clothes.js
import { useRouter } from "expo-router";
import { Text, View } from "react-native";

export default function Clothes() {
  const router = useRouter();

  return (
    <View style={{ flex: 1, alignItems: "center", justifyContent: "center" }}>
      <Text>Clothes</Text>
      <Text
        onPress={() => router.back()}
        style={{ marginTop: 20, color: "red" }}
      >
        Go Back
      </Text>
    </View>
  );
}


router-back()
router.back() is used to navigate to the previous screen in the navigation history. In Expo Router, it behaves similarly to the back action in React Navigation, returning the user to the last visited screen in the stack. This is commonly used for back buttons or actions where you want the app to move one step backward in the navigation flow instead of navigating to a specific route.
An accessories.js and a contact.js page were also included in the project structure, but their content is very similar to the clothes.js page and does not introduce any new navigation concepts. For this reason, their code is not shown here.
router.replace()
router.replace() navigates to a different page and removes the current page from the navigation stack, preventing the user from going back.
Home → Login
router.replace('/dashboard')
Home → Dashboard
import { View, Button } from "react-native";
import { useRouter } from "expo-router";
export default function Login() {
  const router = useRouter();

  return (
    <View>
      <Button
        title="Login"
        onPress={() => router.replace("/home")}
      />
    </View>
  );
}
router.replace() can be used to skip the login page. After signing in, the user is taken directly to the dashboard, as illustrated in the example above.
To learn more about Expo, check out our detailed Expo tutorial.