
Build an AI Chat App with Expo and Gemini API
Building an AI-powered chat app is a great way to learn how Expo, React Native, and generative AI APIs work together. In this tutorial, we'll build a simple chat app with Expo and the Gemini API, allowing users to send messages and receive AI-generated responses directly in the app.
We'll start with a basic Expo chat interface and gradually connect it to Gemini. You'll learn how to manage chat messages with React state, display user and AI responses, handle conversation history, show a loading indicator, and handle API errors.
If you've previously built a chat app with another AI provider such as OpenAI, you'll notice that much of the Expo and React Native code remains the same. The main difference is how we format the conversation and communicate with the Gemini API.
This is a beginner-friendly tutorial that shows you how to build an AI chat app with Expo and the Gemini API step by step.
By the end of this tutorial, you'll have a working Expo + Gemini AI chat app that you can use as a starting point for your own AI-powered mobile applications.
If you haven't set up an Expo development environment yet, follow the Expo installation and setup guide before continuing.
Prerequisites
Before starting this tutorial, you should have:
✓ Basic knowledge of JavaScript and React Native.
✓ An Expo development environment set up.
✓ A code editor such as Visual Studio Code.
✓ A Gemini API key.
You can use your Google account to sign in to Google AI Studio and generate an API key.
This tutorial uses Expo SDK 57.0.14 and gemini-3.6-flash for the React Native application. This tutorial uses Gemini's REST API directly from the Expo app, so no Gemini SDK is required. The examples and code snippets in this guide have been tested with these versions to ensure consistency. Although package versions may change over time, the concepts and implementation steps remain the same.
The examples in this tutorial were developed and tested using the iOS Simulator.
Security Note: This tutorial calls the Gemini API directly from the Expo app to keep the example simple. API keys embedded in mobile applications cannot be treated as true secrets. For a production app, put the Gemini API call behind a server/backend.
How to Get a Free Gemini API Key from Google AI Studio
> Go to aistudio.google.com and log in using your standard Google/Gmail account.
> Click the API Keys button in the left sidebar or top navigation.
> Click Create API key. Select "Create API key in a new project" (or choose an existing Google Cloud project if you have one).
> Copy your API key.
Create an Expo App for the Gemini AI Chat
import { useRef, useState } from "react";
import {
  ActivityIndicator,
  FlatList,
  KeyboardAvoidingView,
  Platform,
  StyleSheet,
  Text,
  TextInput,
  TouchableOpacity,
  View,
} from "react-native";
import { SafeAreaProvider, SafeAreaView } from "react-native-safe-area-context";

// Paste your key once here inside the quotes
const GEMINI_API_KEY = "your_api_key_here";
const MODEL_NAME = "gemini-3.6-flash";

export default function App() {
  // 1. Initial welcome message stored strictly in local UI state
  const [messages, setMessages] = useState([]);
  const [inputText, setInputText] = useState("");
  const [isLoading, setIsLoading] = useState(false);
  const flatListRef = useRef(null);

  const sendMessage = async () => {
    const textToSend = inputText.trim();
    if (!textToSend || isLoading) return;

    // Clear input field and set loading state
    setInputText("");
    setIsLoading(true);

    const userMessage = {
      id: Date.now().toString(),
      role: "user",
      text: textToSend,
    };

    // Update local UI immediately so user sees their sent message
    const updatedMessages = [...messages, userMessage];
    setMessages(updatedMessages);

    // 2. Remove index 0 (the local welcome message) so Gemini only receives active conversation history
    const apiPayload = updatedMessages.map((msg) => ({
      role: msg.role === "user" ? "user" : "model",
      parts: [{ text: msg.text }],
    }));

    try {
      const response = await fetch(
        `https://generativelanguage.googleapis.com/v1beta/models/${MODEL_NAME}:generateContent?key=${GEMINI_API_KEY}`,
        {
          method: "POST",
          headers: { "Content-Type": "application/json" },
          body: JSON.stringify({ contents: apiPayload }),
        },
      );

      const data = await response.json();

      if (data.error) {
        throw new Error(data.error.message || "API error");
      }

      const botText =
        data.candidates?.[0]?.content?.parts?.[0]?.text ||
        "No response received.";

      // Add model's response to UI
      setMessages((prev) => [
        ...prev,
        { id: (Date.now() + 1).toString(), role: "model", text: botText },
      ]);
    } catch (error) {
      console.error("Chat Error:", error);
      setMessages((prev) => [
        ...prev,
        {
          id: (Date.now() + 1).toString(),
          role: "model",
          text: `Error: ${error.message}`,
        },
      ]);
    } finally {
      // 3. Always turns off loading indicator, preventing stuck UI
      setIsLoading(false);
    }
  };

  return (
    <SafeAreaProvider>
      <SafeAreaView style={styles.container}>
        <KeyboardAvoidingView
          behavior={Platform.OS === "ios" ? "padding" : "height"}
          style={styles.flexContainer}
        >
          {/* Welcome message */}
          <View style={styles.welcomeBubble}>
            <Text style={styles.modelText}>
              Hello! How can I help you today?
            </Text>
          </View>

          {/* Chat History */}
          <FlatList
            ref={flatListRef}
            data={messages}
            keyExtractor={(item) => item.id}
            onContentSizeChange={() =>
              flatListRef.current?.scrollToEnd({ animated: true })
            }
            renderItem={({ item }) => (
              <View
                style={[
                  styles.messageBubble,
                  item.role === "user" ? styles.userBubble : styles.modelBubble,
                ]}
              >
                <Text
                  style={
                    item.role === "user" ? styles.userText : styles.modelText
                  }
                >
                  {item.text}
                </Text>
              </View>
            )}
          />

          {/* Loading Indicator */}
          {isLoading && (
            <View style={styles.loadingContainer}>
              <ActivityIndicator size="small" color="#007AFF" />
            </View>
          )}

          {/* Input Area */}
          <View style={styles.inputContainer}>
            <TextInput
              style={styles.input}
              placeholder="Type a message..."
              value={inputText}
              onChangeText={setInputText}
              multiline
            />

            <TouchableOpacity
              style={[
                styles.sendButton,
                isLoading && styles.sendButtonDisabled,
              ]}
              onPress={sendMessage}
              disabled={isLoading}
            >
              <Text style={styles.sendButtonText}>Send</Text>
            </TouchableOpacity>
          </View>
        </KeyboardAvoidingView>
      </SafeAreaView>
    </SafeAreaProvider>
  );
}

const styles = StyleSheet.create({
  container: { flex: 1, backgroundColor: "#f5f5f5" },
  flexContainer: { flex: 1 },
  messageBubble: {
    padding: 12,
    borderRadius: 16,
    marginVertical: 4,
    marginHorizontal: 12,
    maxWidth: "80%",
  },
  userBubble: { alignSelf: "flex-end", backgroundColor: "#007AFF" },
  modelBubble: { alignSelf: "flex-start", backgroundColor: "#E5E5EA" },
  userText: { color: "#ffffff", fontSize: 16 },
  modelText: { color: "#000000", fontSize: 16 },
  loadingContainer: { padding: 8, alignItems: "flex-start", marginLeft: 16 },
  inputContainer: {
    flexDirection: "row",
    padding: 10,
    backgroundColor: "#ffffff",
    borderTopWidth: 1,
    borderTopColor: "#e5e5e5",
  },
  input: {
    flex: 1,
    borderWidth: 1,
    borderColor: "#ccc",
    borderRadius: 20,
    paddingHorizontal: 15,
    paddingVertical: 8,
    marginRight: 10,
    maxHeight: 100,
  },
  sendButton: {
    backgroundColor: "#007AFF",
    justifyContent: "center",
    paddingHorizontal: 18,
    borderRadius: 20,
  },
  welcomeBubble: {
    padding: 12,
    borderRadius: 16,
    marginVertical: 4,
    marginHorizontal: 12,
    alignSelf: "flex-start",
    backgroundColor: "#E5E5EA",
  },

  sendButtonDisabled: {
    backgroundColor: "#A0A0A0",
  },
  sendButtonText: { color: "#ffffff", fontWeight: "b" },
});
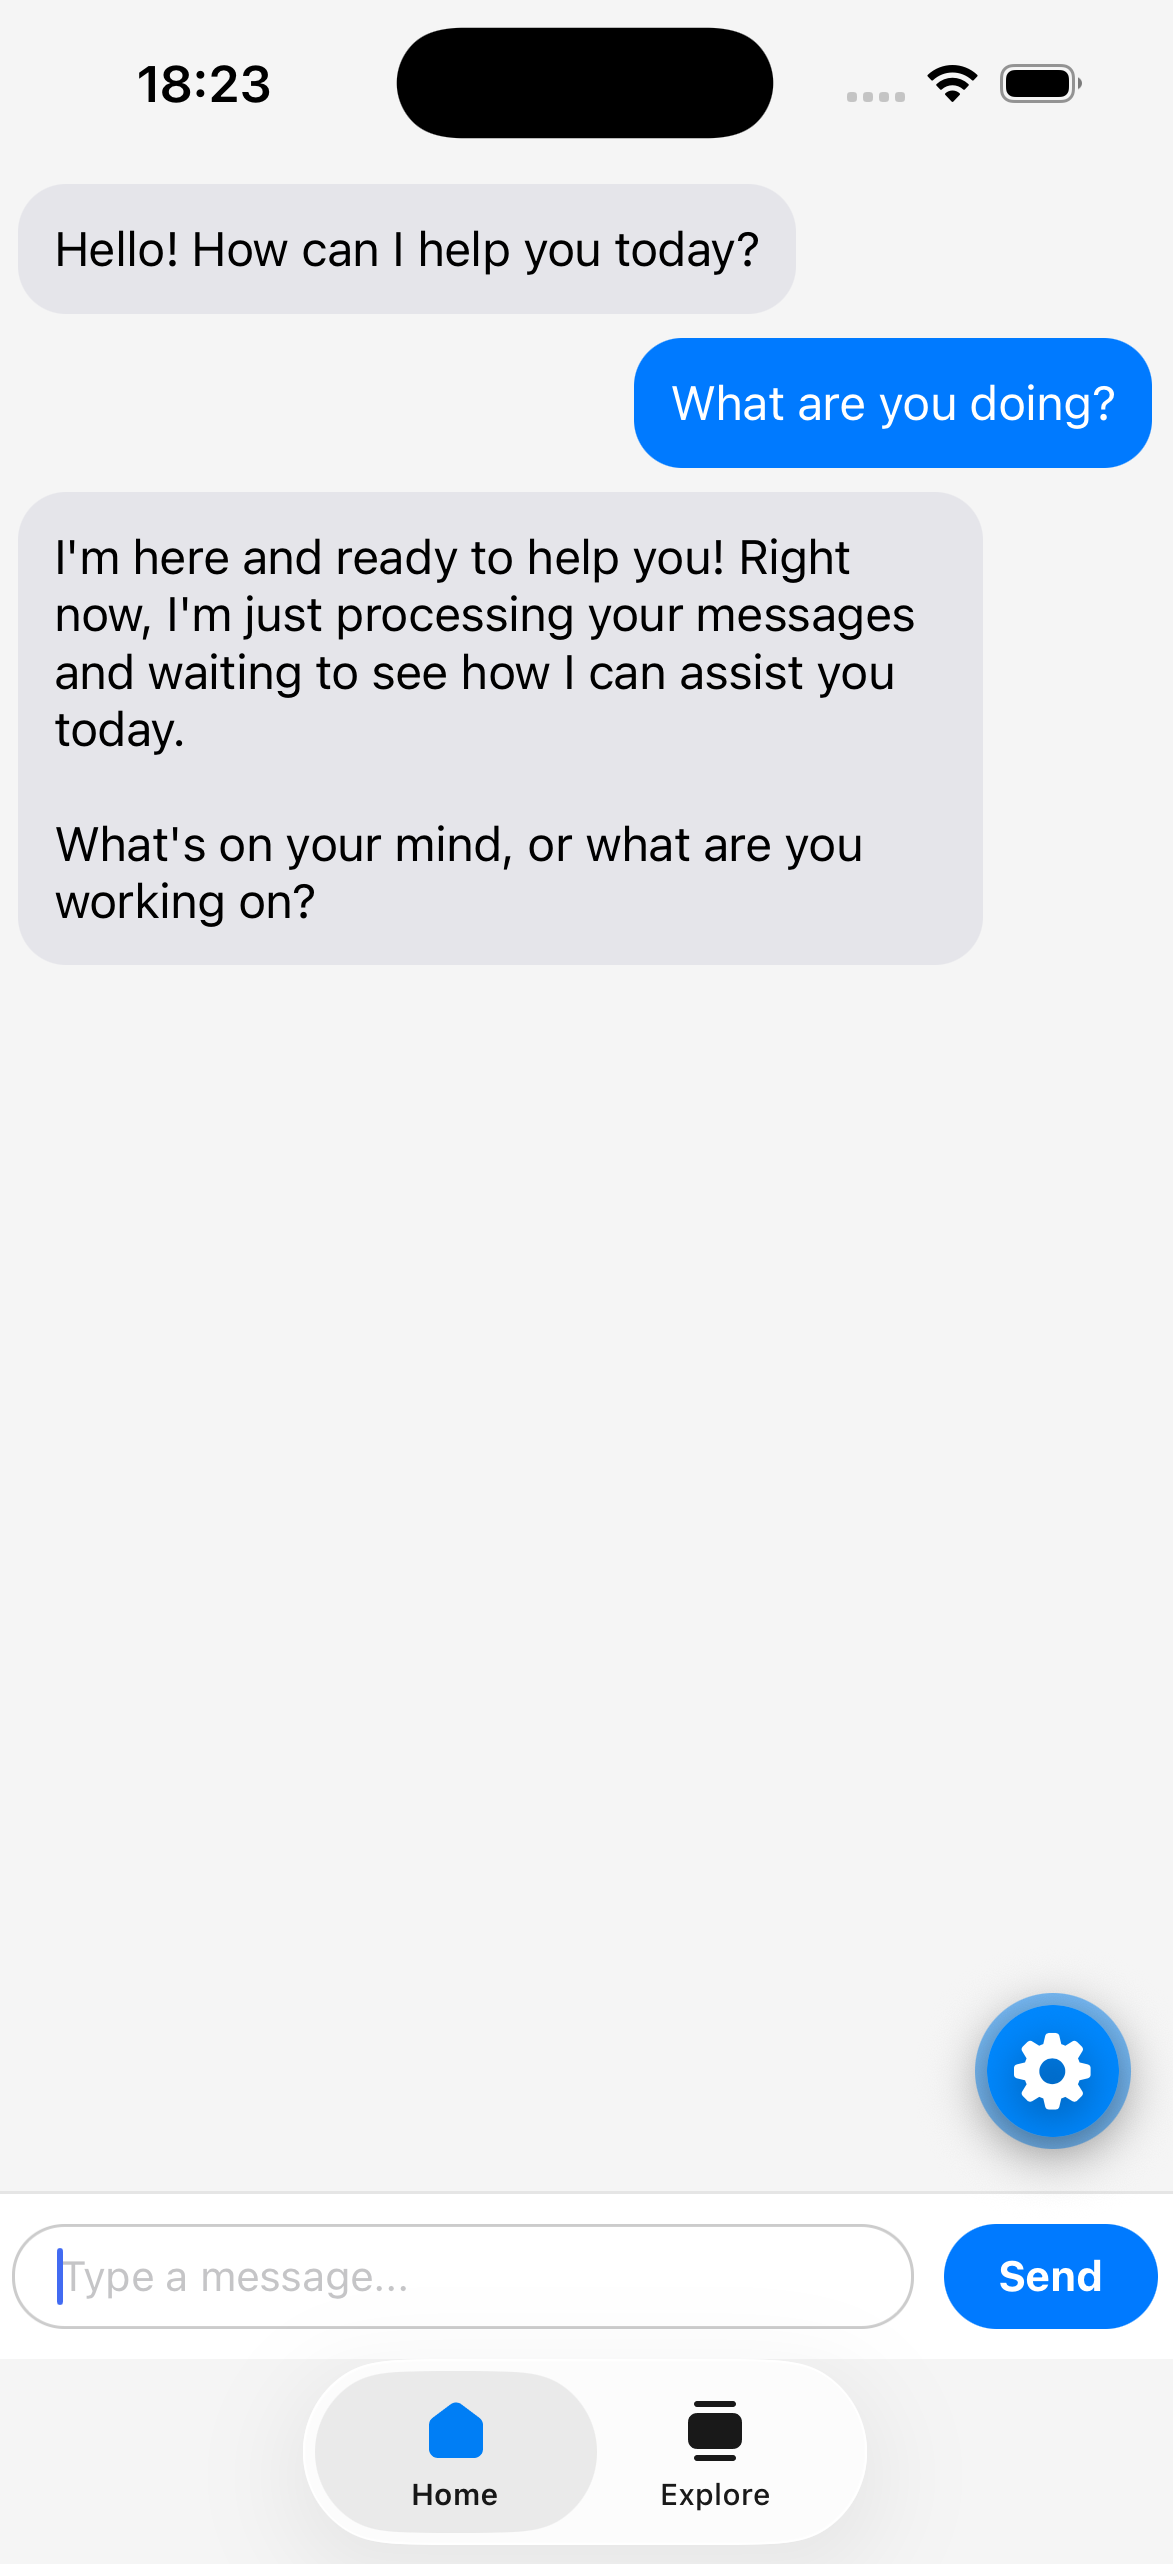
This chat app uses React Native state to manage the conversation, the user's input, and the loading status. When the user sends a message, the app adds it to the local chat history, converts the messages into the format expected by the Gemini API, and sends them using a fetch() POST request. Gemini's response is then extracted and added to the chat as a model message. The FlatList displays the conversation and automatically scrolls to the latest message, while the loading indicator shows that the app is waiting for a response. Error handling with try...catch...finally ensures that API errors are displayed and the loading state is reset whether the request succeeds or fails.
The chat history is maintained by the app rather than by React Native or Gemini automatically. Each time the user sends a message, the app sends the conversation history along with the new message so Gemini has the context needed to generate its response.
Because the API request takes time to complete, sendMessage is asynchronous. The await keyword pauses execution until Gemini returns a response without blocking the rest of the application.
x-goog-api-key
You can pass the Gemini API key through the x-goog-api-key HTTP header. This is Google's recommended method for authenticating REST API requests.
const response = await fetch(

 `https://generativelanguage.googleapis.com/v1beta/models/${MODEL_NAME}:generateContent`,

  {

   method: "POST",

   headers: {

     "Content-Type": "application/json",

     "x-goog-api-key": GEMINI_API_KEY,

  },

   body: JSON.stringify({ contents: apiPayload }),

  }

);
The Gemini API recommends passing the API key through the x-goog-api-key header. However, this only changes how the key is transmitted; it does not make the key secret when the API request is made directly from an Expo app. For a production application, use a backend to keep the API key private.
Managing the chat messages
The messages state stores the conversation displayed in the app. Each message contains an id, a role, and its text. The role identifies whether the message belongs to the user or the Gemini model. When the user sends a message, the app creates a new message object and adds it to the existing messages array. This allows the new message to appear in the chat immediately while also keeping it available as part of the conversation history.
Understanding Gemini's Message Format
Before sending the conversation to Gemini, the app converts the messages from its own format into the structure expected by the Gemini API. For example, the app stores a message like:
{ role: "user", text: "Hello!" }
while the Gemini expects:
{ role: "user", parts: [{ text: "Hello!" }] }
The map() method performs this conversion for every message. The code also uses slice(1) to exclude the initial welcome message from the API request, since that message is only intended to be displayed locally in the app.
Sending the request to Gemini
Once the messages have been converted, the app uses JavaScript's fetch() function to send a POST request to the Gemini API. The API key and model name are included in the request URL, while the conversation is sent in the request body as JSON. After Gemini processes the conversation, it returns a response containing the model's generated text. The welcome message is displayed only in the local UI, so we remove it from the beginning of the array (with slice(1)) before sending the conversation to Gemini.
Displaying the Gemini response
After receiving the response, the app extracts the generated text from Gemini's response object. It then creates a new message with role: "model" and adds it to the existing messages state. Because messages is React state, updating it automatically causes the FlatList to re-render and display Gemini's response in the chat.
Displaying and scrolling the conversation
The FlatList is responsible for displaying the messages stored in messages. Each message is rendered as a chat bubble, with different styles applied depending on its role. User messages appear on one side with the user styling, while Gemini messages appear on the other side with the model styling. The onContentSizeChange callback automatically calls scrollToEnd() whenever the content changes, keeping the newest message visible as the conversation grows.
If you want to take the next step and build a more production-ready architecture, check out our Expo and OpenAI chatbot article. In that tutorial, the Expo app is separated from a Node.js backend, and the OpenAI API key is stored securely on the server using an environment variable. The backend handles communication with OpenAI while the Expo app is responsible for the chat interface. Although that tutorial uses OpenAI, the same approach can be adapted for Gemini by replacing the AI provider on the backend.
How to Fix the Gemini API Model Errors
Depending on the model version you use, you may encounter the following error:
Chat Error: [Error: This model models/gemini-2.5-flash is no longer available to new users. Please update your code to use models/gemini-3.6-flash for the latest features and improvements.]
To avoid this error, make sure you are using the same model version (gemini-3.6-flash) shown in the example above.
Note: Available Gemini models and their names can change over time. If you encounter a model-related error, check that the model name used in the code is currently available for your Gemini API setup.
API Key Security and Production Considerations
For simplicity, this tutorial calls the Gemini API directly from the Expo app. This means the API key is included in the application and should not be considered private. For a production application, move the Gemini API request to a backend and keep the API key on the server. If you'd like to learn how to build this type of architecture, see our tutorial on building a chatbot with Expo, a Node.js backend, and OpenAI, where we separate the mobile app from the server and store the API key securely on the backend.
Gemini vs. OpenAI API Response Format
The response format also differs between Gemini and OpenAI. With the Gemini API, the generated text is nested inside the candidates, content, and parts properties, so we access it with data.candidates?.[0]?.content?.parts?.[0]?.text. OpenAI's Responses API provides an output_text property that can be used to access the generated text more directly. This is one of the differences you'll encounter when switching between AI providers, even though the overall chat application logic remains similar.
Conclusion
In this tutorial, we built a simple AI chat app with Expo and the Gemini API. We created the chat interface, managed messages with React state, sent conversation history to Gemini, displayed the model's responses, and added loading and error handling to make the app feel more complete.
Although Gemini and OpenAI have different API request and response formats, the overall structure of an AI chat application is very similar. Once you understand how the Expo interface communicates with an AI API, you can adapt the same concepts to other AI providers.
For a production application, the next important step is moving the Gemini API request to a secure backend so that your API key isn't exposed in the mobile app. You can also check out our tutorial on building a chatbot with Expo, a Node.js backend, and OpenAI, where we separate the mobile app from the server and store the API key securely on the backend. You can also extend the project with features such as streaming responses, Markdown rendering, conversation persistence, authentication, and multiple AI models.
To learn more about Expo and React Native development, check out our detailed Expo tutorial, which covers the fundamentals step by step. You can also explore our other Expo-related articles for specific topics and practical examples.