
React Native Gesture Handler with Expo
React Native Gesture Handler
Building smooth, intuitive, and reliable touch interactions is a core part of creating high-quality mobile experiences. While React Native offers basic gesture handling out of the box, more complex interactions—such as swipes, pans, long presses, and pinch-to-zoom—quickly require greater control and better performance than the default system can provide.
React Native Gesture Handler (RNGH) addresses these limitations by extending React Native's gesture system with a native-driven architecture. By relying on native gesture recognizers instead of the JavaScript thread, RNGH reduces delays, minimizes gesture conflicts, and delivers the fluid, responsive feel users expect from modern mobile apps. In this article, we'll explore how React Native Gesture Handler works, why it matters, and how you can use it to improve your app's interaction design.
UI Thread vs JS Thread
React Native apps run on two main threads: the JS thread and the UI thread. The JS thread is responsible for running your JavaScript code, including React components, state updates, and event handlers. The UI thread, on the other hand, is in charge of rendering views and handling user interactions on the screen. In a typical setup, when a gesture occurs, the event is first processed on the JS thread before the UI can respond. If the JS thread is busy—performing heavy calculations or rendering updates—this delay can result in dropped frames and noticeable lag. React Native Gesture Handler avoids this problem by moving gesture recognition to the UI thread. By handling touches natively, gestures are detected instantly, even when the JS thread is under heavy load. This direct communication allows animations and interactions to remain smooth and responsive. You can think of it as letting the UI thread "talk directly" to the user's fingers, without waiting for the JavaScript thread to catch up.
Getting Started with React Native Gesture Handler
In this tutorial, we'll use React Native Gesture Handler version 2.28.0 to build gestures step by step. We'll begin with a few simple examples to help you understand how modern gesture detection works, then gradually move on to more advanced, real-world interactions.
Each example can be run immediately—either in your own project or directly on Expo Snack—so you can follow along and experiment as the complexity increases. We'll start with a brief overview of React Native Gesture Handler, keeping it short and focused: just enough to understand how gestures are detected and how to extract the values we need.
While this article focuses on gesture detection, those gesture values are commonly used to drive animations. For a deeper look at turning gesture data into smooth, native-feeling animations, check out the dedicated React Native Reanimated article, where we cover animation worklets and UI-thread animations in detail.
By following the examples below, you'll be able to run each gesture yourself and clearly see how React Native Gesture Handler fits into a modern gesture-driven workflow.
If you need instructions to install and set up Expo, please check the Expo tutorial.
Installation and Setup (React Native & Expo)
The installation and setup process for React Native Gesture Handler is the same for both Bare React Native projects and Expo projects. Since Gesture Handler is included by default in Expo and fully supported in Bare React Native, you don't need a separate or special configuration for either environment.
Start with installing the package from npm:
npm install react-native-gesture-handler
If you need to check compatibility with your React Native version, refer to the official React Native Gesture Handler documentation. In this tutorial, we'll be using Expo SDK 54.0.25 and React Native 0.83.1.
Let's start by writing our first piece of code using GestureHandlerRootView, which is required to enable gesture handling in your app.
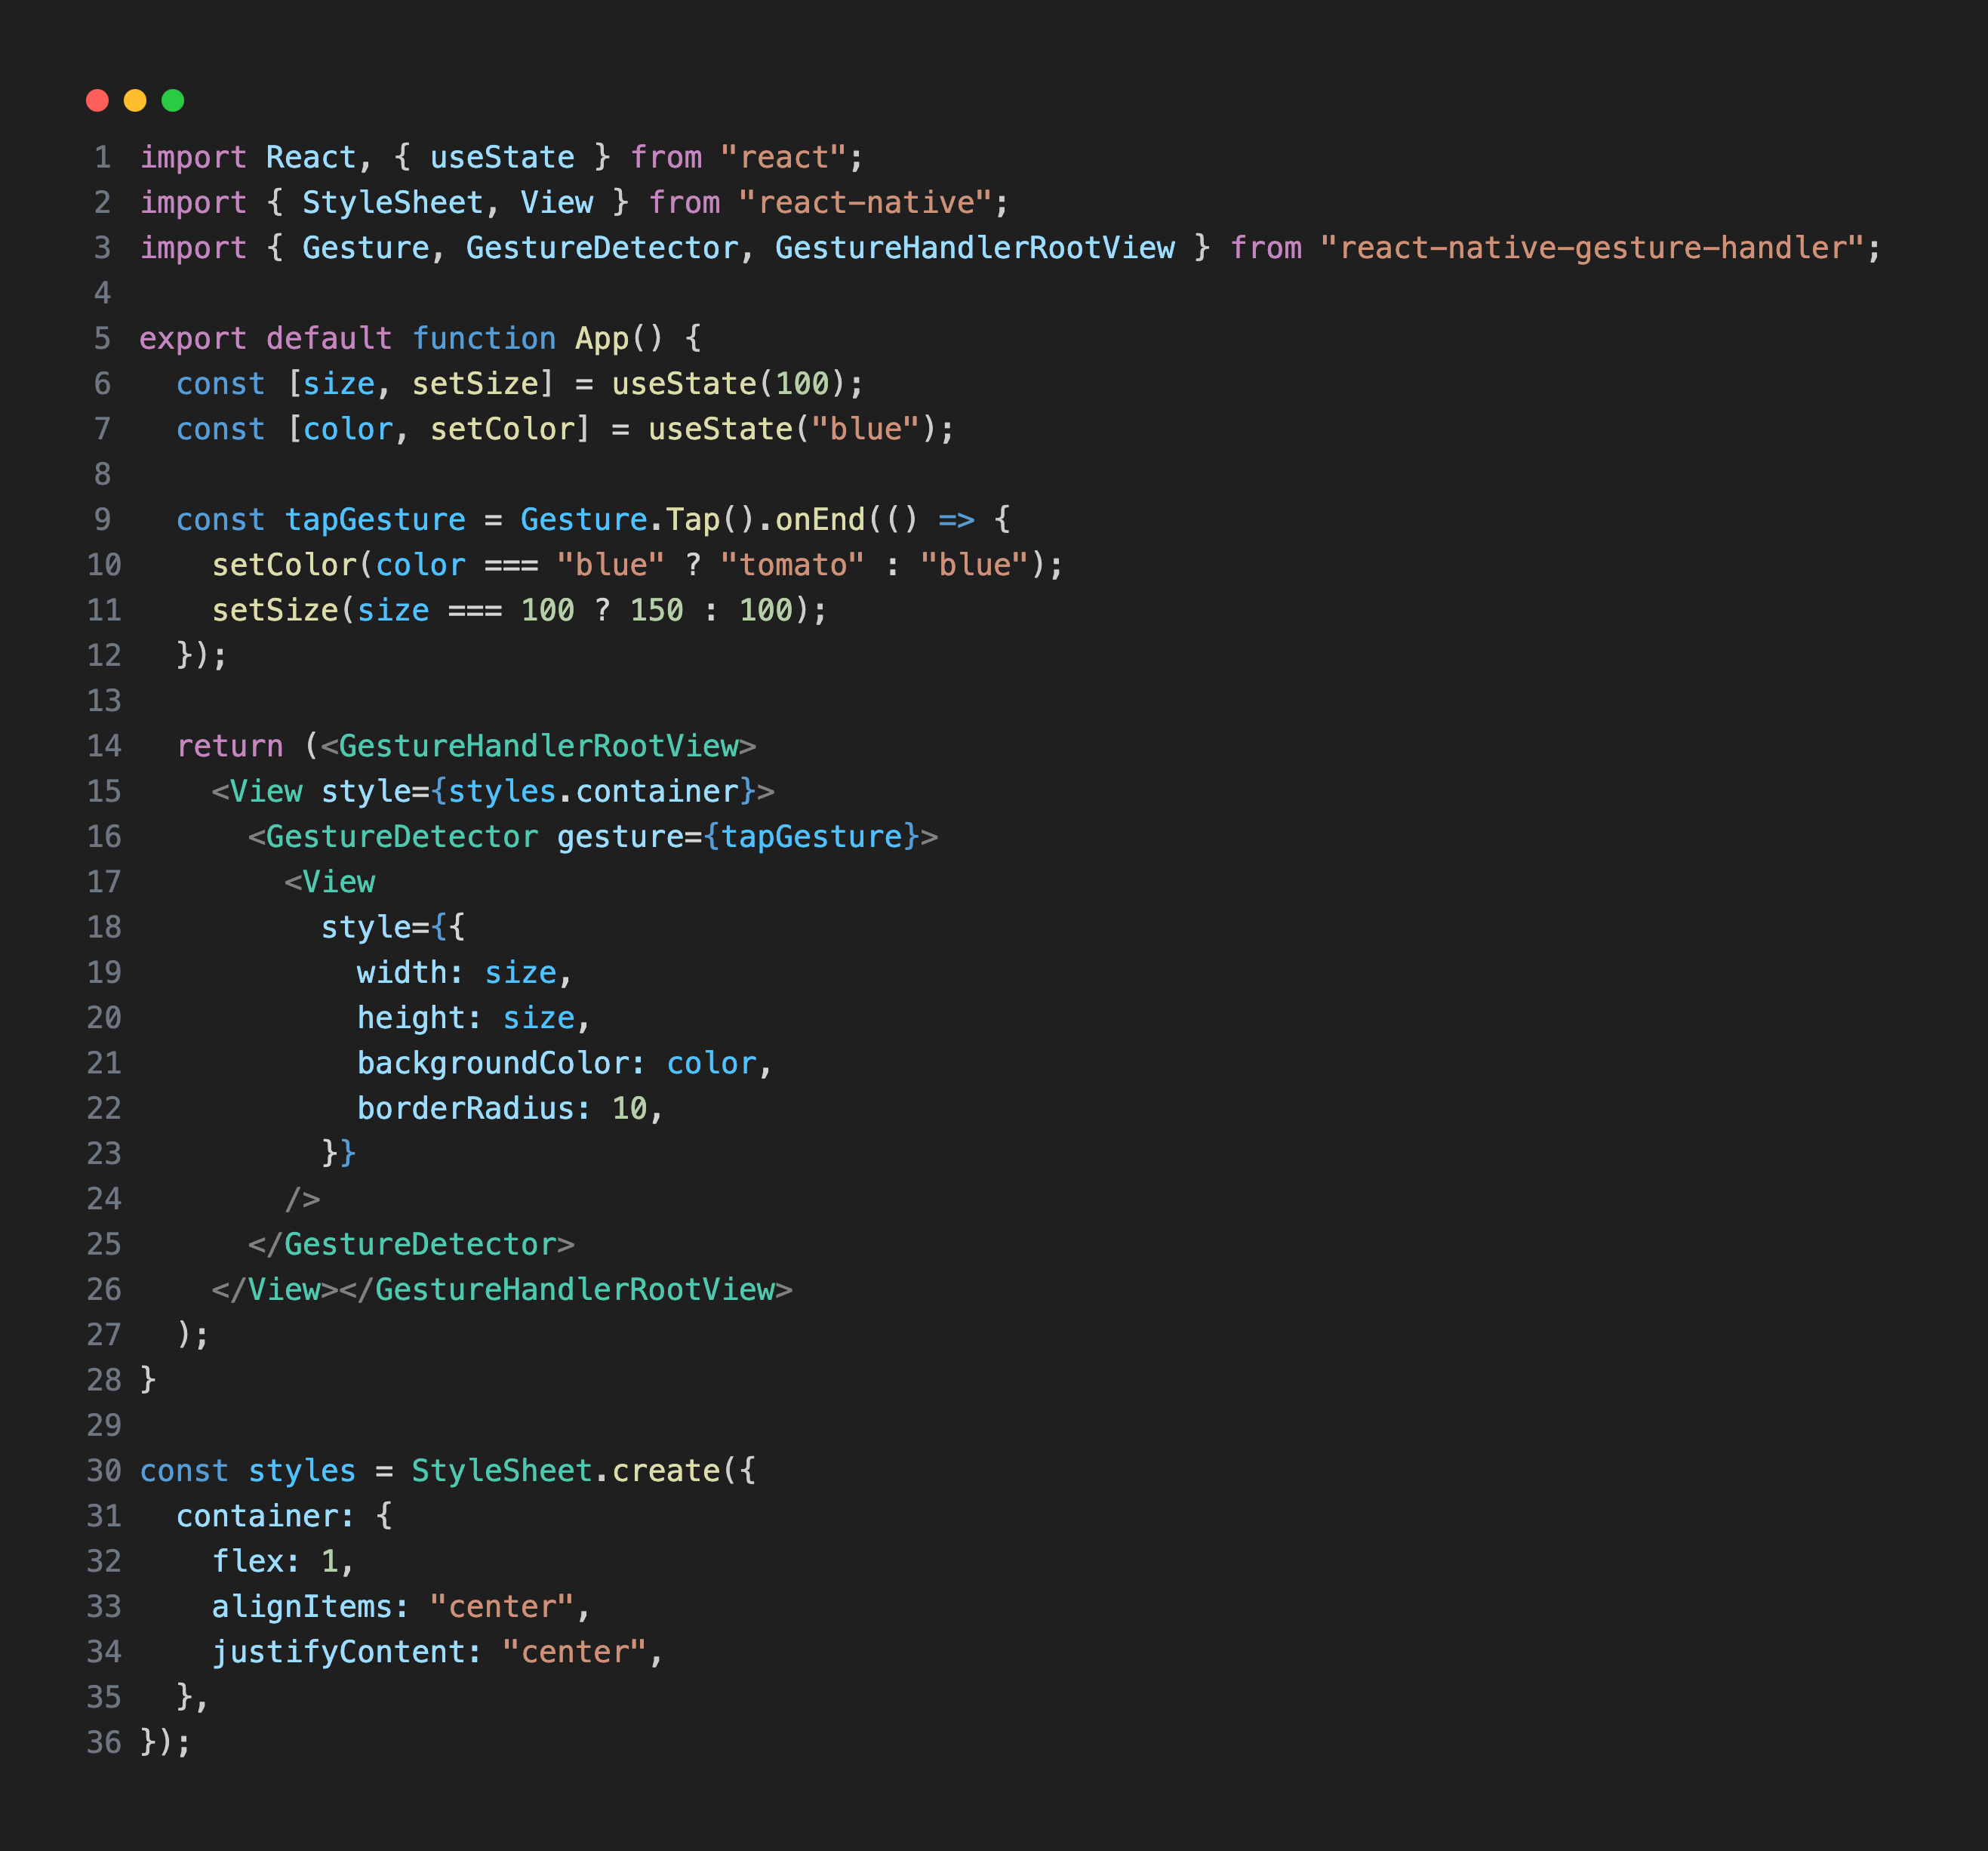
In the example above, we used a tap gesture created with Tap.Gesture(). To create and compose gestures in React Native Gesture Handler, you need a Gesture object, which defines how a gesture behaves and how it responds to user input. You can find more detailed information about gesture composition in the section below.
It's important to always wrap your app with GestureHandlerRootView. Without it, gestures will not be recognized, and you'll encounter the following error:
Error: GestureDetector must be used as a descendant of GestureHandlerRootView. Otherwise, the gestures will not be recognized.
The GestureDetector component is responsible for creating and updating native gesture handlers based on the configuration of the provided gesture. Unlike older APIs, the new GestureDetector can recognize multiple gestures at the same time, making it easier to build complex interactions.
In this example, when the user taps the box, its size and color change, demonstrating how gesture events can drive UI updates.

Other gestures the library offers are Pan, Long press, Rotation, Pinch, Fling, Hover. These gestures can be composed and combined to build more advanced interactions such as draggable cards, zoomable images, and interactive bottom sheets.
The New API (v2): Gesture Objects
The new React Native Gesture Handler API (v2) introduces a declarative, object-based syntax for creating gestures. Instead of relying on wrapper components, you now define gestures by calling functions such as Gesture.Pan(), Gesture.Tap(), or Gesture.LongPress().
Gestures are defined in plain JavaScript or TypeScript and then passed directly to the GestureDetector component. This approach keeps your layout cleaner and separates gesture logic from the view hierarchy, making your code easier to read and maintain.
Each gesture supports lifecycle callbacks, including onBegin(), onUpdate(), onEnd(), and onFinalize(). These callbacks receive detailed gesture event data and, when used with React Native Reanimated, run directly on the UI thread for smooth, high-performance interactions.
Gesture.Simultaneous()
Gesture.Simultaneous() allows multiple gestures to be recognized at the same time. Use it when you want two or more gestures to stay active together—such as panning and pinching an image simultaneously.
By using Gesture.Simultaneous(), you prevent one gesture from blocking the other, enabling smooth, natural multi-touch interactions that feel intuitive to the user. This is especially useful for gestures that often happen together, like zooming and dragging images or rotating and scaling objects.
const combined = Gesture.Simultaneous(pinch, rotate);
Gesture.Exclusive()
Gesture.Exclusive() ensures that only one gesture can be recognized at a time, even if multiple gestures could potentially activate simultaneously. The gesture that is defined first has higher priority, so only one gesture will win and become active.
This is particularly useful when gestures might conflict—for example, a tap versus a swipe. By using Gesture.Exclusive(), the system automatically selects the correct gesture, preventing unexpected behavior and making your app's interactions more predictable and intuitive.
const exclusive = Gesture.Exclusive(longPress, tap);
Let's put it into practice:
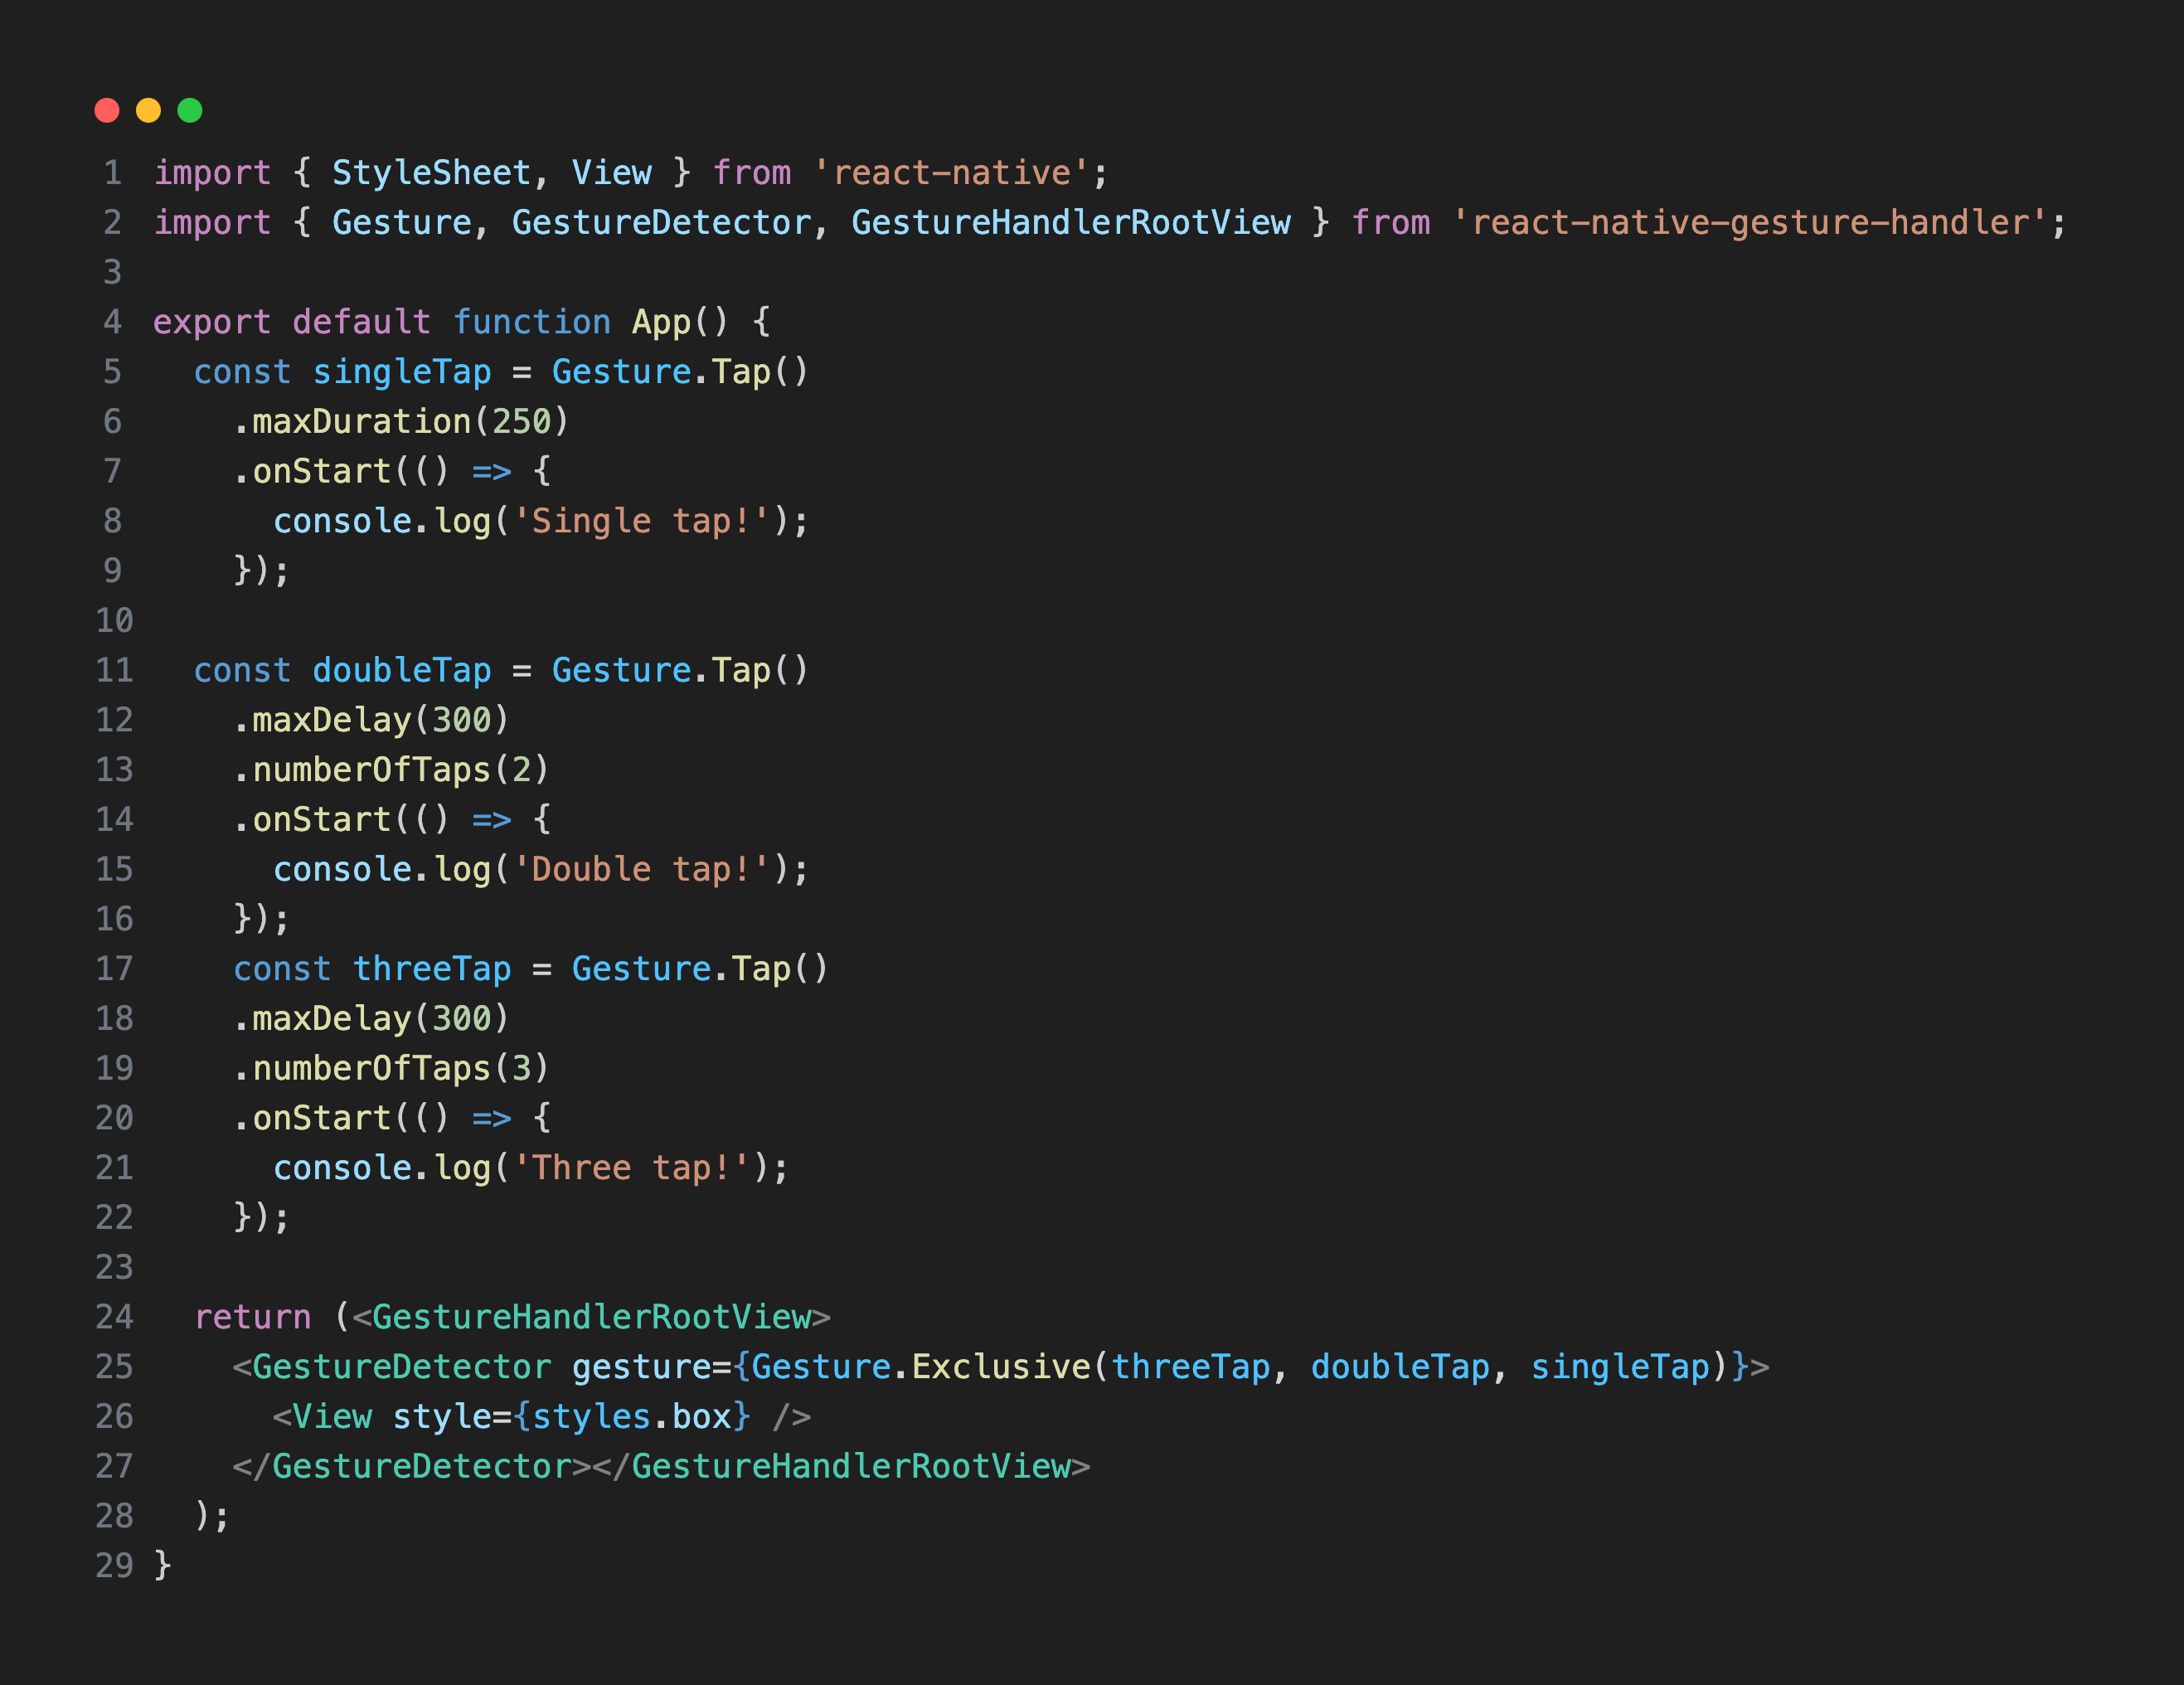
singleTap can be only fired if doubleTap fails. doubleTap can be only fired if threeTap fails. maxDuration sets the total time the gesture can take from start to end. maxDelay sets the maximum delay between individual taps in a multi-tap gesture like doubleTap in the example above. numberOfTaps is the number of tap gestures required to activate the gesture.
requireExternalGestureToFail()
The requireExternalGestureToFail() method delays a gesture from activating until another gesture fails. This is useful for handling gesture conflicts where you want one gesture to wait for another before it runs.
Let's see how to use requireExternalGestureToFail() in practice:
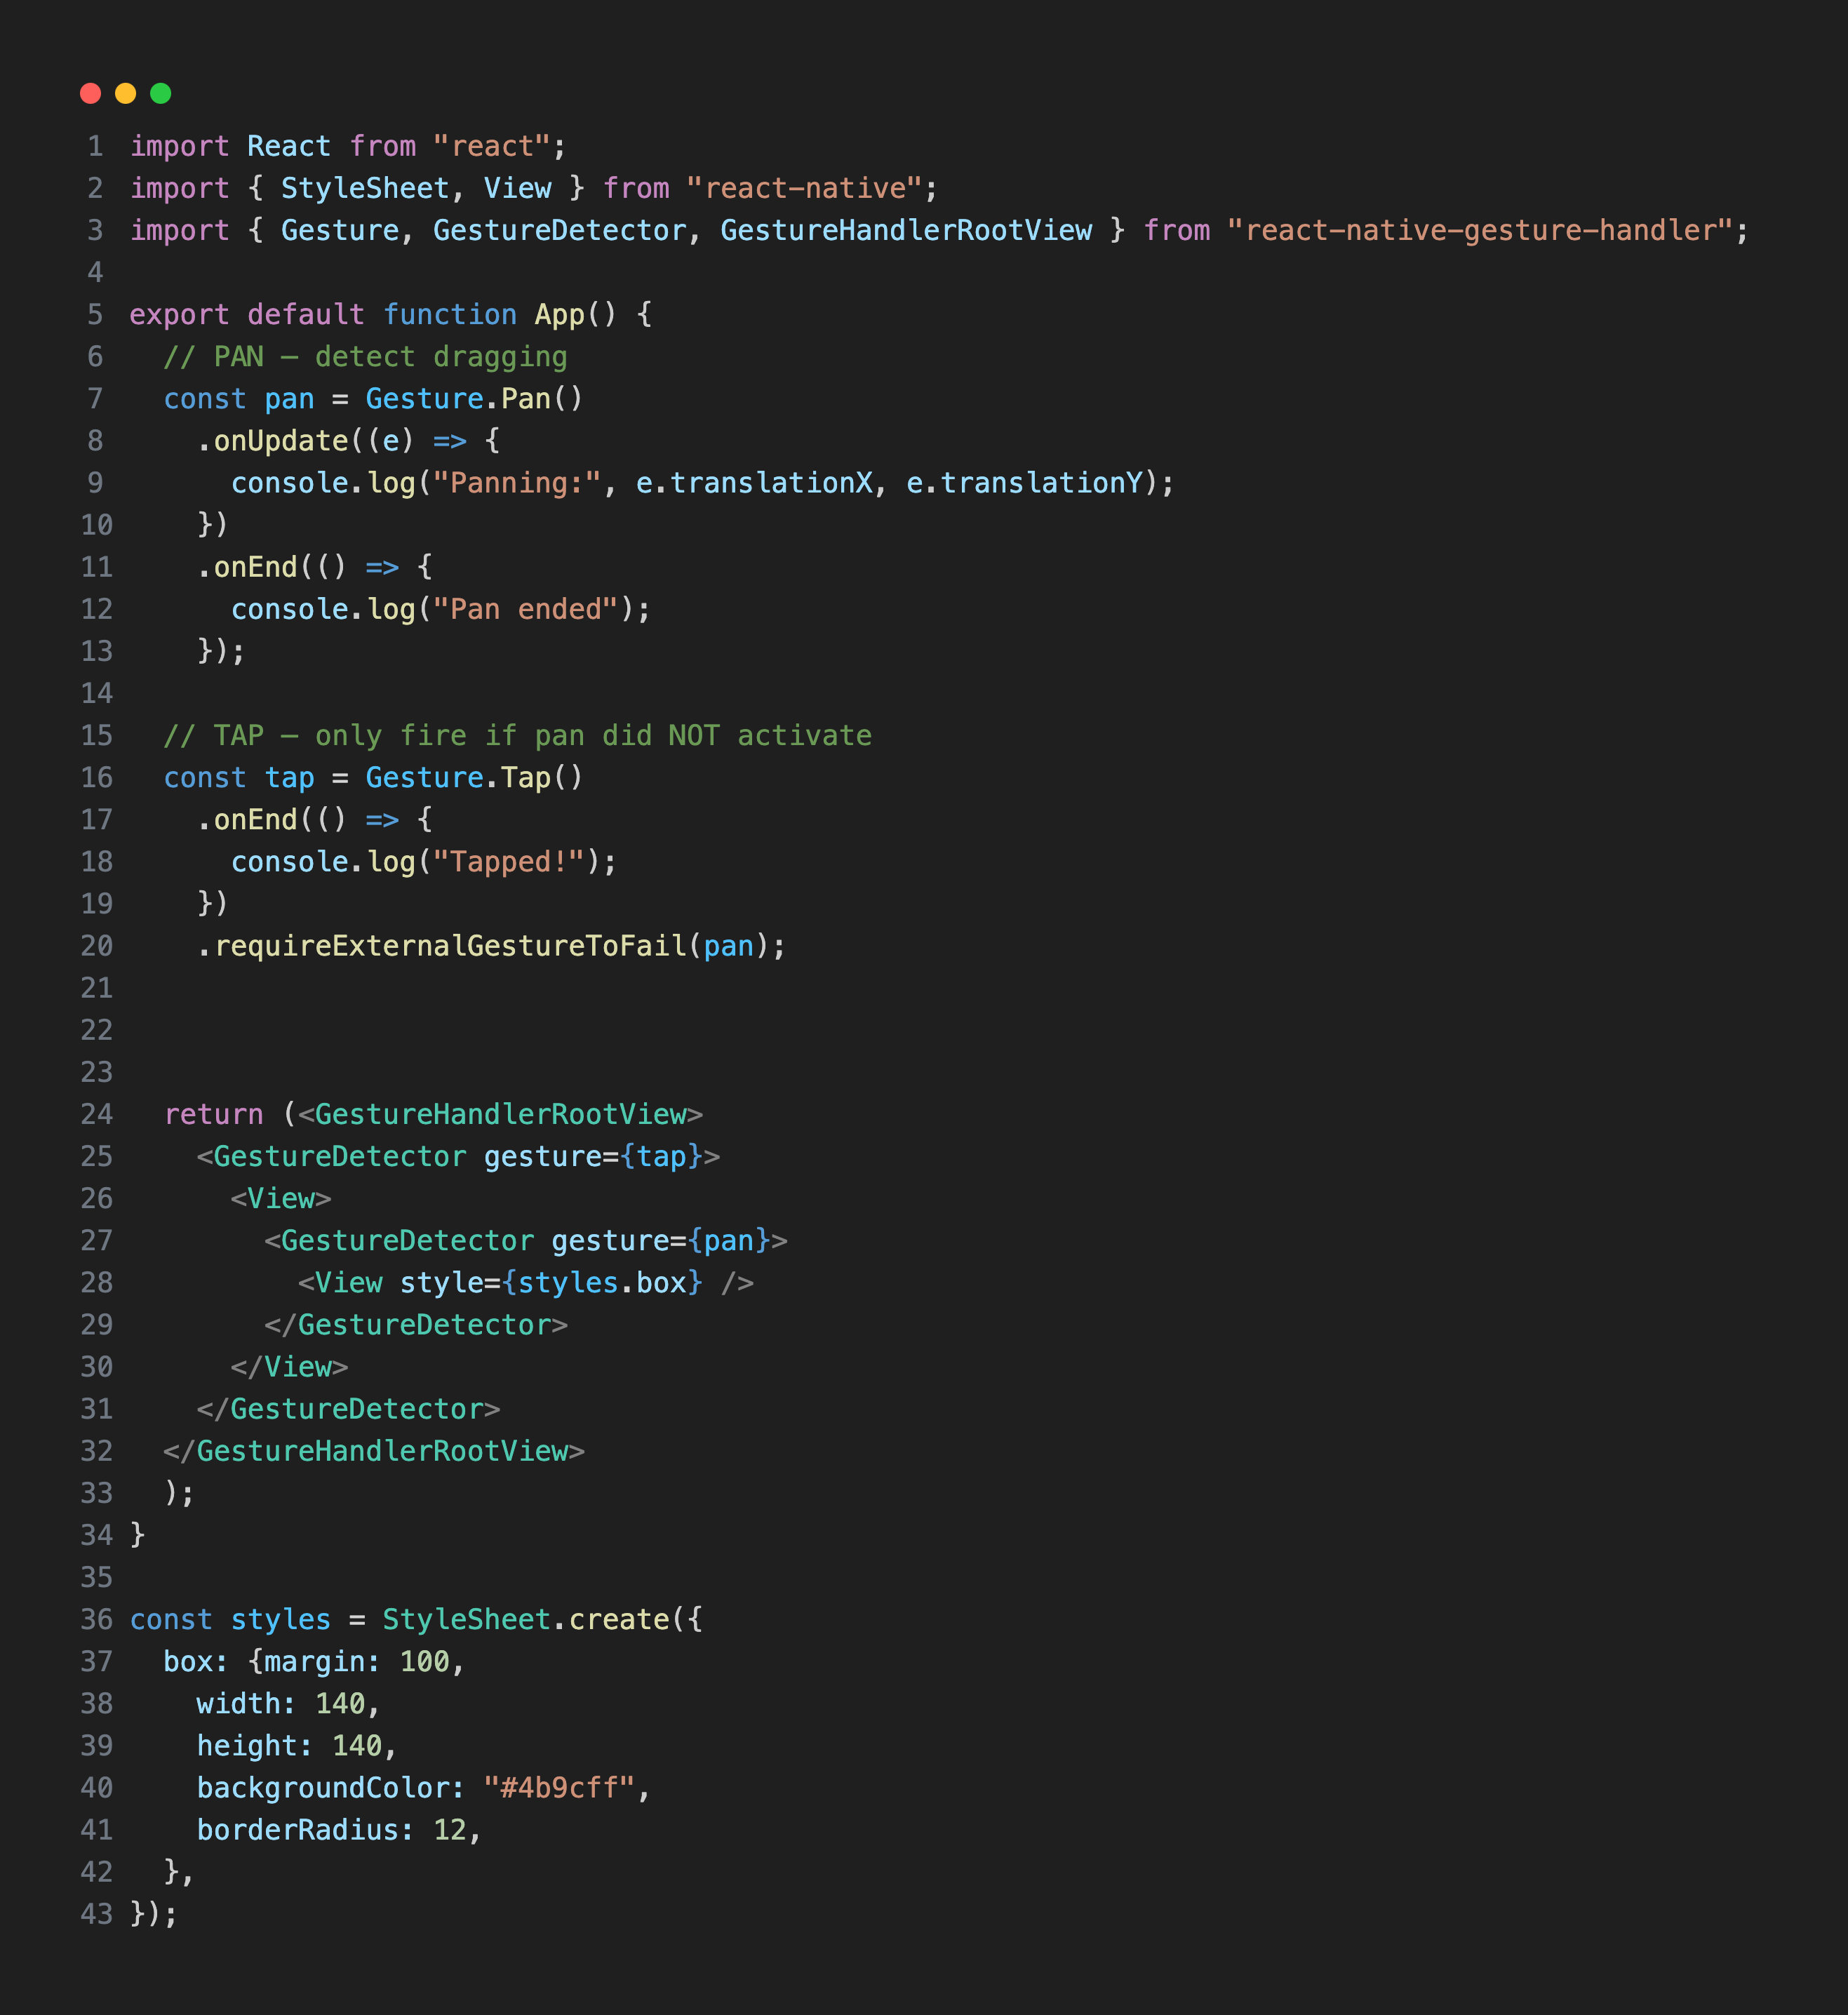
If you don't want a pan gesture to trigger the outer gesture handler, you need to make the outer gesture—such as a tap gesture in the example above—wait until the pan gesture fails. This ensures that gesture conflicts are resolved predictably and that each gesture only activates when appropriate.
What's next?
If you're working with react-native-gesture-handler, our react-native-reanimated article is a helpful next read for learning how animations are handled in modern React Native apps.